Grow Your Own in Pots for Children

Monday, June 11, 2007

Posted by Amanda at Little Foodies

This is my first post so I would like to start by saying hello to everyone, a big thank you to Meeta for asking me to be part of the Daily Tiffin and I'm honoured to be writing alongside such lovely ladies.

I'm passionate about children learning about food. I think it should be fun and exciting but natural and stress free for everyone. One thing most children seem to love, if they have the opportunity, is to have a go at growing their own food.


Growing their own food helps children to learn where food really comes from. It's only natural that they would assume it comes in plastic or paper packets from the shop if they're not told or shown any different. It also helps them to learn patience, a little science, and a little nurturing.

It can be really easy to start with just one pot, some compost and seeds. Unless you're a seasoned gardener, I wouldn't suggest doing a whole veg patch with children. We learned this to our own cost. A kitchen garden or vegetable patch is a lot of work. A little pot or two is good fun and manageable.

I would suggest basil or rocket to begin with as both grow quite quickly and can be eaten cooked or raw.

Things you will need to get you started.

A small to medium size plant pot. A mug would do but would need a drainage hole drilled into it, we used a mug but it's quicker and easier to start with a pot.
A small bag of all purpose compost. The smallest you can buy.
A packet of seeds
Water

If you have the time you could get the children to decorate the pot before they begin. This makes it a longer activity which is great if you're looking for things to fill time in the holidays.

It's a good idea to do this outside or if you're going to do it inside then put some paper down to protect the surface you're going to work on.

Fill the pot with the compost to about 1 to 2cm from the top.
Sprinkle the seeds over the top of the compost (not too many).
Sprinkle a little more compost over the seeds.
Then very gently add a little water.

Leave on a plate (to catch any water draining from the hole in the bottom) in a sunny position on the windowsill or outside if it's spring or summer and there's no chance of a frost. You should check the pot everyday to make sure it's not dry but don't over water. After a few days you should start to see some shoots coming through the soil and then quite quickly you'll have your very own herb or salad with which you can then eat as it is or make into some very tasty food.


Are you interested in contributing to The Daily Tiffin? Drop us an email: blogmeeta@gmail.com. We look forward to hearing your ideas.

This Post was written by Amanda from Little Foodies

4 Essential Moves Dos and Don'ts

Friday, June 08, 2007

Posted by Helene


I first thought about writing an article on “ 4 Essential Strength Training Moves”, and then I wondered what good it would do if you did not know the proper way to do them.
I plan on doing a bi-monthly installment of the sort so there will be more than the first 4 I am showing here: stationary lunge, push-up, abs crunch and triceps dips


1/ Stationary lunge:
-Stand, with hands on your hips. Place your feet hip-width apart, tighten your abs and look straight ahead.
- Take a big step forward with your right foot so your right knee and ankle are aligned (Rear leg is almost straight.) Distribute your weight evenly between your feet.
- Lower your body until your left knee is a few inches from the ground, then push back up. Next, step forward with your left foot.
Option one: do 2-3 sets of 12-15 reps each on one leg and switch or alternate stepping right and left.
Don't look down. Think vertical, not horizontal: Move hips up and down, not forward and back.
Don't shift your weight forward; keep it over your hips to prevent excess pressure on your knee.
DO

OH NO!


2/ The Pushup:
Position yourself facedown on hands and toes (or knees). Pull abs in and keep body aligned from head to toes (or knees). Bend elbows about 90 degrees and lower chest toward floor. Push up and repeat.
Do not raise your buttocks in the air or curve your back inward.
Do 2-3 sets of 12-15 reps each.
DO
OH NO!

3/ Standard Ab Crunch :
Lie face up with knees bent and feet flat on ground, hands behind head and fingers unclasped.
Contract abs as if to press navel toward spine and raise your head, neck and shoulder blades off ground as a single unit. Pause for a second and lower. Repeat 2-3 sets 10-15 reps each.
DO OH NO!


4/ Triceps Bench Dips :
Sit on the edge of a bench or chair with hands next to hips. Legs can be extended in front of you on floor, toes up, or keep feet flat and knees bent (the closer your feet are to your butt, the easier the move). Straighten arms and lift hips off bench and slightly in front of it. Keeping chest high and shoulders down and back, bend elbows 90 degrees and lower hips toward floor. Keep elbows pulled close tight behind you.
Press up and repeat.
Remember to graze the bench or chair. Do not let your butt move forward.
Do 2-3 sets with 12-15 reps each.
DO OH NO!


Are you interested in contributing to The Daily Tiffin? Drop us an email: blogmeeta@gmail.com. We look forward to hearing your ideas.

This Post was written by Helen from Tartelette

Superfoods: Acai - Nature's Energy Fruit

Wednesday, June 06, 2007

Posted by Meeta K. Wolff


It may seem odd to start this list of superfoods with one you’ve likely never even heard of. But studies have shown that this little berry is one of the most nutritious and powerful foods in the world! Açaí (ah-sigh-ee) is the high-energy berry of a special Amazon palm tree. Harvested in the rainforests of Brazil, açaí tastes like a vibrant blend of berries and chocolate. Hidden within its royal purple pigment is the magic that makes it nature's perfect energy fruit. Açaí is packed full of antioxidants, amino acids and essential fatty acids. Although açaí may not be available in your local supermarket, you can find it in several health food and gourmet stores (often in juice form). A new product featuring the unsweetened pulp is now also available, and I highly recommend that you choose this form of açaí.

Açaí pulp contains:
A remarkable concentration of antioxidants that help combat premature aging, with 10 times more antioxidants than red grapes and 10 to 30 times the anthocyanins of red wine.
A synergy of monounsaturated (healthy) fats, dietary fiber and phytosterols to help promote cardiovascular and digestive health.
An almost perfect essential amino acid complex in conjunction with valuable trace minerals, vital to proper muscle contraction and regeneration.
The fatty acid content in açaí resembles that of olive oil, and is rich in monounsaturated oleic acid. Oleic acid is important for a number of reasons. It helps omega-3 fish oils penetrate the cell membrane; together they help make cell membranes more supple. By keeping the cell membrane supple, all hormones, neurotransmitter and insulin receptors function more efficiently. This is particularly important because high insulin levels create an inflammatory state, and we know, inflammation causes aging.

Since the Acai Berry is so perishable we are not able to go to the local fruit market and buy a basket of Acai berries. The good news is, companies like Sambazon have developed a process to export frozen Acai pulp and freeze dried Acai powder.
The highest quality Acai supplements will be made with Sambazon freeze dried acai. Spray dried and "extract" Acai supplements should be avoided at all costs.

This Post was contributed by Pintoo from Zaayka


Are you interested in contributing to The Daily Tiffin? Drop us an email: blogmeeta@gmail.com. We look forward to hearing your ideas.


Microwave mixed rice & fried chicken

Tuesday, June 05, 2007

Posted by Biggie

Mixed rice lunch for toddler

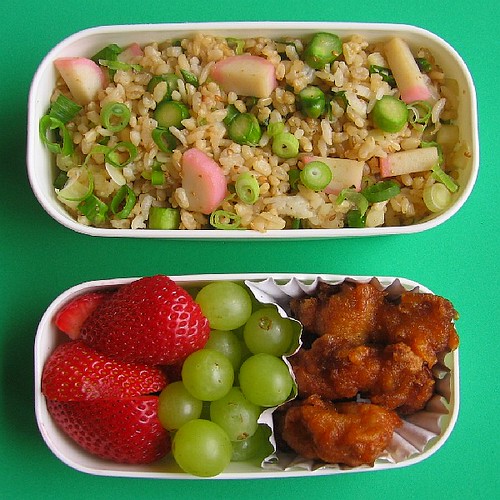
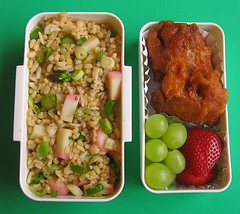
Preschooler's lunch: Quick mixed brown and white rice with asparagus, kamaboko fish cake, and green onions (recipe below). Strawberries, green grapes and Ajinomoto-brand Japanese-style fried chicken ("kara-age"). Pre-cooked frozen fried chicken was great in theory, but not very good in practice as it turned out soggy and greasy -- yuck. It was moist and the flavor was good, but the breading was unappetizing. Didn't bother my son Bug (my son), though, as he devoured the chicken but left the rice untouched for reasons yet unknown...

Morning prep time: 8 minutes, using frozen fried chicken and microwave faux "fried rice" using leftover cold rice.

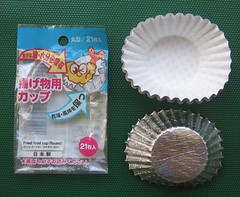
Packing: For the fried chicken, I used paper-lined cups specially designed to absorb the oil from fried food (bought at Daiso dollar store for US$1.50 -- look for the cartoon shrimp on the package). I was pleased with these as they absorbed a lot of oil from the chicken. This was too large for Bug, but the leftovers didn't go to waste...

Lined food cups for fried food

Mixed rice lunch


My lunch was the same as Bug's, with bigger pieces of chicken and halved strawberries instead of quartered.

I used a shortcut to make cheater's 5-minute "fried rice" in the microwave that I adapted from Japanese bento cookbook 園児のおべんとう ("Kindergartner Bentos" from Kodansha), a variation on this version that I made a while back.


Loose Recipe for Mixed Rice

  • 1.5 cups leftover cooked rice (white or brown, refrigerated, frozen or fresh)
  • a few slices of kamaboko fish cake (or any protein, such as roast pork or chicken)
  • a green onion (scallion)
  • a vegetable (asparagus, frozen green peas or corn, etc.)
  • sesame oil
  • soy sauce
  • salt
  • roasted, ground sesame seeds (optional)
  1. Chop up a handful each of protein (kamaboko), green onion and vegetable (if cutting is necessary).
  2. Put the leftover cold white rice in a microwave-safe bowl, and top it with the protein, green onions, and vegetables. Cover with plastic wrap and heat for one minute in a 1100W microwave (times will vary depending upon how much food you're nuking and the power of your microwave). If you have fresh rice made up, just nuke the protein and veggies on their own, and mix them together with the hot rice afterwards.
  3. When hot, add a couple teaspoons or so of soy sauce, a dash of salt and a drizzle of sesame oil to taste, and mix it all up.

NOTE: I keep a cheap sesame seed grinder filled with roasted sesame seeds for freshly ground sesame. If you don't have a sesame seed roaster, you can use a frying pan covered with a splatter screen to toast your own sesame seeds (cheaper and fresher than buying them pre-roasted, but slower).


Are you interested in contributing to The Daily Tiffin? Drop us an email: blogmeeta@gmail.com. We look forward to hearing your ideas.

This Post was written by Biggie from Lunch in a Box

Inside a German Bakery: Multigrain Spelt Wholemeal Bread

Monday, June 04, 2007

Posted by Meeta K. Wolff


Now that you have met my baker and his family, let me show you around some of his delicious products. Every other week I will feature one bread, roll or pastry from Herr Becker's lovely bakery. There are so many to show you I just was not sure which one to start with. After sorting through my pictures I finally decided on this one - a Multigrain Spelt Wholemeal loaf.

In German it is known as Dinkelvollkornbrot mit Körnermix. This is a great tasting loaf, high in dietary fiber and full of health benefits. It is a sourdough made of full flavored wholemeal and spelt, packed with flaxseeds/linseed, oats and oatmeal, and sesame seeds.

Wholemeal is made from grinding the endosperm, wheat germ and bran until they are all finely broken down. This is what gives the bread a characteristic “brown” color and hence bread. As the wheat germ and bran are not removed this bread is usually high in fiber. Make sure you check the labels though; “brown” bread is not necessarily the same as wholemeal. Spelt is a green wheat grain which is low in gluten. This bread is particularly good for people who cannot handle a large amount of gluten in their diets.

Bread and other cereals are very good sources of carbohydrate and fiber and also provide a number of vitamins, minerals and protein. In comparison to white bread, which is fairly high on the GI (Glycemic Index) scale, this bread has a medium GI level of approx. 54.

We all know that bread is an important part of a balanced diet, but it has to be the right kind of bread. Stay away from the white breads ad read the labels. Choose grainy and wholegrain breads. These are best for most adults, as they are high in fibre, slow to digest, and they provide important vitamins and minerals. These types of breads are important as they work to keep the bowel healthy; this has been proven to decrease the risk of bowel cancer and stomach cancer.

This bread can be enjoyed with any type of spread - sweet or savory. Soeren and I love to spread vegetables on this bread. The nutty flavor of the seeds combined with the vegetables is unbeatable. Today, we share our favorite open faced sandwiches.

Roasted Bell Pepper and Asparagus Sandwiches

4 slices multigrain spelt wholemeal bread
1 small bunch of green asparagus - washed and woody ends trimmed
1 red or yellow bell pepper - de-seeded and cut into quarters
1 ripe tomato - sliced
salt and pepper
2 tablespoons extra virgine olive oil
150g Gruyere cheese - grated
2 garlic cloves - minced
2 tablespoons lemon juice


Pre-heat the oven to 180 degrees Celsius.

In an oven proof dish place the asparagus and peppers and add the olive oil and lemon juice. Salt and pepper and give the vegetables a good toss. Arrange them on a baking sheet and allow to roast for 15 minutes. Allow to cool, then remove the peel from the bell peppers.

Place the 4 slices of bread on a baking sheet and arrange the roasted vegetables on each slice. Top with a few slices of tomatoes and a good sprinkling of grated cheese.

Turn the grill function of your oven on and grill the sandwiches until the cheese has melted and just started to brown. Take out and serve immediately.

Hope you enjoy your week!


News:

We would like to ask you all to welcome our newest Daily Tiffin member. Amanda of Little Foodies will be enriching our blog with fantastic articles focusing on parents and children. She will share kid friendly recipes, ideas for arts and crafts, food trends and other related topics.

Here is what Amanda says about herself:

I'm a stay at home mum of two great boys, just setting up a business from home. My working life has been diverse to say the least, and includes time in the travel industry, the landscape gardening industry and before becoming a mum a few years as Training and Development Manager for a Law Firm. I never was one to follow one straight path!! My main passion is food, particularly children eating and learning about good food.

Welcome to the team, Amanda!


Are you interested in contributing to The Daily Tiffin? Drop us an email: blogmeeta@gmail.com. We look forward to hearing your ideas.

This Post was written by Meeta from What's For Lunch, Honey?

12 Habits To Start and Stick to A Fitter Lifestyle

Saturday, June 02, 2007

Posted by Helene


The end of May marks an anniversary for me: at the end of May 1996, I reached my personal goal of losing 50 pounds. Fast forward 11 years, May 2007 and I am still going to blow a candle on that 50 pound weight loss. Yes, you read right, I have managed to keep the weight off. The only difference is the tremendous improvements in my lifestyle over the past 11 years thanks to adding “fitness habits” regarding exercise, nutrition, wellness and motivation. It’s not always fun, it does not go without pain or pushing the envelope but it is worth it.

You have probably been down this road before of starting on a healthier path only to find your walking routine derailed by the rain, a treadmill that broke down a bad day at the office or a birthday party leaving you with enough cake for 3 weeks…One excuse after the next and before you know it you are back to your old routine and you hate it…

1/ If you have a hard time starting or sticking to it (whether eating or exercise), visualize fitness as an appointment. We keep doctors, hair, dentist appointments, all necessary to make us healthier and prettier, do the same for your daily exercise. Schedule exercise into your day and before you know it, it will become second nature for you, like an extra 10 minutes walking the dog or a 20 minute play date with your kids at the park, Schedule to eat 3 healthy salads this week instead of cafeteria meals, schedule 8 glasses of water throughout the day,…little things like that add up toward reaching your goals over the years. Make fitness a non-negotiable part of your life, like brushing your teeth or washing your hair.

2/ Start a journal:
- write down short term and long term goals. Write down your moods, your hurdles, the tips and tricks that helped overcome these obstacles. Write down your planned workouts and what you have actually accomplished. It’s like balancing a checkbook: proper nutrition and exercise are like deposits that enable you to make weekend withdrawals (lounging on the sofa, brunch with friends,…)

3/ Be a body in motion:
- Wake up 15 minutes earlier and go for a walk around the block. It will allow you to visualize your day ahead. I come up with my best dessert creations on my morning jog. During your lunch break, find another 10 minutes to either go get our lunch or just walk to your favorite shop and back. When you get home, put on your tennis shoes and go for another minute walk. It will relax your brain and allow you to shift form work to home mode.
At the end of the day you would have accumulated 30 minutes of easy fitness, add a couple sessions of more strenuous aerobics activity and you are there!

4/ Bring exercise into your house : rent/purchase a stack of exercise videos or record some exercise shows on tv and do them 2-3 times a week. Clip exercises from fitness magazines and start doing them a few times a week.
- When you lean down to reach for a toy or an object, squat down instead: you will firm up your butt muscles and quadriceps and not strain your back.
- Do some leg lifts while you are stirring that sauce on the stove
- Take the stairs as much as possible rather than the elevator. Park you car little further away. Map out routes and pathway to stores nearby that you can walk to. Walk over to the neighbors down the street instead of driving there.

5/ Think like a kid: shoot hoops in your driveway, use a jump rope if you can. Play sports that make you happy like ping pong, badminton. Roll in the hay if you want to!

6/ Develop a buddy system: Meet with a couple of friends and start an exercise routine. The time will fly while you exercise, they will give you motivation and you will keep those friendship bonds strong. It may not be as good as having a trainer or being able to train hardcore, but it is better than what you were already doing…nothing!

7/ Drink water and get good sleep:
- my clients find my car analogies funny, but the thought of driving you car without gas would never cross your mind…same thing with your body. Keeping hydrating is good for your organs, your skin, your digestive and circulatory systems. Flavor it with lemon juice or brew yourself some black or green tea and sip on it throughout the day.
- make sure you get plenty of rest. Starting an exercise program is taxing on your joints, muscles and circulatory system. To prevent injury by working out tired muscles make sure to get 7-8 hours of sleep. If you can take a nap while your children are resting go for it. Getting plenty of shut-eye is also beneficial to your serotonin levels and helps regulate your appetite and mindless munching.

8/ Plan your nutrition at home: I never leave my eating to chance. I know if I eat unhealthy, my body suffers. Is it fun to pay attention 80% of the time? No! Is it worth it? Yes!
-Take some extra time on the weekends to plan healthy meals for you and your family. Make a shopping list of all that is needed plus healthy snack and stick to it religiously while at the store. Cook double batches and freeze the leftovers so you can have healthy meals already prepared when you are pressed for time or too tired to cook.
- Bring colors to your plate: add variety and spice when you cook by incorporating all sorts of different colored fruits and vegetables. Don’t know where to start…visit the personal food blogs of my co-administrator and you will fins great suggestions. (mine is for the 20% remaining…when you need a sweet treat)

9/ Plan your nutrition on the go: be as diligent as you are at home, I am known as the pack rat where food is concerned. I always carry an small insulated lunchbox that I fill accordingly so that I am never stranded running errands on a pounding headache because I did not have anything healthy available.
- Pack your lunch the night before: you will find great lunch box suggestions here.
- Stock up on single servings snacks like bay carrots, string cheese, yogurts, unsweetened applesauce, whole wheat crackers. If you save money by buying in bulk, divide the snacks into portions in ziplock type bags and write in bold with a black marker: one serving.
- not sure about portion sizes? Print this handy guide (pdf) and post it on your fridge.

10/ Download fast food menus and circle or highlight their healthy options.Write them or copy them on an index card that you put in your wallet. This has become a lifesaver when traveling and eating out with a group. This site has tons of listings for restaurants and convenience shops.

11/ Don’t eat when you are not hungry:
- I always look at children for inspiration on that subject. Have you ever notice how they sit down at the dinner table and eat according to their appetite and not because there is food in front if them…we usually end up forcing them to finish their plate.
- What about the mini meals (5-6) theory? Well, to do it successfully you kinda have to plan well. Lay out on a piece of paper all the foods you should eat for the day (1800-2000 calories) and spread them out in 5-6 meals. Most people take this principle upside down and end up eating 5-6 normal sized meal.
- Think European: 3 meals, maybe an afternoon snack if necessary to tie up over until dinner time. Never skip breakfast as it jump starts your body functions and brain cells. Make lunch a sizeable one, enough to replenish your energy level and carry you until the end of your workday. If you plan on hitting the gym before going home, make sure to have a small snack (granola bar/fruit/piece of cheese). Try not to have your main meal at dinner…most of us sit down and relax and do not burn the extra calories provided by too rich a meal.

12/ Stop the voices in your head:
- only you can take the decision to start a fitness plan, but here’s the catch: you can’t say “I’ll try”, you either do or you don’t. Remember that this is not a huge mountain to climb but a series of stones to put down in order for you to reach the summit. Never listen to nagging coworkers or family members, they are just jealous that you are doing something towards improving your quality of life.
- once again, think like a kid: no fear, no self-doubts, no negative self talk, no self-criticism, no worries, no destructive anxieties or thoughts of failure.

Are you interested in contributing to The Daily Tiffin? Drop us an email: blogmeeta@gmail.com. We look forward to hearing your ideas.

This Post was written by Helen from
Tartelette

Do Additives Make Children Hyper?

Wednesday, May 30, 2007

Posted by Anonymous

I was never one of those overactive kids (in fact, I may have been borderline sluggish), but my mom also kept us away from as many processed foods as possible. She was a firm believer in whole foods and natural ingredients (she even tried to pass frozen fruit off as "ice cream" on more than one occasion) and perhaps that's why we were well behaved.

It may be a coincidence, but a new British study is showing that there is a link between artificial food coloring and hyperactivity. Groups of 3, 8 and 9 year olds were given fiven different food colorings - the amount that an average child might consume all day. The children in the study showed behavioral problems such as temper tantrums, poor concentration, hyperactivity and allergic reactions. The additives they tested were ones that are approved in the EU (although some are actually banned in the US). A similar test from a few years ago also found similar results.

They haven't fully published the new findings, but I would be really interested to see the full scientific results. I'm not totally surprised, as I'm sure the additives do something, but I'm curious to see how the control group was tested. Aren't temper tantrums and hyperactivity just part of being a kid? What do you guys think?

Source: Press TV


Are you interested in contributing to The Daily Tiffin? Drop us an email: blogmeeta@gmail.com. We look forward to hearing your ideas.

This Post was written by Sabrina from YumSugar

Tiffin Tuesday: Crepe Cake, Crepe Rolls and Fruit

Tuesday, May 29, 2007

Posted by Meeta K. Wolff


Leftovers are worth gold when it comes to packing lunches for the next day. Never ever throw anything away, when you can either use it the next day or freeze and then make a new creation a few weeks later.

Soeren's lunch box here is a good example of how I used some leftovers.


Contents: Savory crepe, spread with light goat cream cheese, turkey breast and a dash of homemade tomato sauce to seal the crepe rolls. A slice of Tom's birthday cake - chocolate crepe cake. Adding more color to the lunch box are the slices of juicy oranges and sweet organic strawberries.

Prep time: 5 minutes
The cake was made two days earlier so I just needed to cut up a slice large enough to fit into the container and large enough for Soeren's appetite. While making the crepes for the cake I had reserved some of the batter before making it sweet. I baked a small batch of savory crepes and froze them. The best way to freeze pancakes or crepes is to lay a sheet of waxed or parchment paper between each layer of crepe. Then place the entire stack in a ziploc bag and freeze. This hinders the pancakes sticking to each other. You can take them out individually and as many as you require. For Soeren's lunch box I took one out and placed it just for a few seconds in the microwave on "defrost". Spread some of his favorite goat cream cheese and layered it with a slice of thinly cut roasted turkey breast and some homemade tomato sauce. Then after rolling the crepe up, I simply cut them in bite size pieces. For kids it's a practical way to serve and pack things like stuffed pancakes or tortillas - the filling does not leak out and while eating the sizes are more manageable.

If you would like to indulge, you will find the recipe for the Chocolate Crepe cake here.

Enjoy your lunch, where ever you are!


Are you interested in contributing to The Daily Tiffin? Drop us an email: blogmeeta@gmail.com. We look forward to hearing your ideas.

This Post was written by Meeta from What's For Lunch, Honey?


Safety and Care: Kids in the Kitchen II

Monday, May 28, 2007

Posted by Meeta K. Wolff

The kitchen can be a very dangerous place for the younger ones on our lives. Toddlers and small children are very inquisitive and in their innocence will try anything lying open or pull anything that is within their reach.

Due to this reason the many points and guidelines focusing on safety and care in the kitchen when kids are around, cannot be stated often enough.

This is a pretty sensitive subject for me personally. My brother was involved in a kitchen accident at the age of 3. Today he is 32 and still suffers from the issues that plague him from this accident. One day he ran into the kitchen where our house-help was boiling water. She was not in the kitchen at the time my brother ran into the kitchen. Unfortunately the pot was a little too close to the edge and in his haste he managed to somehow pull the whole pot onto himself. He had third degree burns and a suffering of a life time. Surgeries and plastic surgeries, therapy and rehab followed. Till today he has not "healed". In his head he sometimes still fights certain demons that follow him.

So, writing this post is a bit difficult, but at the same time a bit satisfying. Satisfying because I hope my experience might help others who read this.

With just a few simple steps you can make the kitchen a safer place for your children. Prevention is the key word that will help you to avoid injuries, burns, and even fatality.


  • Keep the pot and pan handles always turned to the back. This will keep children from intentionally or unintentionally pull them down from the stove and causing burns or other serious injuries.

  • Be sure that children cannot climb on top of counters or cabinets. Tablecloths and other such hanging placements should be removed or kept out of range of your toddlers or small children. This prevents them form pulling things down onto themselves.

  • Keep hot items at a safe distance. Never place anything hot on the edge of the counter. When moving hot items around make sure your toddler or small child is not in your way. It is safer to keep toddlers in a playpen or highchair when cooking in the kitchen, instead of allowing them to crawl on the floor.

  • When opening the oven doors make sure that your child is not anywhere nearby. A toddler may unintentionally grab for the oven door and burn himself/herself.

  • Microwaves should be placed out of reach for children. The best place for it is in between the wall cabinets.

  • Use a microwave door lock to keep the microwave locked.

  • Make sure the containers or formulas bottles that come out of the microwave are not hot. Let them to cool before allowing your children to handle them.

  • Keep all appliances and their cords tucked away neatly. Allowing them to dangle over the counter top may cause children to pull them down from the counter.

  • Plastic plug protectors are the perfect way to prevent tiny fingers sticking into the sockets. All sockets accessible to toddlers or small children should be protected with such plastic plug protectors.

  • When older children are in the kitchen helping out, supervise them and never leave them out of sight.

  • Keep sharp objects out of all children's reach. Knives should be placed in knife blocks and stored towards the back of the counter.

  • Detergents, washing liquids and other cleaning material should be stored in a cabinet above the sink and not below the sink.


I have a wonderful online learning game I play with Soeren every now and then. It is called Welcome to Welltown. In Welltown your children will learn how to stay healthy and keep themselves safe by doing certain activities. A playful way to teach them such important lessons. We too spend our time in Welltown and often we focus on Kitchen Safety. Hope you and your children enjoy playing the game.

Review your kitchen with a sharp eye and make it a safe place for your children. Although you will find these points obvious and you might have often seen them it is so vital to take them into consideration before something really happens.

Further resources:
Kitchen Safety for children on their own
Kitchen Safety Fire Prevention in the Kitchen

I would also like to thank Asha and Sharmi for contributing to our Safety in the Kitchen month.

You will also find valuable information from our own Daily Tiffin team on out theme this month - Safety & Care. Each member shared helpful and important information for various topics, which should be actually be bookmarked for future reference.

We wish you a safe and accident free week.


If you like what we girls do here and would like to vote for us in the Blogger's Choice Awards here. Thanks for your support!


Are you interested in contributing to The Daily Tiffin? Drop us an email: blogmeeta@gmail.com. We look forward to hearing your ideas.

This Post was written by Meeta from What's For Lunch, Honey?


Safety in the Kitchen - Part 2: Simple First Aid

Thursday, May 24, 2007

Posted by gilly


Last time we looked at many of the potential hazards that loom in one's kitchen. We discussed how a few simple precautions can often prevent injuries from occurring.

Although we can take many actions in making our kitchen's safe, we cannot foresee all accidents that may possibly occur. For this reason, this article will discuss some simple first aid concepts that may prove useful when the unforeseeable happens.


First Aid Kits
As mentioned previously, it is wise to keep a first aid kit in your kitchen. It should be in an easily accessible place, known to all family members. First Aid Kits can be readily purchased, or you may put together your own - including (but not limited to):

Assorted bandages and dressings (sealed and sterile)
Antiseptics
Soap/cleaners
Scissors
Safety pins
Safety gloves - latex or vinyl
Moist towelettes
First aid guide
Medical tape
Gauze
Pain relievers (non-prescription)


Other First Aid Necessities
Food allergies are becoming increasingly common, as well as severe. As most food preparation takes place in the kitchen, it pays to be diligent about ingredients that may affect members of your household, as well as knowledgeable on what to do in the case of an emergency. If you or others have severe allergies, you may be instructed to wear a medical bracelet outlining your condition, or be required carry medicine to be administered in the event of accidental ingestion. It is extremely important for other members of your household to understand your condition, and know how to treat it.

For example, I have a fairly severe allergy to shellfish, so I am required to carry an Epi-pen with me at all times. The Epi-pen is an injectable shot of epinephrine designed to treat anaphylactic shock. There are specifics regarding how it is administered that my husband, close family members, and co-workers must be made aware of in order to buy me time to get to a hospital - and therefore save my life if I was to accidentally ingest a shellfish product.


Administering First Aid
Firstly, it should be stated that many serious accidents require medical help. The goal of first aid is to provide temporary (though often life-saving) help until qualified medical personnel arrive.

Two of the most common accidents in the kitchen are cuts and burns, so let's look at some simple first aid measures that can be taken in the event of an accident.


Serious Cuts
Serious cuts can occur from numerous sharp objects in the kitchen. It is important to seek medical help if you are unsure of the seriousness of the cut, or it's origins (IE. a rusty can lid, a knife, broken glass, etc.)

When a serious cut occurs:

  • Phone for medical help if necessary.
  • Assess the situation.
    • If possible, clean the cut of any dirt or debris by wiping AWAY from the wound with a clean (preferably sterile) cloth.
    • Protect the wound by covering it with a clean (preferably sterile) cloth
    • If there is profuse bleeding, use a bandage or cloth to apply pressure to the cut. Elevate above the heart if possible.
    • If there is an embedded object, do NOT try and remove it yourself, rather, support the object with the help of bandaging
  • Make the casualty as comfortable as possible until help arrives


  • Burns
    There are two forms of burns that occur commonly in the kitchen. A dry burn is one that occurs from a direct source of dry heat, such as touching a burner or other hot object. A moist burn is one occurring from steam.

    Burns are indicated in various degrees:

    A first degree burn refers to burning of the top layer of skin. It is associated with swelling and reddening of the skin. The casualty may complain of mild to serious pain.

    A second degree burn refers to burning the top layer of skin, along with the second sub-layer. It is associated with raw, moist skin - coloured white or very red, and often weeping fluids. The casualty may complain of extreme pain.

    A third degree burn refers to burning the top two layers of skin, as well as underlying muscle, nerve or fatty tissues. These are extremely serious, and are associated with waxy white or charred skin, dry or leathery appearance, and complaints of little to no pain in the deepest burned areas.

    When a serious burn occurs:
  • Phone for medical help if necessary.
  • Cool the burn:
    • Immerse in cool water (not cold)
    • If it is not possible to immerse, gently pour cool water over the burn.
    • If that is not possible, use a cool clean soaked cloth over the burn
  • Remove any restrictive materials (i.e. clothes) or objects (i.e. jewellery) immediately, before swelling occurs.
  • When the burn has been cooled, and the pain has lessened, apply a loosely fitting clean (preferably sterile) cloth over the burn. Secure with tape, begin careful not to apply tape over the burn.
  • Make the casualty as comfortable as possible until help arrives


  • First Aid Training
    These are just a few suggestions for caring for an individual until help arrives. However, it is advisable for members of your household to be trained by certified first aid trainers. There are many agencies specializing in first aid training, and taking a course could save a life! Please consult your local agencies for more information on how you and loved ones can receive first aid training.

    Also be sure to keep your training up to date - which reminds me, it's time for me to retake my first aid course again! If you know of an agency in your region that offers training in first aid and live saving measures, please leave information in the comments section - it may prove useful to others!


    I hope that you found this article useful, and I wish you health, happiness, and safety!

    Resources:
    Canadian Red Cross
    St. John Ambulance (Canada)
    First Aid: First on the Scene: 6th Edition © 2003 by St. John Ambulance


    If you like what we girls do here and would like to vote for us in the Blogger's Choice Awards here. Thanks for your support!


    Are you interested in contributing to The Daily Tiffin? Drop us an email: blogmeeta@gmail.com. We look forward to hearing your ideas.

    This Post was written by Gilly from Humble Pie


    Meet My Baker!

    Wednesday, May 23, 2007

    Posted by Meeta K. Wolff


    Allow me to introduce the man responsible for all the wonderful bread creations that are used in Soeren's lunch boxes and enjoyed by us at dinner time: Herr Becker ("Herr" being German for Mr.). Soeren and I are forever joking with him and call him "Herr Becker der Baecker!" - Mr. Becker the Baker. He takes it lightly and with humor. That's one of his many qualities - he is not just a brilliant baker but a kind hearted soul, always smiling and despite the size of him he is as gentle as a lamb. His family is equally wonderful and each one of his five ladies help out at the bakery: his daughters Katarina, Katy, Kim, Keila and his wife Kathrin.


    I decided to revisit this post I had written to start a German Bread series a while back. Unfortunately, as many things so happen, I never got around to it. But thanks to Bee and Jai who reminded me about it. Both liked it and were charmed by this article so much and wanted to know more about my bakery and German bread and so they asked me to take part in their wonderful postcard series. So, I decided to re-write the article, dust it up and bring it out again. I am sending this with hugs and love to Jugalbandi's postcard series.

    Visiting the Beckers at their bakery is never just an in-and-out routine, but an event. We always bring enough of time with us, because there will be a lot of chatter, a bit of gossip and a lot of tasting. Being his favorite customer, Soeren is allowed to go into the back and always taste one of his new creations that "he is currently in the middle of testing" - a new cake, cookie type, or bread. The bakery produces (mostly) organic breads and pastry and the thing I really like is that Herr Becker is always trying out new things. Kneading and mixing up concoctions, always busy and always with a huge grin on his face. In a week we visit the Beckers 3 to 4 times, buying mostly fresh bread, buns, rolls and pastry. It really is hard to choose one favorite when the variety is so huge, but we have found a few favorite breads we like to buy regularly. That is till the next time Herr Becker comes up with a new bread creation - who knows it might just become one of our new favorites.


    Bakeries in Germany sell their large selection of breads in uncut loaves. They are all piled and sorted nicely on shelves behind the glass sales counters. In the glass counters you are disillusioned by the colorful selection of wonderful pastries, cakes and cookies. I think if I was ever left in there at my own risk I would dive into the counter - one of my more crazy fantasies!

    The loaves of bread are sold by weight and depending on what's in them. One of the very best moments is to come home with a bread that is still warm, cutting a slice with the bread knife and the aroma of this wonderful freshly baked good spreading throughout the house, getting some fresh butter out of the fridge and spreading it on the slice. As the butter melts and trickles into the bread you take a huge bite. UMMMMMM! Heavenly!


    Did you know that there are at least 300 types of bread to choose from? I think however that, that is just a rough basic number and in actual fact the number is a lot higher. "Brot" is a fundamental part of German food. You will find a "Baeckerei" (bakery) at any street corner and when we ask any of our friends and family living abroad what we should bring with us, the answer is always the same - "Some of that lovely German bread!" A typical bread mixes wheat and rye flour to form the basis of the traditional German bread. Other popular ingredients also include oats, barley and spelt, or onions, nuts, special types of grain, herbs and spices.

    Something we really enjoy eating at our home is probably the darkest bread ever: Pumpernickel. It consists mainly of grainy rye flour and isn’t baked but steamed. This makes it very firm and juicy with a slightly sweetish flavor. As it stays fresh for a long time it is a handy gift for friends and relatives living outside Germany.

    What I like about many bakeries here is you can often buy just half of a loaf. Which I do very often. I buy a half of one type and half of another type. This way I have a variety and it does not spoil that quickly.


    So, maybe some of you can understand why I never wish for a bread machine on my Birthdays or for Christmas. Why should I when Herr Becker the Baker is just around the corner?

    With this I am starting a new series on the Daily Tiffin. I hope to show you the many varieties of breads, rolls and pastries available in a normal everyday bakery.


    If you like what we girls do here and would like to vote for us in the Blogger's Choice Awards here. Thanks for your support!


    Are you interested in contributing to The Daily Tiffin? Drop us an email: blogmeeta@gmail.com. We look forward to hearing your ideas.

    This Post was written by Meeta from What's For Lunch, Honey?


    Pasta frittata lunches and recipe

    Tuesday, May 22, 2007

    Posted by Biggie

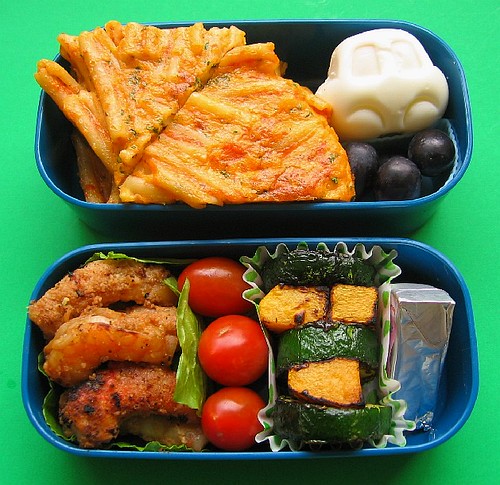
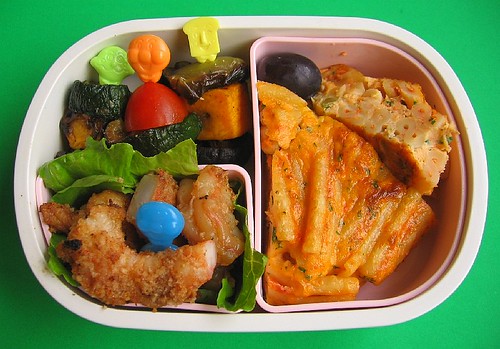
    Pasta frittata lunch

    Contents: (upper) Mini frittata made with leftover pasta (recipe/tutorial below), hard-boiled egg shaped like a car, and grapes. (lower) Leftover grilled shrimp with wasabi bread crumbs, cherry tomatoes, grilled zucchini and butternut squash, and cheese triangle.

    Morning prep time: 15 minutes. The zucchini and squash were already cut and prepped from a picnic; I microwaved them in a covered bowl with a splash of water first to speed up grill time (no-cost substitute for a microwave mini steamer). A friend had made the shrimp, so that was leftover too. I'd made a batch of eggs before, so it was waiting in the fridge in the mold. The frittata was the most labor-intensive thing in the morning.

    Packing: Lettuce can also act as an edible food divider (instead of hard-to-find plastic food dividers). I cut the tails off the shrimp for neater eating.

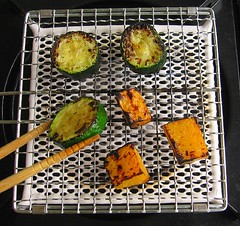
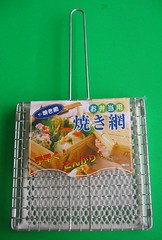
    Multi-grilling on stovetop grill Stovetop grill

    Japanese bento cookbooks often show the speed technique of cooking different kinds of food together in the same pan, pot, broiler pan, etc. This is a variation: multi-grilling on a stovetop grill. Similar to a Japanese fish grill, this one has finer mesh on the top so that vegetables don't fall through, and is marketed as being the right size for bento lunches. Just put it on your gas or electric stove, heat, oil the grate and grill food (veggies, meat, fish, etc.) as if you were outside -- much faster than firing up the outside grill in the morning (yeah, who's going to do that?). Mini stovetop grill bought for US$1.50 at Daiso (Japanese dollar store with stores internationally). Amazon carries a slightly larger Japanese stovetop grill here.

    Pasta frittata lunch for preschooler

    Contents: Bug (my two-year-old) had a mini pasta frittata, grape, leftover grilled shrimp with wasabi bread crumbs, and little skewers of leftover grilled zucchini, butternut squash, green bell peppers and cherry tomatoes.

    Morning prep time: 15 minutes. The shrimp and the vegetables were leftover from a Mother's Day picnic, and the pasta in the frittata was also leftover. The only dish made especially for this lunch was the mini frittata.

    Packing: Lettuce can also act as an edible food divider (instead of hard-to-find plastic food dividers). Little Anpanman-character picks make it easy for little hands to manage the grilled vegetables, and the blue pick is for the slightly messy shrimp. I cut the tails off the shrimp and halved them to make it easier for Bug to eat. The lone grape acts as a gap filler to keep the lunch from shifting during transport.

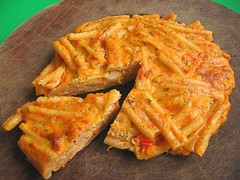
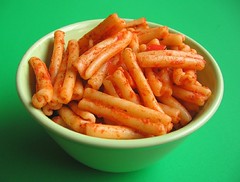
    Pasta mini frittata Leftover pasta for pasta frittata #1

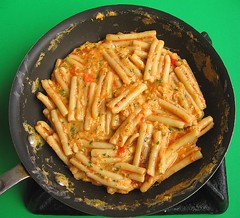
    Pasta frittata before the frying pan #2 Pasta frittata in mini frying pan

    Pasta Frittata Recipe
    • 2 cups leftover pasta with sauce (any kind, although long pastas like spaghetti work particularly well, and pesto sauce is particularly nice)
    • 3 large eggs
    • 3 Tb Parmesan cheese, grated
    • 2 Tb Pecorino Romano cheese, grated (if not available, substitute Parmesan)
    • 2 Tb parsley, chopped
    • freshly ground pepper to taste
    1. In a bowl, beat together the eggs, cheeses, parsley and pepper. Add leftover pasta and stir well.
    2. Pre-heat broiler, and heat a mini frying pan (8-inch or similar) on medium heat and oil pan (with cooking spray, vegetable oil or butter). Pour in the egg and pasta mixture, and stir with a heatproof spatula until curds have formed in the egg. Use the spatula to pat the pasta down and shape the sides into a disc (will look like the fourth photo above).
    3. Run the pan under the hot broiler until the top is golden brown, remove from heat and let sit for a few minutes. Residual heat will continue to cook the inside of the frittata without turning it rubbery.
    4. If necessary, run the rubber spatula under the frittata to loosen it from the pan, and turn it out onto a cutting board. Cut and serve (additional sauce optional).
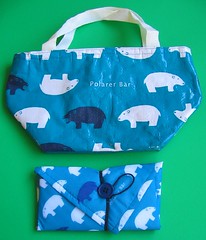
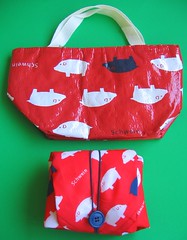
    Insulated "Polarer Bear" lunch cloth and bag Insulated "Schwein" lunch cloth and bag

    I threw both lunches into the blue "Polarer Bear" insulated lunch bag above (gotta love the Engrish -- my bear is polarer than your bear!). Both zippered bag and lunch wrapping cloth (furoshiki) are lined with insulated material to keep food cool or warm. The 41 x 41 cm lunch cloth holds up to a 600ml two-tier box, with an easy elastic & button closure. I quite like the insulated lunch cloth -- it's compact and keeps multiple boxes tightly wrapped, so I can toss the whole secure bundle into my diaper bag. Bought for US$1.50 each at a Japanese dollar store in San Francisco.

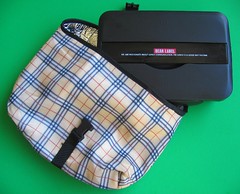
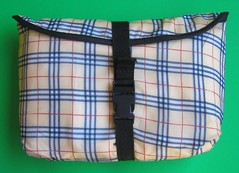
    Insulated bento bag (large) Insulated bento bag (large)

    I also picked up a larger bag made of insulated material with an adjustable buckle. Holds larger boxes up to 1000ml: either a one-tier (max. size 21 x 16 x 5 cm) or a two-tier (max. size 20 x 9 x 8 cm). These kinds of products are indicative of the trend in Japan toward insulated lunch bags and better packed lunch food safety.


    If you like what we girls do here and would like to vote for us in the Blogger's Choice Awards here. Thanks for your support!


    Are you interested in contributing to The Daily Tiffin? Drop us an email: blogmeeta@gmail.com. We look forward to hearing your ideas.

    This Post was written by Biggie, originally for Lunch in a Box.