Showing posts with label Fun Activities. Show all posts

A world outside of mozzarella & pepperoni

Sunday, June 28, 2009

Posted by Antonio Tahhan

A simple google search for kid-friendly recipes is scary. What shows up, in fact, is a harrowing slew of butter-saturated, sugar-filled recipes written with a complete disregard for health. I discovered this last week because I was looking for just that - simple recipes that I can make with kids.

My friend Beth invited me to cook in front of a class of kindergarten students. Her son is in the class and they were looking for someone to do a cooking demo for the kids' end of the year party - I was flattered that they thought of me and happily accepted.

I took this as my tiny opportunity to make a difference in the way these kids looked at food. While this was not the time to introduce them to the delicate flavors of perfectly-seared scallops or steak tartare, I wanted to cook with them something they're familiar with, but probably never had before. I decided to let them make their own pizzas. Instead of just mozzarella and pepperoni though, I brought with me a ton of different vegetables and all sorts of sauces for them to experiment with. Well-aware of the fact that the kids will have a short attention span that rivals mine, I also brought with me my pizza paddle and pizza stone so they could take turns sliding their pizzas into the oven.
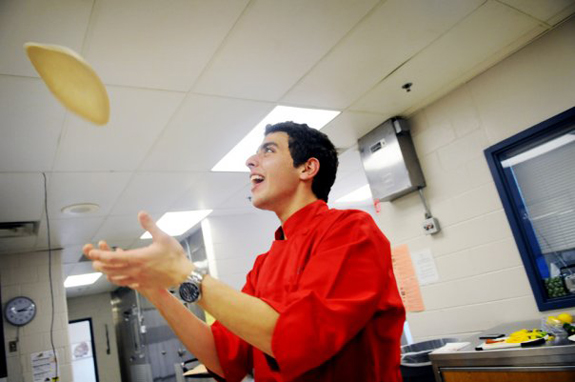


This is my first article for The Daily Tiffin, and it couldn't have come at a better time. Inspired by my pizza event last week and the smoldering heat of the summer, I decided to make a lemon-infused, goat ricotta, white pizza topped with thinly sliced zucchini. The flavors are light, refreshing, clean - perfect for the hot summer days ahead.
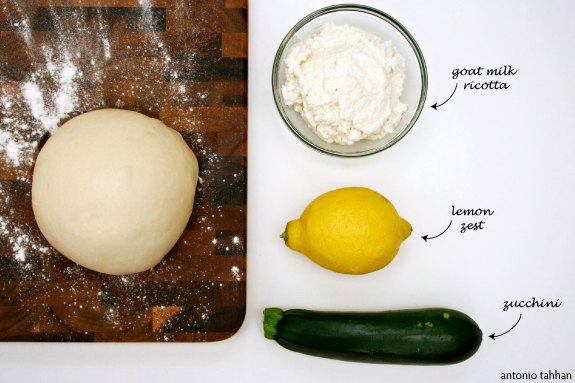


Count them - four ingredients; five if you include the extra virgin olive oil. This means no skimping on ingredients! I tried this same pizza with regular ricotta and it doesn't work. The wow factor just wasn't there. If you absolutely cannot find goat-milk ricotta, however, not to worry. Mix a semi-firm chevre (like Spanish Capricho de Cabra) with some good quality, fresh ricotta and you'll get a similar result. Like I said, it won't be spot-on, but you'll get pretty darn close.
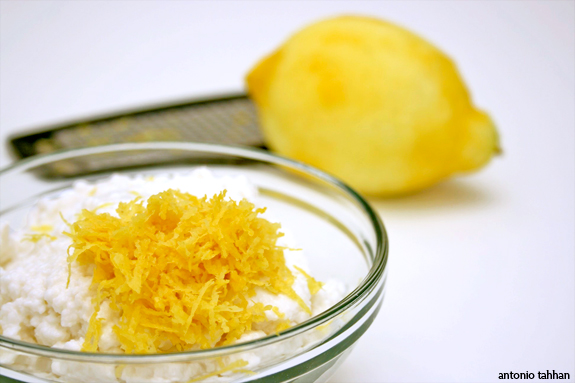


The lemon zest in the ricotta serves two purposes. Not only does it heighten the flavors of the goat cheese, but it also gives the pizza a clean, crisp flavor. If you can get organic lemons, I recommend them because their zest tends to be more flavorful than their non-organic buddies.
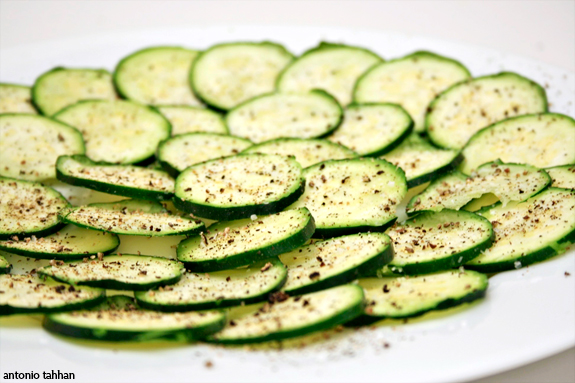


Zucchini in general has lots of moisture and moisture is the kryptonite, so to speak, of pizza. To remove some of this excess moisture you'll want to thinly slice the zucchini (preferably with a mandoline) and fan the slices out on a plate so they're not on top of each other. Then season the slices with salt and pepper and the salt will start to break down the cell walls of the zucchini, and thus allowing it to give up some of that moisture. Soak it up with a paper towel and your ready to roll.
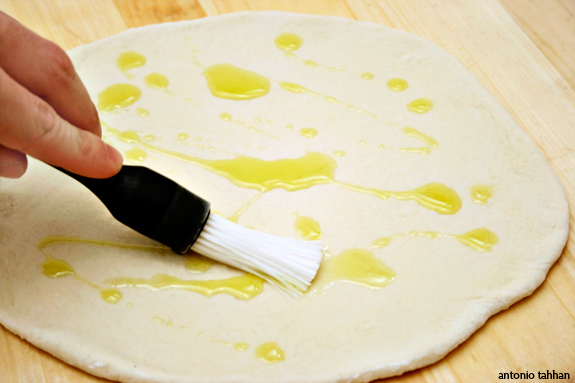


The kids were shocked when I hinted to the idea of a pizza without red sauce. Their facial expressions were absolutely priceless. And although not many ventured down this path, I feel like those that did may have a bright culinary future ahead of them.
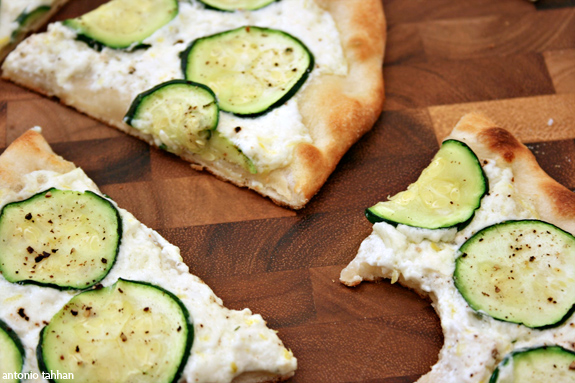


Recipe:
Ingredients:


  • 24 oz. pizza dough

  • 2-3 tbsp extra virgin olive oil

  • 1/2 lb goat milk ricotta

  • zest of 1-2 lemons

  • 1 zucchini, thinly sliced

  • salt and pepper, to taste


Putting Them all Together:

  1. Zest the lemon(s) and stir the zest into the goat ricotta

  2. Thinly slice the zucchini (preferably with a mandoline), fan out on a plate, season with salt and pepper, and cover with a paper towel to soak up some of the moisture.

  3. Stretch pizza dough to approx 1/8" thickness - this pizza is better thin than thick - and brush a thin coat of olive oil over the top.

  4. Spread the goat cheese mixture over the top and top with the thin slices of zucchini.

  5. Preferably bake on a hot (550 degrees F) pizza stone for 5-7 minutes or until the crust gets golden brown.


This is why everyone should invest in a pizza stone:
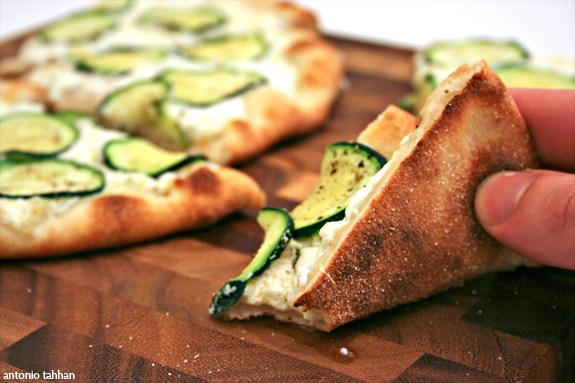


This post was written by Tony


Are you interested in contributing to The Daily Tiffin? Drop us an email: thedailytiffin@gmail.com. We look forward to hearing your ideas.

Art of Rock Painting - Kids Crafts

Thursday, May 21, 2009

Posted by Mansi

rock-painting
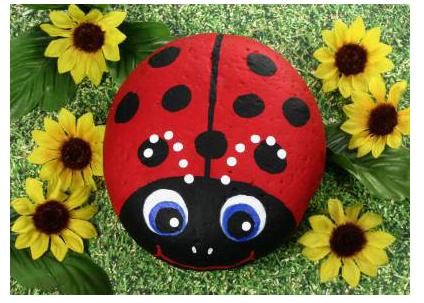
(LadyBug Image copyright & property of Patty Donathan)

As Summer vacation sets in, parents are scrambling to keep their kids entertained as much as possible. Summer camps and activity centers are obviously, the first choice, and a great way for them to get some healthy exercise. But there are a lot of activities that you can do with your kids over the weekends, or when you have some free time, and right in the luxury of your home. Rock Painting, or Rocks Arts, is one such fascinating best-out-of-waste kind of project that can be great for kids of any age group. It is fun, simple, needs very few supplies, and will be a fun, creative weekend project to interact with your kids.

What & Why of Rock Painting?
As the name suggests, Rock Painting involves collecting small stones or rocks of varying shapes and sizes, and turning them into something more meaningful, like a creature, a flower, a centerpiece, a paper-weight or anything else, by being creative with shapes and of course, colors. Moreover, the actual experience of rock hunting also encourages the child to "look" for shapes within the rocks. Does that one look like a little gold fish? Maybe it looks like a shark? How about a flat rock that looks like a "potato"? This will help enhance their natural creativity and sense of imagination, along with the ability to identify and relate objects to one another.

What Do you Need?
The simplest of any kids' activities, Rock painting needs no more than a list of 3-4 things, and most of them, you'll already have in your house, except, of course, the Rocks:)
1. Rocks of different shapes & sizes
2. Acrylic Paint & paint brushes of all sizes
3. Photo or Image you want to create on the rock
4. recycled newspaper - to prevent stains!

How to Do it?
If your child is old enough, and has a natural interest in painting, this project should be fun and easy for him, and can be done with minimal intervention, yet supervision and support from the parents. However, if your child is too young, or not so good at drawing/painting, go easy and choose simple patterns or ideas to recreate shapes and images on the Rocks. Here are some neat Rock Art Ideas that you could try, with complete information about what you need, and the How-To steps, all included:

1. San Diego Zoo's Rock Owl Paperweights
2. Martha Stewart has a ton of lovely rock craft ideas, with detailed instructions for most of them. The Ladybug, the Frogs, the Pandas and the Turtle are some of my favorites - heck, even adults would have fun doing these!
3. Creativity Portal has a bunch of ideas, weblinks and tutorials on how to get started with Rock Painting, and I'm sure you'll find it inspiring.
4. Use your Imagination, and go wild! Don't just restrict yourself to using paints, you can use tissue paper, threads, ribbons, fiber, glitter or fabric to create beautiful creatures out of stone. Check out some more rock crafts at Lakeshore Learning
5. Finally, take some inspiration from Patty Donathan, who's an established Rock Painting specialist. She has some free tutorials/PDF's on her website, including the "LadyBug" shown in the pic above.

Summer is a great time to go outdoors and play in the sun, though not too much! But there are several ways you can interact with your kids and keep them entertained, as well as inspire creativity by engaging in simple yet fun activities, like Rock painting. Hope these tips and ideas help you and your child create a masterpiece that can find a place on your mantel, something you'll be proud of for years to come!


This post was written by Mansi

Are you interested in contributing to The Daily Tiffin? Drop us an email: thedailytiffin@gmail.com. We look forward to hearing your ideas.

When a Beautiful Hike Can Go Wrong

Thursday, April 30, 2009

Posted by Indian Food Rocks

I wouldn't say we are avid hikers or adventurers but we do like to hike as a family. That usually limits us to easy to moderate hikes with moderate gains in altitude. The longest hike we have done is a 5.4 mile hike along The Loop in Rocky Mountain Park. We always take the necessary precautions:

  • we carry enough water for each person
  • we wear sunscreen
  • we carry or use insect repellent
  • we carry several layers of clothing, including one that is water resistant, as the weather can change in a heartbeat in the Rockies
  • we carry walkie-talkies just in case. Most of the time, my daughter uses these to sing to everyone else who might be on the same frequency.
  • we do not let our daughter walk alone ahead or behind us - we're usually in mountain lion territory.
  • we carry energy bars or fruit leather on short hikes. On slightly longer hikes, I carry boiled eggs - it's the only time I eat boiled egg yolk - and sandwiches.
  • the hikes we go on have well-marked trails so we don't need a map but we carry the one the Park gives us anyway.
  • we stay on the marked trail.
  • we don't pick wildflowers or mushrooms or any plants.
  • we're keyed into the weather and if we see a thunderstorm approaching - a very common afternoon phenomenon around here - we pack up and head for safety.
  • we do not hike in the dark, except at Delicate Arch in Arches National Park, where the hike back is well after sunset and partly in the dark.
  • we carry flashlights.
Is it possible then that anything could go wrong? It can and it did. On a very easy hike - you could even call it a stroll. You see, there were a couple of important things that are not covered in the list above and add to it a sense of complacency.

Like out of a dream, the kind that suddenly goes bad without any warning
We were hiking in Yosemite National Park over spring break late last month. The hike or stroll in question was around Mirror Lake, a shallow pool of water along Tenaya Creek that has fabulous reflections during spring. As the season progresses, the water dries up to reveal sandy beach-like areas along the creek. People walk off the trail and onto these beaches for a picnic.

YO-12

I was so enamored by the reflections that I started to lag behind as we walked towards the beach. Usually, we are always within earshot and sight of one another and no matter what, my daughter is never alone. Soon, my family had gone so far ahead that I couldn't see them. When I reached what looked like the access point to the sandy area, I looked out and couldn't see them. I saw other picnickers frolicking away instead. Irritated, I continued along the trail thinking that it was rather typical of my significant other to keep going. He is known for pushing us further and further on every hike. Hmmph. He might have waited for me to catch up!

As I hiked on alone, the forest started getting thicker and there was no-one ahead of me or behind me. I looked in my backpack and oops! I'd forgotten the walkie-talkie in the car. There was no way I could ping them and my cellphone was also in the car - not that it would have helped any as T-Mobile has no reception, whatsoever, in the Park. AT&T does have a signal in some parts of the Yosemite Valley. After about 20 minutes, the terrain started becoming rockier and I decided to turn back. A short while later, I met a couple who were planning to hike to the head of the creek and they promised me that they would let my family know that I had turned back, if they ran into them. The couple then advised me to stay put at the trailhead, which was 1.2 miles from the parking lot, because my family would have to go past the trailhead to get back to the car.

I returned and waited at the trailhead. And waited and waited and waited. It was nearing sunset and becoming progressively colder. After an hour of fuming, I decided to give them another half hour before going in search of a ranger. Luckily, I didn't have to because two very worried and very angry persons showed up soon thereafter.

They had not walked on ahead along the creek like I had assumed. Instead, they were trying to get back onto the trail from the sandy beach and could not be seen from the trail. When they got back onto the trail, they assumed that I was still walking towards them and so walked back. When they didn't find me along the trail, they walked back to the car. [3.4 miles total at this point] They had tried calling me on the walkie-talkie and got no answer and realized why when they saw the walkie-talkie in the car. That was my first Oops! Since it was an easy hike, I was not careful about ensuring that I had my walkie-talkie with me.

They found the second set of car keys also in the car. That was my second Oops! Always keep a second set of car keys with another person in the group so that if you split up, the other group has access to the car, especially if you traveled in one car. Of course, if both keys end up with the group that gets lost, not much can be done!

Since they now knew why they could not contact me, their irritation levels were higher than their concern levels. They walked back to the trailhead [4.6 miles total at this point] and found me. This was my third Oops! If you get separated from your group, head back to where you left the car or always have a place that you will meet at and, also agree upon the latest time that everyone should expect to reconvene in such an event. We never expected to lose each other and while it seemed practical to me to wait at the trailhead, it wasn't for several reasons. The trailhead was a short loop and returning hikers usually take the shorter route out to road that leads to the parking lot. Not that it mattered, in this case, because when I reached the trailhead, they had already gone past it on their way to the parking lot! Also, I would have been exposed to the elements at the trailhead had there been a storm. Another point to consider: discuss how long each party should wait before going in search of help.

After taking turns to vent, we walked back to the car together and when we reached the parking lot, two out of three of us had walked 5.8 miles of which 2.4 miles was completely unnecessary and could have been avoided easily.

So learn a lesson from our experience where I made several basic mistakes on a very easy hike, despite having hiked for so many years.


This post was written by Manisha

Are you interested in contributing to The Daily Tiffin? Drop us an email: thedailytiffin@gmail.com. We look forward to hearing your ideas.

Happy Thanksgiving from all of us at The Daily Tiffin

Wednesday, November 26, 2008

Posted by Mike of Mike's Table

For those of us who celebrate Thanksgiving, this hustle and bustle leading up to the holiday also signals the beginning of the winter holiday season. This can be the beginning of a very hectic time of year--tidying up the house, spending time with infrequently seen friends and family, preparing a lot of food, bargain hunting for gift purchases, planning a big vacation--whether you're hosting or just visiting, it can get pretty chaotic pretty quickly and there's a lot of little things that demand your attention. I for one have been running around like a headless chicken trying to ensure my Thanksgiving dinner comes together as I imagine it, focusing so much more time and effort than I would on any other meal. While I do enjoy the craziness, I also realized that its easy to get preoccupied with the details and lose sight of the bigger picture.

So most importantly, out of all the things you can focus on, I just thought it might be useful to remind the readers out there who can be a bit like me: remember to have a great time! All of us at The Daily Tiffin hope you have a very Happy Thanksgiving !


This post was written by Mike


Are you interested in contributing to The Daily Tiffin? Drop us an email: thedailytiffin@gmail.com. We look forward to hearing your ideas.

Its Time for Halloween & Holiday Baking!

Monday, October 20, 2008

Posted by Mansi

Fall is upon us in all its glory, and as we move on to cooler weather, its time to turn on the heat in your ovens! Halloween is around the corner, and the Holiday season is on a roll as we look forward to Diwali, Thanksgiving and Christmas. I'm not really sure why Halloween is celebrated - some believe it is a celebration of the end of the harvest season in Gaelic culture, and is sometimes regarded as the "Celtic New Year". So how did it get associated with goblins, ghosts, and witches?? The term Halloween is shortened from "All Hallows' Even" , which is now also known as All Saints' Day, a day of religious festivities in various northern European Pagan traditions.

(img source: wikimedia)

According to Wikipedia, Celts believed that on this day, the disembodied spirits of all those who had died would come back in search of living bodies to possess; this was their only hope for the afterlife, as all laws of space and time were suspended on this day. So, not wanting to be possessed, the "living" people dressed up as ghosts, trying to trick the dead into believing they were already dead! Boy, isn't that confusing!!

And where does the "Trick-or-Treat" come from?? It is thought to have originated with a ninth-century European custom called Souling. On November 2, All Souls Day, early Christians would walk from village to village begging for "soul cakes," made out of square pieces of bread with currants. The more soul cakes the beggars would receive, the more prayers they would promise to say on behalf of the dead relatives of the donors. At the time, it was believed that the dead remained in limbo for a time after death, and that prayer, even by strangers, could expedite a soul's passage to heaven.

Ok, so now that our History class is done, let's turn our attention to some Goodies, shall we! Whatever may be the origin, it is a Holiday that people celebrate with gusto, especially kids! If you are looking for some inspiration, check out Martha Stewart's Halloween Ideas. From Cake Stencils to Pumpkin Favor bags, there is tonnes of fancy stuff to explore. For the more artistic kinds, check out these eery pumpkin carving patterns and ideas, or these cute pumpkin candleholders!

And I'm sure all you baker-moms out there would be looking for ideas to make a batch of Pumpkin Pies or Halloween Cupcakes! Check out these deliciously scary Halloween Spider Cupcakes, the spookiest Skull Cupcakes, the Crawly Spider Cakes, or the largest Halloween Cupcakes roundup you've ever seen.

Don't forget to check out the Halloween Blog for costume ideas, and some wonderful Halloween ideas and tips over at HGTV

Like any other holiday, celebrate this one with gusto; but be sure to teach your kids to be responsible. Don't leave them out-of-sight for long, especially when they go to collect treats. And be as scary, spooky or ghostly as you want, but don't go overboard in giving someone a heart attack! What plans do you have for Halloween? Care to share a few with us?!

Related Posts:
Food & Drink Ideas for Halloween
Creative Decoration Ideas using Pumpkins & Wreaths
How to make an Attractive Gift Wrap at Home?


Are you interested in contributing to The Daily Tiffin? Drop us an email: thedailytiffin@gmail.com. We look forward to hearing your ideas.
This Post was written by Mansi from Fun and Food

Are you on Board the Strategy Train?

Thursday, October 09, 2008

Posted by Indian Food Rocks

With the days growing shorter and the increasing chill in the air, children will no longer have the luxury of playing outdoors as much as they used to. The onslaught of fall is often one that sends parents into despair – how will they fight the beast that morphs from TV into video games into the computer, depending on the whims of the child. Moderation, as always, is the key. For the rest of the time, go to your neighborhood store and invest in some classic board games. Not only do board games encourage everything from logical to lateral thinking, they also spell quality time spent with your children.

Chutes and Ladders is an old favorite. As are Sorry!, Scrabble and Monopoly. There is, however, an element of randomness or luck in these games. One or more poor rolls of the dice could mean the difference between winning and losing. In Scrabble and Monopoly, some of this randomness is offset by strategy. Pure strategy games encourage logical thinking and inculcate the ability to anticipate counter-moves and therefore planning ahead. Games that have a high element of strategy but also have an in-built quotient of luck are equally desirable as they bring management of uncertainty into the mix. This article will focus on pure strategy games.

Chess is the ultimate example of a pure strategy game. And just like chess is not for everyone, pure strategy games are not for every child. However, there are a few classic games that fall within this realm that are worth taking a look at.


Connect Four is a great two-player game for the young thinker. The players take turns dropping colored discs into a 7x6 grid. The objective of the game is to be the first to connect four discs of their chosen color in a line that may be horizontal, vertical or diagonal. The other objective is to foil the attempts of the opponent. The online version of this game, played against the computer or with a friend, is also hours of fun.


Blokus is a two to four player game that has shades of the popular computer game, Tetris, except that Blokus is played on a board. This game has consistently won awards since its first release in 2000. The board is a 20x20 square board with game tiles of different shapes in four different colors. Players must begin play in their corner using their color of choice and place additional pieces on the board such that the newest piece touches at least one other piece of the same color only at the corner, never along the side. The objective is multi-fold: place all 21 pieces on the board by garnering as much of the real estate as possible, thereby blocking other players from placing all of their pieces on the board. This game can get very animated and leads to hours of fun. That it is simple to understand makes it a perfect game for younger players. There are many versions of Blokus, including a 3D version, that sharpens critical thinking. And yes, this too, can be played online.


Stratego is a lesser known board game but one that is very popular in my home. It is a two-player war game that involves strategy, bluffing and memory. Each player gets 40 pieces that include army personnel of varying ranks including a spy, mines and a flag. The objective is to protect your own flag while trying to attack the opponent’s flag and taking out as many men as possible in the bargain. It's difficult to describe Stratego in a few sentences when there are entire sites devoted to rules and variations therein, and the different strategies that can be employed. One such site is Ed's Stratego Site. We found Stratego to be an excellent alternative to chess.

These three games have led to hours of play coupled with critical and logical thinking, without losing that essential element of fun. With Christmas not too far away, you may want to consider these games as gifts that will keep your children or grandchildren occupied productively and away from the idiot box. You might enjoy a round or two between yourself and a friend, too!


Are you interested in contributing to The Daily Tiffin? Drop us an email: thedailytiffin@gmail.com. We look forward to hearing your ideas.

This post was written by Manisha of Indian Food Rocks

Tasks for Kids in the Kitchen

Tuesday, September 16, 2008

Posted by Kristen - Dine & Dish


I think it is very important to get kids into the kitchen as early in their life as possible. There are so many tasks that they can handle at a young age and by allowing them the opportunity to help out, you are giving them the confidence they need to feel like a valuable contributor to the family. In addition, there are some things that my four year old daughter swears up and down she doesn't like to eat, but put her in the kitchen and have her actually help to make the dish, and it is a completely different story. She has pride in what she helped make, therefore she is excited to eat it when it is presented to her at the table.

Here are just a few things you can do to involve your children with tasks in the kitchen:

  • Washing Vegetables - Put a stool up by the sink for them to stand on, give them a veggie scrubber brush and let them go to town. They will love it so much, you will probably have the cleanest veggies around!
  • Rolling Dough - Give a kid a rolling pin and some dough and you have got a fun and productive activity way for them to get involved in mealtime!
  • Chopping Veggies - I know... this probably makes you nervous. I learned a great tip from the blog Steamy Kitchen. Give your children (age 5+) what I know as a "Crinkle Cutter" and a child size fork. Have them hold the veggie in place with the fork while with the other hand using the Crinkle Cutter to chop vegetables. Of course, your child should always be supervised when performing this task!
  • Measuring and pouring - By allowing your kids to learn about the measurements involved in cooking, you are teaching them valuable math skills. They won't even realize they are learning something when they are in the kitchen with you!
  • Stirring - This is one of the simplest tasks for the smallest of children. Don't fret if they make a small mess doing this. Just let them go and have fun!
  • Cookie Dough - My kids love to help make cookie dough into balls or to roll and cut dough into cookies.
You may have to give up the fight to keep a pristine kitchen when your kids are helping out, but the sacrifice is well worth the smiles you will receive in the end!


Are you interested in contributing to The Daily Tiffin? Drop us an email: thedailytiffin@gmail.com. We look forward to hearing your ideas.

This Post was written by Kristen Doyle from Dine & Dish


Skewer it!

Thursday, June 19, 2008

Posted by Lydia (The Perfect Pantry)


When three generations of women in one family came together for a cooking class to celebrate the birthday of 14-year-old Brianna, they let her choose the menu.

Brianna chose "Skewer It!", an entire appetizers-to-dessert menu of food on a stick.

Everything looks fancier on a skewer, and this meal was all about presentation and playing with your food. Skewered food is the ultimate party fare.

Bamboo skewers are easy to find, either in the grocery store, an Asian market, or online, and come in lengths from 6 to 14 inches. Most are round, but some are flat and wide -- great for shish kabob, shrimp, or anything that is apt to spin on a round skewer. If you're cooking food on the skewers, soak the bamboo skewers for 30 minutes or more in a bowl of water, until the moment you're ready to cook.

For Brianna's menu, we used skewers as serving utensils, so we didn't need to presoak them.


Our party featured dishes with mix-and-match dips. We didn't make shrimp, because one of the participants was allergic, but I'd definitely do some steamed or grilled shrimp (instead of the Thai chicken balls) with this menu:

Caprese skewers with roasted red pepper pesto
Teriyaki chicken chunks with spicy peanut dipping sauce
Thai chicken balls, with cilantro and sweet chili sauce
Veggie skewers with smoky black bean dip
Chipotle barbecue meatballs
Honeydew, mint and kiwi skewers with lime-yogurt dipping sauce
Mini ice cream sandwiches (rolled in cocoa powder) on skewers
Confetti kabobs

All of the skewers were a big hit with Brianna and her family, but one of the favorites was the caprese skewers, named after the mozzarella, tomato and basil salad so popular in Italy. 

CAPRESE SKEWERS WITH ROASTED RED PEPPER DIP
The pesto is a great dip for any veggie skewers; make extra to use as a pasta sauce. Makes 24 skewers.

For the pesto:
1 cup roasted red peppers (good quality store-bought OK)
1/2 cup firmly packed fresh parsley leaves
1/2 cup pine nuts, toasted
3 Tbsp olive oil
1 Tbsp tomato paste
1 Tbsp balsamic vinegar
1 tsp minced garlic
1/4 tsp kosher salt
1/8 tsp ground black pepper

Combine all ingredients in a food processor. Blend until smooth. Set aside.

24 bocconcini (small mozzarella balls), in the cheese section of your supermarket
24 cherry or grape tomatoes
24 basil leaves
24 pitted kalamata olives

On a small skewer, thread an olive, tomato, basil leaf and cheese. Dip in red pepper pesto.


Here's Brianna with the dessert skewers she made: confetti kabobs (frozen marshmallows dipped in melted chocolate, and rolled in colored sprinkles), and mini ice cream sandwiches (chunks of ice cream sandwich, rolled in cocoa powder).


Are you interested in contributing to The Daily Tiffin? Drop us an email: blogmeeta@gmail.com. We look forward to hearing your ideas.

This Post was written by Lydia from The Perfect Pantry.

Outshining Mommy

Wednesday, May 07, 2008

Posted by Dharm

Being a Dad is never easy. Kids always seem to prefer their Mom. I suppose I can understand that in some ways. After all, I’m the one that is the disciplinarian. I’m the one that does all the nasty things like pointing to the corner and telling them to go stand there. How many of you remember the old cartoon series Wait till your father gets home? Yeah, some things never change. My Lovely Wife, although playing a large role in disciplining the kids, still leaves the bulk of it to me and the phrase “Shall I tell Daddy what you did?” is often the trick in getting the children to behave.

There is one thing however where I will always outshine Mommy. There is just no comparison when it comes to this. Somehow, the Lovely Wife just cant do this well – even when she tries, the kids will just shake their heads and say Daddy is better! If your thinking it's cooking, you couldn't be more wrong!


So what is this magic that I have? Nothing more than Silly Games! The kids know they are nothing but silly games -but they love them! The Lovely Wife can't figure out what makes the kids laugh so much and have a whale of a time. She thinks the games are - well, Silly!

Here are five silly games that I play with my kids that they thoroughly enjoy.

The Boat Story
Lie on the bed with the knees raised and together with the soles of your feet on the bed. Place your child on your stomach and let them lie back on your upraised knees. Grasp their hands in your’s and tell this story.

(I pause at the parts in Italics and get the kids to say it themselves – It lends to more participation and of course more fun!)

Once upon a time, there was a girl called Sarah. One day she decided to go to the harbour. She got into a Boat

(this is where you would wiggle a little to simulate the movement of getting into the boat)

The girl started to row the boat out into the sea. (now you move her hands forward and back in a rowing motion). It was a lovely day with the sun shining brightly and the wind blowing in her hair.

Suddenly… it began to rain! The waves became larger. (your rowing action would become a little crazy now and you’d start swaying and bucking your body to toss your child around a bit) The sea swelled and the waves crashed into the boat. The girl was thrown overboard! (you’d jerk your body and tip your child off of you and onto the bed.)

They will be in fits of laughter at this stage and asking you to do it again! The Boat is sometimes varied to an Aeroplane or a Train - anything really.

Sleepy Daddy
Call your child over and ask for a hug. As you are hugging them, rest your chin on their head or shoulders and then pretend to fall asleep. Start snoring while hugging them really tightly. Your child will start squirming and asking you to let them go. Pretend that you are fast asleep. They will start calling out your name, trying to wake you. Let them call out your name for a while and then suddenly ‘wake-up’ and look around you as if startled. “What, what?” you cry out. “What’s worng? Why are you shouting? I fell asleep….”

You’d be amazed how something as silly as this makes them laugh so hard.


Time Machine.
This game is probably the most fun of all as the whole family can play together! Lie in bed pulling the covers over your and pretend you are in a time machine. Flick imaginary switches as you go through an imaginary checklist.

Engine Oil – All okay
Food supplies – yes, okay
Temperature – good
Oxygen supply – check

Finish off with “set the time for the time machine” My son used to love going “back in time” to the Jurassic or Triassic period. After the “Time” has been set, make a hissing sound and lot of bumps and groans. Then make another hissing sound as you lift the covers off and pretend you are in another time period. Let your imagination run wild and try to ‘see’ things that you would in that time period. If Mommy isn’t playing and she happens to come into the room, make her the ‘dangerous dinosaur’ and quickly get back under the covers and set the time machine to present time – returning home to find Mommy!

Stop Running
This is a great game to play when out shopping. First, as you walk along holding your childs hand, tell them in a rather stern voice (but friendly manner, so they know you are playing) “Don’t run around okay? I don’t want you running in the shopping centre”. Walk along slowly and then speed up a little so you are a few steps in front of your child. Pull your hand forward quickly so they are forced to run forward to keep up with the momentum. Then you ‘scold’ them – “I thought I told you not to run!” Keep doing this until your arms gets tired – which it is bound to do! My kids absolutely love this game! A variation to this game is to walk really fast while holding their hands so they are forced to run - or at least jog at a fast trot - to keep up. Then you ‘scold’ them again for running! This is where they break out in a huge grin and say “Daddy, you are the one making me run!”


Kids Rides
Pretend you are a kid ride – you know, the coin operated kind you find in shopping centres. Place your child on your knee and as them what ‘machine’ you are supposed to be. Then ask them to put a coin into the machine (all make believe of course) Once the ‘coin is deposited’ start a rolling, rocking motion with your legs, while holding the back of their shirts of pants – so that they don’t fall off!

All really quite silly games aren't they. I have fun though and so do the kids - and I guess that's what is important. I hope that when the kids are all grown up, they will remember these silly games that we played and how much fun they used to have with Daddy.

I’m sure all of you have your own ‘silly games’ to entertain your kids. What are some of yours?


Are you interested in contributing to The Daily Tiffin? Drop us an email: blogmeeta@gmail.com. We look forward to hearing your ideas.

This Post was written by Dharm from Dad ~ Baker & Chef


How to make deviled eggs

Thursday, March 13, 2008

Posted by Lydia (The Perfect Pantry)


‘Tis the season for eggs, whether painted, dyed, tea-stained, or hidden on the lawn. While you’re having fun decorating your eggs, don’t forget to make some to eat, too.

Kids love deviled eggs, and by learning to make them, they learn how to hard cook an egg, peel it, create a filling with their own choice of embellishments, and use a pastry bag to make their egg beautiful.


How to hard boil (or hard cook) an egg

• Start with very fresh eggs, preferably from a farm stand.
• Place eggs in a heavy, flat-bottom pan, and cover with one inch of cold water.
• Place pan over high heat, and bring to a boil.
• Just when the water comes to a rolling boil, remove pan from heat, cover, and let sit for 15 minutes.
• Your eggs are ready!

To peel an egg: Drain the water from the pot, and gently agitate the eggs in the pot to crack the shells all over. Then, under running cold water, peel each egg, dry on a clean dish towel, and set aside or refrigerate until ready to use.


Deviled eggs


First, a basic version:

6 hard boiled eggs, peeled, cut in half lengthwise, yolks mashed in a bowl
2 Tbsp mayonnaise
2 tsp yellow mustard
2 tsp Worcestershire sauce
3/4 tsp Old Bay seasoning
1 tsp distilled white or cider vinegar
1/4 tsp black pepper
Salt to taste (you won’t need much, if any)
Paprika or the thin tops of chives, for garnish

In a small bowl, combine the mashed yolks with the mayo and mustard. Stir in the Worcestershire, Old Bay, vinegar and pepper. Add salt if you need it.

Slice a tiny bit off the outside of the white egg halves, so they'll sit flat on the platter. Fill the whites evenly with the mixture (with a pastry bag, which makes them look pretty, or with a spoon), and sprinkle a tiny bit of paprika on each for garnish. If you wish, stick a small piece of chive or two on the top!

Now, for variations:

1. Mix in some avocado with the egg yolks and mayo.
2. Mix in some sour cream with the yolks.
3. Mix in some chopped tomato, or parsley, or dill.
4. Mix in some dried herbs.
5. Mix in some dry onion soup mix.

In other words, have fun!


Are you interested in contributing to The Daily Tiffin? Drop us an email: blogmeeta@gmail.com. We look forward to hearing your ideas.

This Post was written by Lydia from The Perfect Pantry

It's a Wrap

Wednesday, December 12, 2007

Posted by Meeta K. Wolff


This holiday season, rather than wrapping all your gifts the same way, let the gift wrap hold some clues about the contents- see if your recipient can guess the gift just by looking at the way you have wrapped it. Chances are pretty good that you already have things around your home that would be useful for jazzing up your gifts.

Here are five ways to give your gifts a unique look:

  1. Skip the store-bought gift wrap...and come up with your own. Sunday comics, old maps, calendar pages and foreign language newspapers all make interesting substitutes for wrapping paper. You can get kids to make their own signature wrapping paper by decorating plain brown or white paper. One of my favorite craft activities as a kid was to dip cut vegetables into paint and stamp paper with them- cut okra, carved potato halves and halved onions look just beautiful. Leaves and buttons are also great for stamping.

  2. Skip the paper altogether and use fabric for wrapping. Fabric is especially great for wrapping gifts that are awkwardly shaped. Some ideas for pretty fabric wraps: scarves (could be made of a variety of fabrics), Indian dupattas, shawls, tea towels (for food gifts and kitchen-related gifts), bandanas. Scour thrift shops for old linens that will the gift an antique look. Furoshiki is the Japanese art of fabric gift wrap with many beautiful ways of neatly wrapping gifts in fabric.

  3. Skip the bows and try some unusual package toppers. Found objects from nature look gorgeous as gift toppers- some examples include pine cones, dried leaves and flowers, perhaps a sprig of mistletoe? Shells and pebbles could be glued on too. A cute brooch or pair of earrings might be much appreciated as well. For a food related gift, spices like cinnamon sticks, bay leaves and star anise would be very suitable. Jingle bells or small ornaments would also be gorgeous toppers for the perfect look.

  4. Skip the conventional ribbon and look around the home for something different to use instead. Bright shoelaces are a great way to tie a gift for a child or a teen, or if it is a sports-related gift. One could use beaded necklaces too. Yarn or lace might be cute for a gift for a crafter. For a festive look, use colorful tinsel.

  5. Give a gift inside a gift. Use a nice tote bag or drawstring bags to package the gifts. All of us should be using reusable shopping bags anyway, so an extra tote bag is always welcome. Or you might give a gift card packaged inside a wallet. Flower pots or watering cans can be filled with gardening supplies. Homemade food gifts can be filled into a cute baking dish. A child's toy could be wrapped in a folded T-shirt. The possibilities are endless!

One tip that I have found very useful is to have a location in the home as a central spot for all things related to wrapping gifts. It could be a shelf or a drawer; I simply use a cardboard shoe box tucked into a closet. Throughout the year, any bits and bobs (trinkets/beads/ribbons), old cards, paper with interesting textures, gift bags that I receive- all of these things find their way into this box, ready to be recycled into fresh clothing for the next gift. Yes, I freely recycle wine bags and gift bags. There are those who believe that recycling gift bags is tacky. To me, being spoilt and wasteful and tossing perfectly good gift bags and boxes into the trash is waaaay tackier. A small pair of scissors and sticky tape also have a home in this little shoe box. It makes wrapping gifts a fun and interesting activity when you don't have to overturn the whole house to look for double-sided tape.

Happy Holidays!


Are you interested in contributing to The Daily Tiffin? Drop us an email: blogmeeta@gmail.com. We look forward to hearing your ideas.

This post was contributed by Nupur from One Hot Stove


Christmas Baking - A Family Affair

Thursday, December 06, 2007

Posted by Meeta K. Wolff

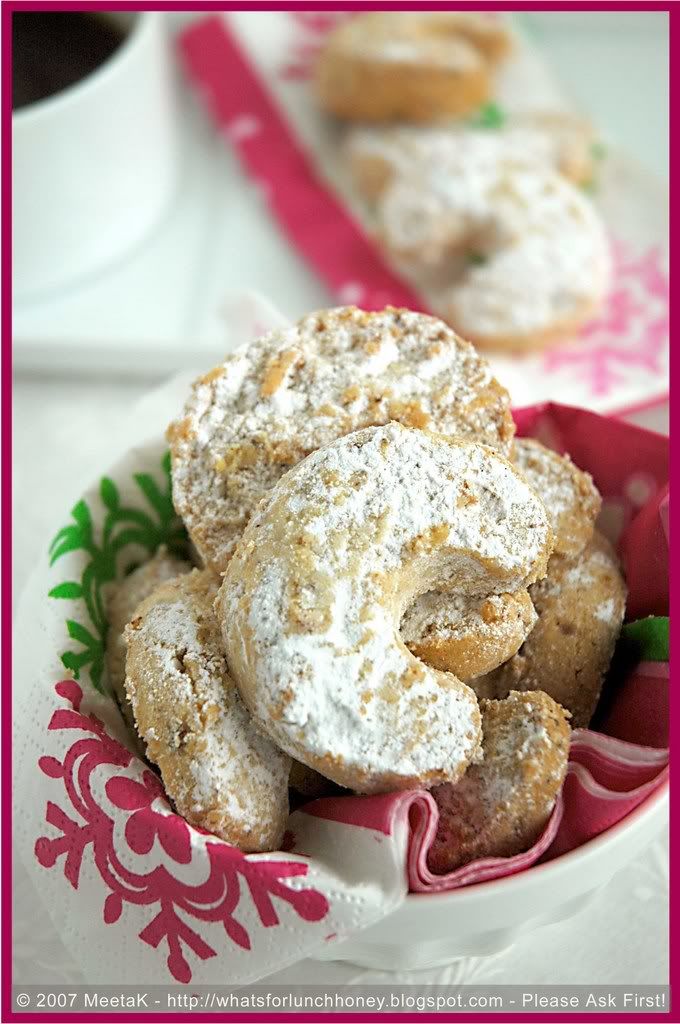
Vanilla Kipferl (01) by MeetaK


Covered in flour, sticky dough on the fingers and the good old fight over who gets to lick the chocolate covered spoon - it certainly can get chaotic in the home Christmas bakery. However, with a little bit of planning, baking cookies with the family can turn out into an unforgettable experience.

The best thing to do is discuss the types of cookies you would like to bake with the family a few days in advance. Everyone has a different favorite, so consider everyone's liking and disliking, otherwise you will have a few long faces around the kitchen table.


Weighing, whisking and mixing are exciting things for the children and they want to be a part of it right from the beginning. They want to see how the dough is made and formed and often cannot wait to get their hands into the dough.

Make room on the countertops of the kitchen. Move any machines, like the coffee machine, that are not going to be required while baking the cookies. Wipe the countertops clean and organize enough aprons for all the little ones.

Each task can be alloted according to the ages of your kids. So, make a list of the "to dos" and distribute the tasks accordingly. For example, allow the older kids to melt chocolate in a saucepan or weigh the ingredients, the younger ones can be responsible for mixing or whisking the dough. Everyone however can form or cut out their cookies. So, it is important to have enough cookie cutters and forms to go around.

As soon as you are ready to go - make sure you are always there to keep an eye on the kids and lend a helping hand whenever required. Take time to answer questions and explain the processes in detail. Show your little baker-boys and girls the tricks and tips that makes a professional baker. You will notice they will be in awe and will eagerly apply the learned lessons.

Being the grown up it is important to set an example for the children around you. Hot cookie trays or forms should be taken out of the oven using oven gloves and keep the little ones away from sharp knives, hot saucepans and other dangerous kitchen utensils (read more about Kitchen Safety with the kids).

Nibbling during baking is explicitly allowed. That's the fun part of any baking session. Just be careful about raw dough, as these often have raw eggs incorporated into them it would be advisable if the kids do not eat this.

Decorating is a process that everyone can join in. Make it fun and maybe even a small competition in teams will add to the motivation. Besides the regular sugar and chocolate frosting, you can find many decorating items in the stores. Colored frosting or sugar pearls, hearts or colorful sprinkles are great and make the cookies look very eye-catching.

I personally often find making a simple type of dough, like a shortcrust pastry dough, in larger quantities is the best way to go. It is a simple dough, even for the children to make. Once rolled out the children can cut out several forms and shapes. An additional advantage is that cookies from this dough often do not require long baking times.

Maybe you'd like to organize a cookie baking session and then donate them to charity for a good cause. Drop In & Decorate is an awesome way to share sweet moments with your children and then together sweeten someone else's day by bringing them some of those fresh cookies.

I wish you happy cookie baking!

Need a few good cookie recipes?
Marshmellow Chocolate Mud Cookies - Fun and Food
Mom's Shortbread Cookies - What Smells So Good
Nankatai - Indian Food Rocks
Hello Dolly Cookies - Food Blogga
Gluten Free Gingerbread - Saffron Trail
Gingerbread Man Cookies - Simply Recipes
Linzer Cupcakes - Culinary Concoctions by Peabody
Raspberry Bars - Homesick Texan
Vanilla Kipferl - What's For Lunch, Honey?


Are you interested in contributing to The Daily Tiffin? Drop us an email: blogmeeta@gmail.com. We look forward to hearing your ideas.

This Post was written by Meeta from What's For Lunch, Honey?

Thanksgiving Fun with Kids

Monday, November 19, 2007

Posted by Meeta K. Wolff


There are times when we as adults forget one thing in the midst of planning parties or traditional feasts like Thanksgiving and Christmas - the kids. They are certainly not interested in how long the turkey takes to roast or if the tablecloth matches the napkins or if Uncle Harry can or cannot be placed next to Aunt Greta. I am also pretty sure that on Thanksgiving, it's not only the kids that DO NOT want to watch 6 hours of football!

So, how to integrate the children into such family holidays and feasts.


I decided to take a look into my own planning. We celebrate Thanksgiving because it's something I did growing up. My parents believed it was a fantastic way to be thankful for so much - friends, family, food, health. So, ever since I can remember we have been celebrating Thanksgiving.

Although in Germany it's not an official holiday, I am carrying on this tradition for my own son. I invite some of our closest German friends and their families and we spend a wonderful day together. It's something that over the years is so looked forward to by all of my friends. Each one of them brings a little something for our dinner table. Now many of them (me included) have children and we are always looking for ways to integrate them.

It's something I am sure many of you think about and so I thought I would simply share a few things we do.

When I am busy cooking Tom and Soeren always help out. There's plenty to do and one of the things we love is playing a game we call "Peels". The idea is to peel the longest apple, potato or carrot peel, without breaking it. All of us, armed with peelers, get ready to produce the longest peel. The winner then gets to proudly display it at the dinner table for all the guests to admire.

If weather allows it, we all go outside and play a few games. Kids love it when adults simply join in and become "one of them". Here are two games we really love and are sure to have everyone playing in fits of laughter.

Deer & Hunter
Several players of all ages stand in a circle holding hands. The first person, who is the deer, runs around through the circle, ducking under the hands of various players and finally taps a player - the hunter. The hunter then separates from the circle and follows the deer. He has to imitate the exact moves the deer makes.

If the hunter catches the deer, the deer goes into the middle of the circle. But if the hunter doesn't follow the deer's movements exactly, or doesn't catch the deer before it has gone around the circle once, he has to stand in the center of the circle. The game continues until there are too many people standing in the center to be encircled by the remaining players.

Turkey Trot
I love this game. Pair up the players and get them to link their elbows. Each team is handed a turkey mascot. We normally stuff a brown bag with crumpled newspaper and draw on a face with colored markers (making this mascot can be treated as a separate kids activity). The Turkey mascot has to be held between the two players' heads.

On cue, the pairs try to make their way to the finish line at the far end of the playing field. The first team to get there without dropping their bird or unlinking their arms wins.

Of course the weather outside is not always perfect and so we have a few indoor games we love to play too.

One of my favorites is "Stories". It can get so crazy and funny but at the same time provokes the imagination to great extends. Soeren has become such a funny and great story teller that almost everyone picks him.

Here's how it goes:

Someone starts a story and, after a couple of sentences, points to someone else to continue the story. It's more fun if you go fast. The crazier the story, the better and the more laughs we all have.

So whatever you choose to do over Thanksgiving try and integrate a few fun games to keep not only our little ones smiling, but I promise you the grownups will have a great laugh too. As for those grownup "kids" who prefer to watch 6 hours of football instead joining the fun - well sometimes kids will be kids ;-)

I hope you all have a great week and a Happy Thanksgiving!


Are you interested in contributing to The Daily Tiffin? Drop us an email: blogmeeta@gmail.com. We look forward to hearing your ideas.
This Post was written by Meeta from What's For Lunch, Honey?

Drop In & Decorate

Wednesday, November 14, 2007

Posted by Meeta K. Wolff


For those of you getting into the baking season, we at the Daily Tiffin would like to bring to your attention a wonderful cause started by the lovely Lydia over at The Perfect Pantry.

It all started a few years ago when Lydia and a few of her friends got together to bake cookies.

Well it seemed like they had baked a few too many and decided to call their local shelter and asked what they thought about receiving a package of wonderfully baked and decorated cookies. You can guess, they were extremely pleased. These cookies had brightened up many peoples day. Ever since then it has become somewhat of a tradition. Each year Lydia and friends get together and have a cookie baking and decorating party. Each cookie is carefully wrapped and then donated to a shelter. Imagine the smiles all around!

Lydia calls it Drop In & Decorate. It's simply a wonderful idea. Call up a few friends, bake a few cookies and then donate them to your nearest shelter. Then watch how this small gesture puts a sunny smile on someones face.

Lydia has also put together a helpful guide, which will show you how to host your own Drop In & Decorate party. This year she's even got King Arthur flour to sell a perfect Drop In & Decorate party kit.

So, if you are already in cookie baking fever why not have a party and help others. Drop on over to Lydia's blog and check out how you can host your own Drop In & Decorate party.


Are you interested in contributing to The Daily Tiffin? Drop us an email: blogmeeta@gmail.com. We look forward to hearing your ideas.


spooky time

Thursday, October 18, 2007

Posted by Abby


It’s coming up to the spooky time of year – Halloween! Traditionally this isn’t a big festive celebration in the UK but it’s one of my favourites so I thought I’d share some ideas for Halloween food and drink in case you’re thinking of celebrating. Most of these ideas are focused on kids but I’m sure the big kid in all of us will be happy enough too!

Skeleton fingers - use sliced white bread and take the crusts off. Lightly butter it and then spread it with crushed crisps (any flavour will do but you could go for something like beef so they taste meaty). Roll the bread up and secure with a cocktail stick. Eat quickly as they won’t stay crunchy for long.

Witches fingers
– you can make sweet or savoury versions of this. The sweet version uses finger-shaped piped biscuits which, when they are cooked, are dipped in jam at one end. dab the top of the biscuit at the other end with more jam and press on a flaked almond so the jam oozes out and looks like blood. For savoury, cook some sausages. Tear the end of each and dip this in a little ketchup so it looks like the blood from a chopped off finger. At the other end, press in a flaked almond so it looks like a fingernail. Alternatively you can use asparagus spears.

Eyeballs – use a packet of white marshmallows. Using food colouring, paint the top with green/blue circles. Let this dry then use black food colouring to paint in the iris. You could add thin red lines around the edge to look like blood vessels.

Spooky cookies
- get some Halloween shaped biscuit cutters and bake up a batch of various shapes – witches, cats, tombstones, spiders. Pumpkins etc. using the writing icing that you get decorate one of each then invite younger guests to make their own. however, if you do the tombstones, i think it’s decorate these yourselves - ice then in white then use black icing to pipe on the rip and the name of each guest. You can present these as people arrive!

Bats wings - marinade and roast some chicken wings and serve them on a platter labelled appropriately!

Witches fingernails – label up a bowl and fill it with the roasted seeds from your pumpkin - scoop out the seeds, wash them well and then roast them with salt, oil, chilli and garlic.

Not So Lucky Dip
- finally, and you’ll not want to eat this creation, fill a bowl with chopped up jelly. Add some cold cooked spaghetti (intestines), lychees or grapes (eyeballs) and mini sausages (fingers) and some plastic spiders which can be exchanged for prizes. Cover with two folded cloths, leaving a gap in the middle where people can insert their hands then and invite your guests to see what they can find…

What other ideas are out there?


Are you interested in contributing to The Daily Tiffin? Drop us an email: blogmeeta@gmail.com. We look forward to hearing your ideas.


This post was written by Abby from eat the right stuff

Boost your Brainpower

Thursday, October 04, 2007

Posted by Abby

I’ve just returned to London after 2 weeks holiday in Italy and despite having only been back at work for 4 days I’m already struggling. My concentration is minimal and my ability to focus on the task at hand seems to have gone AWOL.

Urgent action is needed and I’ve been researching ways to boost my brainpower. I thought I’d share my top 5 with you in case the increasingly wintry days are getting to you too. These tips are also good for kids who’re struggling now the excitement of the new school term has worn off.


1. Eat breakfast
Studies consistently show that having breakfast helps boost our concentration, mental arithmetic and logic skills as well as stabilising our moods. In contrast, an empty tummy can make us feel grumpy and tired.

2. Boost your intake of omega 3 and 6
These fats have a protective and curative role in brain health. Omega 3 fats are found in oily fish and vegetable oils, particularly those made from rapeseed, flax and walnuts. Omega 6 fats are found in most vegetable oils. So, how about a slice of toasted seedy bread topped with peanut butter for breakfast? A big salad with goat’s cheese and toasted walnuts for lunch? Kedgeree for supper?

3. Keep hydrated
Dehydration affects our ability to concentrate. Waiting until you are thirsty means you are already dehydrated so sip water regularly throughout the day.

4. Boost your fruit and vegetable intake
Recently, the media has been full of contradictory stories about whether or not the use of vitamin supplements can boost children’s academic achievements. Avoid the controversy by taking the natural route and make sure you are eating a wide range of fruit and vegetables.

Good brain boosters include:
- blueberries - their rich antioxidant content has been shown to improve coordination, concentration and short-term memory in elderly rats (not that I’m jumping to conclusions about Daily Tiffin readers but I think it’s as good an excuse as any to eat this fabulous fruit!)
- broccoli – this is one of five fruit and vegetables that have been found to contain substances that act in the same way as drugs used to treat degenerative diseases such as Alzheimer’s. Potatoes, oranges, apples and radishes are the other four in case you’re interested.
- iron rich food such as eggs, green leafy vegetables and red meat – these will ensure that you don’t experience the drop in energy and concentration associated with low iron levels

5. Get moving
Studies of school children show that those who exercise regularly perform better in exams and tests of mental agility. And if, like me, you’re looking for the low-energy option here, pick up some balls! German scientists found that juggling balls for 60 seconds a day can boost brainpower significantly.


Are you interested in contributing to The Daily Tiffin? Drop us an email: blogmeeta@gmail.com. We look forward to hearing your ideas.


This post was written by Abby from eat the right stuff.


Little Shutterbugs

Friday, September 28, 2007

Posted by Meeta K. Wolff

butterfly3


Photography is a prominent and widely recognized art form, and increasingly, a popular hobby among children of school-going age. With digital cameras and computers becoming commonplace in many households, photography is now accessible to all members of the family, including the little ones.

Photography is a unique way to cultivate an aesthetic sense in kids. Armed with a lens and with the purpose of taking a good shot, children learn to look more carefully at the world around them, become more observant. They learn to recognize beauty everywhere they look. They forget to be "bored" all the time, and instead to enjoy observing their surroundings. The resulting photographs can provide a glimpse into the unique perspective of a child. Like any good hobby, photography can help kids develop their strengths and overcome their weaknesses. A shy child may be able to express herself through pictures. A hyperactive one may learn to calm down and focus on the task on hand. Photography is a great way to develop a young mind's interest in science and nature. When outdoors on hikes or picnics, it provides a way to reinforce the wise saying, "Take only pictures, leave only footprints". A child who learns to capture memories and appreciate beauty is much less likely to vandalize and sully nature.

Recently, photography has been used as a tool to empower children who live in marginalized communities or who face crisis situations, to give them a voice and a means to express themselves and to boost their self-esteem. I highly recommend watching the Oscar award winning documentary Born into Brothels. This is a heartbreakingly beautiful chronicle of a project where photographer Zana Briski went into the red light district of Calcutta, India and armed children with cameras. The perspective of these little photographers provides an unforgettable glimpse into an otherwise bleak and oft-forgotten world. Another example is a UNICEF project allowing tsunami-affected children in Thailand to express themselves through photography.

butterfly1


For parents interested in getting their child involved in photography, there are several ways to go about doing it. There are photography resources available on the internet, as well as book devoted to photography for young ones. While photography equipment can be astronomically expensive, it is important to start with relatively inexpensive equipment so that the child can be allowed to "play" with the camera without a major crisis developing if the camera is accidentally broken or dropped. Digital cameras are ideal because one can shoot hundreds of pictures without having to spend the money on film, printing only the ones that are desired. Perhaps the whole family (aunts, uncles, grandparents) could get together and gift the child a camera as one "big" birthday or holiday present. Perhaps the parents could purchase a basic no-frills digital camera at a low price, or even find a used (second-hand) camera that may be perfect as a starting point. Don't forget to remind the child of the responsibility that goes along with taking pictures: that they need to ask their subjects politely before they take pictures, and respect their subjects' privacy.

Here are some ideas for Photography Projects for Kids:
  1. For very young photographers, one could play games where the child takes pictures based on a theme: it could be a color (parent and child walking around the neighborhood taking pictures of everything
    that is "red", say), or a letter theme (taking pictures of things in the kitchen that start with the letter "L", say), or a pattern theme (find "stripes" in the garden and take pictures of them).
  2. Host a mystery photo contest: have the child take pictures of common household objects in strange angles and close-ups and then see if the rest of the family members can identify what they are.
  3. Let the child take pictures, then convert the best picture into customized gifts for family and friends- such as a jigsaw puzzle for a friend or a sibling, or a photo calendar for a
    grandparent, or a T-shirt for a special aunt.
  4. Older kids can be nominated as the "official photographer"for events such as a family reunion or their sibling's birthday party, and asked to document the event as completely as they can.
  5. With the help of parents, kids can make a travel guide to their city- a scrapbook with captioned pictures of all the touristy places, attractions, parks and restaurants they love best.


I'll be back next month with an article on Clutter-Free Gifts.
See you then!


Are you interested in contributing to The Daily Tiffin? Drop us an email: blogmeeta@gmail.com. We look forward to hearing your ideas.

This post was contributed by Nupur from One Hot Stove

How Does Your Garden Grow?

Wednesday, August 29, 2007

Posted by Meeta K. Wolff

flower2

Today, parents and teachers face endless challenges in raising their youngsters: the threat of childhood obesity, the relentless onslaught of marketing to kids resulting in a sharp preference for junk food, a global environment that seems to be getting more and more toxic and unpredictable, and so on. One simple idea that can be a positive step towards addressing many of these issues is: School Gardens.

Keeping in mind the space and resources available, a garden can be set up in the schoolyard in the soil (if it is rich and nutritious enough) or in raised garden boxes, or even in small recycled containers. Plants (herbs, fruits, vegetables, flowers) that are appropriate to the region can be grown. Children can start digging and sowing and watching as their garden takes shape. Parents, teachers and gardening experts can lend a helping hand and enjoy the garden alongside the kids.

Imagination runs wild when it comes to school gardens! Themed gardens are very popular: some of the ideas I came across were a butterfly garden, planted with nectar plants; an herb garden with a selection of aromatic herbs used in different cuisines; a rainbow garden planted with flowers of the appropriate colors planted in rows or arcs; and my favorite idea of all- a pizza garden planted with all the delicious vegetables that go into pizza- tomatoes, garlic, basil, and perhaps some toppings like zucchini and eggplant!

School gardens have benefits that touch upon every aspect of the child's development. When a whole class comes together to create a garden, it arouses a sense of community and an understanding of teamwork. The physical activity involved in taking care of the garden provides some welcome exercise and outdoor time spent away from the TV and computer screen. Most parents complain of children who refuse to touch vegetables and fruits- but the school
garden experience shows that children are eager to taste the produce that is grown with their own hands, which could be the beginning of a lifetime of healthy eating habits. Eating a tomato fresh off the vine may well the first taste of "real food" for a lot of kids who live on a steady diet of processed food. From an academic standpoint, a school garden provides a unique hands-on learning experience in every school subject that one can think of: ecology (eg. learning
about the interplay of plants, pollinators and pests), geography (eg. learning about climate, weather, and soils), botany (eg. studying the birth of a whole plant from a seed), history (eg. learning about how the origins of plants and how they "traveled" across the world), writing skills (eg. keeping a gardening journal). Perhaps the most important benefit of school gardens would be to make the child a better citizen of the world by cultivating earth-friendly attitudes: by completing the gardening cycle with a compost heap, or by setting up rain barrels and learning about water conservation. Indeed, the Edible Schoolyard in Berkeley, California, started by Chef Alice Waters, has pioneered the integration of organic gardening into every aspect of the school curriculum. School gardens are a blessing everywhere,
but they can truly transform schools in communities that are troubled by crime. Here, school gardens can provide a safe and pleasing haven to children, teach them valuable life skills, and give them a green space of their own. Studies by the National Gardening Association depict the heart-warming results of having school gardens- read their evaluation here.

For parents and teachers who want to take the lead in setting up school gardens in their own schools, there are many resources that you could turn to. The Edible Schoolyard hosts a wonderful resource page that could be a good starting point. Of course, search engines will provide many other pages of useful information on the internet. One could also use local know-how by contacting the garden clubs,
botanical gardens and nurseries in the area. Libraries can be counted upon for books related to gardening and local flora.

Of course, if the idea of starting something on a school-wide scale in not possible, one can always start gardening with kids in the home. It could begin with a simple project such as planting flowers in window boxes outside the child's room in spring, or planting a kitchen garden in summer. On a big scale or as a small venture, gardening with kids is a fruitful activity that is sure to blossom into good times and happy memories!

flower1


A big THANK YOU to Meeta for inviting me to join the team at the Daily Tiffin. I'll be back next month with an article on Kids with Cameras. See you then!


Are you interested in contributing to The Daily Tiffin? Drop us an email: blogmeeta@gmail.com. We look forward to hearing your ideas.

This post was contributed by Nupur from One Hot Stove

Healthy eating: the big outdoors

Thursday, August 09, 2007

Posted by Abby


Here in London the weather seems to have finally got back on track. The rain has stopped, the sun is out and temperatures are rising. Finally, it’s starting to feel like summer.

It’s at times like this when I wish that I had a garden. Warm afternoons, balmy evenings, outdoor dining and the freckles to go with it! Still, it’s not all doom and gloom as London is full of fabulous parks just begging you to visit and have a picnic. More excitingly (for some) there are also lots of fabulous beaches only a short train journey away.

Choosing what to eat is when it starts to get tricky. Most supermarkets are well tuned to the laziness that lurks within us all and offer a wide variety of picnic friendly foods. As well as the ubiquitous (aka boring) sandwiches there are tubs of tzatziki and taramasalata, nestled alongside pasta, bean, lentil and rice salads. Bags of vegetable crudités and the seemingly-endless variety of cheeses and cold meats complement the quiches and pies. So many choices, and all ours in exchange for a few folding green notes.

And it all sounds quite healthy too so what’s the problem?


Well, appearances can be deceiving and most of those tubs of delight are packed with salt, fat and a variety of additives and preservatives. If you can avoid them, it’s worth making the effort to do so. The good thing is that a homemade picnic is easy to put together, and much cheaper than buying everything ready-prepared.

There are a lot of great ideas already on the Daily Tiffin as many of the packed lunches that are featured contain things that can easily be adapted.

And if you need a few more ideas, my perfect picnic hamper would contain:

* Homemade hummus with (home-chopped) crudités - I like dipping cherry tomatoes; celery sticks; carrot batons; red, yellow and green pepper pieces; cauliflower pieces and cucumber circles. Actually I lied, I hate cucumber with a passion but many others don’t so why not some in the picnic hamper to divert people from the good stuff!

* A vegetable tart – there are some ideas here, here and here. Leave large tarts in the tin to make transporting it easy. If you make your tart with puff pastry you might have some pastry leftover. This is easily turned into cheese and mustard sticks – roll out the leftover pastry, spread the top with wholegrain mustard and grated cheese (a hard cheese with lots of flavour, like parmesan, is best), fold the pastry in half, roll it out again and then cut into strips. Twist these and bake on a tray until golden and crispy. Sprinkle them with sesame seeds for extra nutritional goodness.

* If you have meat-eaters in your party, some marinated and roasted chicken drumsticks will go down well. Don’t bother buying the ready-marinated chicken with its lurid colours that scream warnings of the artificial colourings and flavourings that they contain, instead try a simple mix of garlic, lemon zest and olive oil. Or sundried tomato paste thinned with a little olive oil. Or honey and mustard, again with a bit of oil. Leave the meat to marinade overnight if you can for extra flavour.

* Cupcakes or muffins are good for a treat - I find individually-sized cakes much easier to handle on a picnic. Also take along a selection of beautiful fresh fruit as a more healthy option.

* Cold drinks are always in demand. A bottle of cordial (or just use water) that has been frozen for a few hours will remain cold enough to see you through your picnic. Frozen berries, kept cool with an ice-pack, are a nice addition to sparkling white wine (or water for the kids) if you want to push the boat out!


Are you interested in contributing to The Daily Tiffin? Drop us an email: blogmeeta@gmail.com. We look forward to hearing your ideas.

This Post was written by Abby from eat the right stuff

>

Big rolls of paper art fun

Monday, August 06, 2007

Posted by Amanda at Little Foodies

Our home would be missing something if we didn't have a huge roll of paper that we can call on at a moments notice when there isn't very much else going on.


Read more for some ideas on what we do with ours. What do you do with yours?


1. We roll it out and then one of us lies on the paper and another draws around whoever is lying down. The person lying down then gets up and we all draw the details on - hair, eyes, nose, mouth, ears, clothes, etc, etc. When we're feeling a bit mad we also draw imaginary details on like alien antennae or very large clown shoes, you get the idea. If you have children who like to do their own drawing then just draw around each person and that person can then decorate however they wish. (Excuse the poor pic.)


2. We do landscape scenes with a theme, e.g. The sea or the time that land forgot with lots of dinosaurs. We stick these to the walls for a few days, but then they come down and are either folded up and put away or binned (in the recycling bin of course).

3. We make up a story and then start drawing at one end. We all get to have a go at making up the story and adding to the picture. We quite often end up with something completely different to what we started with.

The RULES are that nobody is allowed to criticise what somebody else has drawn or any ideas that anybody has. All ideas and drawings are praised! Quite important when you've got children of mixed ages and abilities.

We have used rolls of lining wallpaper but our current role was bought at IKEA, for not much money at all.


Are you interested in contributing to The Daily Tiffin? Drop us an email: blogmeeta@gmail.com. We look forward to hearing your ideas.

This Post was written by Amanda from Little Foodies.