Showing posts with label Special Occasions. Show all posts

TASTING WITH THE EYES...dressing it up for the holidays!

Monday, November 10, 2008

Posted by Deeba PAB

Colour & looks, basically presentation, play a crucial role in the taste and perception of food. Alongside flavor and texture, color & presentation are considered by to be a major quality factor of food. In fact, the combination just might play the most important role. “If you don’t have the color right, I think you can forget about the other two,” says Jack Francis, food scientist at the University of Massachusetts. “If it isn’t the color you expect it to be, you don’t like it." In his book Fast Food Nation, journalist Eric Schlosser mentions a study conducted in the 1970s that found the color of food had a great effect on people’s appetites. Presentation as a whole changes the way the mind perceives food, & affects our association with food.

Let's dress stuff up...
It's the holiday season & here are a few fun & simple ideas to make food look special. I find these special touches exciting & therapeutic...they seem to give food & 'mood' an instant lift!
Things you can keep/make in advance:
  • Chocolate leaves/scrolls/shavings/strings
  • Chocolate designs piped out & set on parchment paper, & stored in a cool place
  • Crystallise edible flowers & leaves
  • Coffee beans, jelly beans, Smarties/MnM's
  • Silver leaves, metallic edible silver/golden dragees
  • Slivered pistachio & almonds, roasted sunflower seeds, sesame seeds etc
  • Themed sprinkles
  • Coloured/sanding sugar
  • Marzipan

Things to keep in mind:

  • Use the colour wheel if you need help to tie in a holiday theme.
  • A dusting of cocoa/powdered sugar/cinnamon powder are a beautiful way to cover flaws.
  • Put different chocolates in baggies/ziplocs (dark, milk, white) microwave in 30 second intervals. Once melted uniformly, just snip off an end, & drizzle different colours.
  • While the chocolate is still wet, you can sprinkle slivered almonds/pistachios, or 100's & 1000's etc.
  • A simple icing for sugar cookies is adding just enough water/extract/lime juice to powdered sugar to get a thick flowing consistency. Colour this (in different bowls if you want different colours), & pipe this on to the cookies. While the icing is wet, you can add dragees/sprinkles to it. I find that sugar cookies take to this sort of icing the best. Leave overnight on racks to dry. If they are not 100% crisp the next day, pop them into a medium oven for 2-3 minutes.
  • If you want to tie in colours, add some colour to the white melted chocolate & either spread out on a cold surface & flake; or drizzle over out of a snipped baggie.
  • If you choose to garnish with fresh fruit/leaves, don't do it more than 2 hours in advance.
  • A swirl of cream gives soup or even a caramel custard a new look. Add fresh coriander (for savoury) or fresh mint...just a tiny sprig makes a difference!
  • If you are gifting home-made stuff, try & colour coordinate the packing too. The possibilities are endless...

Have a good & colourful holiday season...


This Post was written by Deeba

Are you interested in contributing to The Daily Tiffin? Drop us an email: thedailytiffin@gmail.com. We look forward to hearing your ideas.

Fathers Day and the best gift ever!

Wednesday, July 02, 2008

Posted by Dharm


Father’s Day was recently celebrated, in most parts of the world, on the 15th June – as it was in Malaysia. I’m not a great observer of these commercially oriented days and so when my kids asked me what I wanted to do for Father’s Day, I told them that we needn’t have to do anything as to me, it was just a silly day created to celebrate father’s and that there was no need to wait for a special day if they wanted to celebrate Father’s Day.


Yeah, probably all a bit too much for them to digest but I think they got the idea. Usually, since Father's Day always falls on a Sunday, we go to Church and then drop in at my parents and the in-laws to wish our respective fathers. We might then go out for an early lunch to beat the crowd or maybe have lunch at my parents with all of us bringing a dish. We'd then just spend the rest of the day relaxing at home. No real fuss and nothing fancy.

My son took ill with a lung infection on the Wednesday prior to Father’s Day and he spent two nights in the hospital for observation. He had been having a bad cough for a week which just got progressively worse. We thus decided, with even more determination, that Father’s Day would not be celebrated at all and at the very most we would pop round to my own Father’s house. He kind of likes the family to get together on Father’s Day.

The kids and the Lovely Wife had other ideas, unbeknownst to me of course! The Lovely Wife decided to cook a lovely lunch on Saturday that we all enjoyed tremendously. Later that day, as I mentioned on my own blog, I took a nap while the kids were supposed to be resting. In actual fact, they were making me a batch of cookies for Father’s Day. My little princess, who supplied the recipe that she had learnt from Kindergarten, reminded me that the cookies were also for Tata and Appu (maternal and paternal grandfather, respectively)- so I was not to finish them!
Very thoughtful children indeed!

However, that is only half the story. Some years ago, my son made a comment that went something like this:

“For Mummy’s birthday, Daddy makes the cake. For my birthday, Daddy also makes the cake. For Sarah’s Birthday, Daddy again makes the cake. Who makes Daddy’s birthday cake then??!!!”

He said this with his trademark waving of his hands in the air for emphasis! For the record, the Lovely Wife normally buys me an ice-cream cake or a ‘high-end gourmet’ cake for my birthday!

However, since that day, I often kid around with my children and tease them by ‘complaining’ that Mummy gets the better deal – especially as far as presents go. On Sunday night, as Father’s Day drew to a close, I teased the children again by asking them how come Mummy got a lovely pendant for Mother’s Day but Daddy didn’t get anything. My son then piped up:

“I told Mummy to get you the long lens Daddy!”

My wife then went on to explain that my son was adamant that they should buy me a new lens for my camera but she explained to him that she didn’t enough about cameras to know which lens I wanted.

“Then we should have got him a watch Mummy.”

My wife then had to explain to him that Daddy is quite particular about what watch he wear as watches can sometimes be very personal.

“But I told you he wanted a Seiko watch Mummy!”

I was very touched at how my son knows exactly what I like. He had seen me checking out a few lenses at a camera shop once and had obviously also been listening when I asked about a watch once in another shop.

I may not have got any physical presents but it didn't matter at all. This was by far more precious. It’s really true what they say. It’s the thought that counts and each time I think about this, I’m almost moved to tears at how thoughtful my son is! Happy Father’s Day, belated though it may be!


Are you interested in contributing to The Daily Tiffin? Drop us an email: blogmeeta@gmail.com. We look forward to hearing your ideas.

This Post was written by Dharm from Dad ~ Baker & Chef


Birthday Cakes - 3 Dimensional

Wednesday, March 26, 2008

Posted by Dharm


3-D cakes, also known as Novelty Cakes are lovely to look at and also give the impression of being extremely difficult to make. How many of you have looked at cake books that feature 3-D cakes and sighed enviously, if not in defeat?
I used to be like that but no more! That’s not entirely true. The cakes featured in books are still way beyond my league but I guess the point that I am trying to make is that the cakes shown in books are not only made by professionals, but the pictures are taken by professionals too! So there is no need to sell yourself short by comparing yourself with a pro now is there.

This article will attempt to show you that you can do it at home - with a little patience and creativity.

Novelty Cakes are really not that difficult to make. The trick is to work within your comfort zone. If you are not familiar with sugarpaste, then stay away from it. If you are afraid of fondant, then wear a string of garlic around your neck. One thing you need though, before you take the plunge into 3-D cakes is a good idea and a little faith in yourself. Okay, so that’s two things you need. So shoot me.

The very first time I ventured into 3D cakes was for my son’s 5th Birthday. You see, as I mentioned in my previous post, the best thing about making cakes for your own children is that it never has to be perfect. They will love you (and the cake!) no matter what.

I was planning to make him a Formula One race car and I knew that I could just trace a car design on to a rectangular cake and ice it. Nonetheless, I wanted to make an extra special cake for him and at the same time raise my ‘skill’ level. And so I took the route of a 3-D cake.

That's how I ended up making a Ferrari F1 cake for my very first 3D attempt. Sounds complicated? Yes, it sure does. It certainly Sounds complicated but it really isn't as I will attempt to explain. With all things, a little bit of planning goes a long way.

I'm an F1 fan myself. Have been for many, many years. So I knew what F1 cars looked like. This is also where my Engineering training came into good use! I figured what I needed was a Plan View (View looking from the top) of an F1 car. The plan view, coupled with the picture in my head of what an F1 car looks like would enable me to construct a 3D F1 Car out of cake. I guess all that time sepnt, many years ago, studying Technical Drawing using Third Angle Projection would come in really handy now! That was my plan.

Okay, so did I lose you? Sorry... Let me try again.

As always when you are trying to find information - Search The Web. I was looking in particular for an F1 car in Plan View. As I said earlier, this means a view from the top. (like in the diagram below - you Have To appreciate that I drew this (okay, maybe traced it) for you okay!!).


The plan was starting to come together. Now I needed to bake the cakes.

Did I say cakes? Yes! I baked two rectangular cakes. Why two cakes for only one car? Well, the car needs a track to run on doesn’t it? So anyway. Two cakes. The first cake acted as the roadway or base for the car. I iced it with buttercream icing – black for the road and green for the side of the track or runoffs. The sides of the cake was iced with a brownish green just to differentiate it from the actual track. To finish off the track I used strawberry flavoured rolled wafers to act as the Rumble Strips, or kerbs. My track was now complete. Now for the car.

Using the second cake, I cut the outline of the car out using the Plan View and that resulted in a piece like this:


You're starting to get the idea now arent you!! Now referring to the plan view again, I cut out a rectangular piece that would serve as the Front Wings for the car. Next, I cut out another piece that that resembled a rectangle with a half cone on top. This was the Engine cowling.

Finally, the Rear Wing was fashioned by cutting a squre piece of cake and covering it with a rectangular piece. Not exactly the way a Rear Wing should look but hey, its just a cake okay!!!

The cake was then assembled on a cake board and covered in a rather thick buttercream before being smoothened down with a spatula dipped in hot water. I let the cake rest for a while before lifting it using a spatula and cake server to place on to the ‘track’. You may notice that my car didn’t exactly sit very straight but at this point in time, I was just thankful that I had managed to get the car onto the ‘track’ without any damage!


The four tyres were fashioned out of icing sugar, a little butter and cocoa, rolled out into a ball and then flattened in the shape of tyres. The wheel suspension was simply chocolate biscuit sticks pushed into the cake and tyres. To give further detail and authenticity to the F1 car, I printed out my sons name, the Ferrari logo as well as the Number 5 – as the number of the car as well as my son’s age – on to Overhead Projector Transparency sheets. I then cut these out and ‘stuck’ them to the cake.

And there you have it – a Ferrari F1 Car. I added two Lego men to the cake and that made my son even more excited!


When my daughters 3rd birthday came up a few months later, I carried on with the theme of 3-D cakes. My daughter loves all the Disney princesses and in particular Ariel, the little mermaid. It only seemed logical to make her a mermaid cake!

All things must start with a plan. The plan in my mind was to buy a doll-pick (a doll with only the torso while the bottom half is a pick to stick into the cake). This would be the body of the mermaid. I would have the mermaid sitting on a rock and then fashion its tail out of icing. Not only did I have a plan, it also sounded do-able!

What I did was to make one large rectangular cake and a much smaller dome cake. The rectangular cake was iced in blue and green – for the sea. I didn’t make the icing too smooth but rather used the spatula to make little billows – for the waves.
The dome cake was cut somewhat jagged and then covered in chocolate and placed at the top half of the cake – like a rock. I then stuck the doll-pick into the ‘rock’ but left it sticking out just a little so that I could fashion her ‘hips’ and ‘tail’. I used a mix of butter, loads of icing sugar and some liquid glucose (you can also use Corn Syrup) to give the icing some pliability. I coloured it a dark green and then rolled it out into a sausage shape. I then flattened one end of it and cut the ends to resemble the fish tail. Now it was just a matter of draping the tail on to the rock and shaping the ‘hips’ to join nicely to the doll-pick. I then cut the end of a drinking straw into a semi-circle and used that to make scales on the tail!

To finish off the cake, I drizzled more chocolate around the base of the rock and then sprinkled some brown sugar around it – to make it look like sand. I placed some chocolate shells around the rock and used fish shaped candles for the final touch.


Just last year, I made this Pirate Ship cake for my son’s 6th birthday.


In the interest of saving space and since I already posted it before on my own blog, this is where you can find the full instructions for the Pirate Cake.

And just last month, I made this Dora themed Pinata Cake for my daugther’s 4th birthday. This was a lot of fun to make and even more fun to crack open! Again, full instructions are detailed on my blog.


So there you have it! 3-D cakes are possible with a little imagination and are really not that difficult to do.

I still owe you tips on hosting Theme Based parties but rest assured that I will cover that soon! Till next time…..


Are you interested in contributing to The Daily Tiffin? Drop us an email: blogmeeta@gmail.com. We look forward to hearing your ideas.

This Post was written by Dharm from Dad ~ Baker & Chef


How to make deviled eggs

Thursday, March 13, 2008

Posted by Lydia (The Perfect Pantry)


‘Tis the season for eggs, whether painted, dyed, tea-stained, or hidden on the lawn. While you’re having fun decorating your eggs, don’t forget to make some to eat, too.

Kids love deviled eggs, and by learning to make them, they learn how to hard cook an egg, peel it, create a filling with their own choice of embellishments, and use a pastry bag to make their egg beautiful.


How to hard boil (or hard cook) an egg

• Start with very fresh eggs, preferably from a farm stand.
• Place eggs in a heavy, flat-bottom pan, and cover with one inch of cold water.
• Place pan over high heat, and bring to a boil.
• Just when the water comes to a rolling boil, remove pan from heat, cover, and let sit for 15 minutes.
• Your eggs are ready!

To peel an egg: Drain the water from the pot, and gently agitate the eggs in the pot to crack the shells all over. Then, under running cold water, peel each egg, dry on a clean dish towel, and set aside or refrigerate until ready to use.


Deviled eggs


First, a basic version:

6 hard boiled eggs, peeled, cut in half lengthwise, yolks mashed in a bowl
2 Tbsp mayonnaise
2 tsp yellow mustard
2 tsp Worcestershire sauce
3/4 tsp Old Bay seasoning
1 tsp distilled white or cider vinegar
1/4 tsp black pepper
Salt to taste (you won’t need much, if any)
Paprika or the thin tops of chives, for garnish

In a small bowl, combine the mashed yolks with the mayo and mustard. Stir in the Worcestershire, Old Bay, vinegar and pepper. Add salt if you need it.

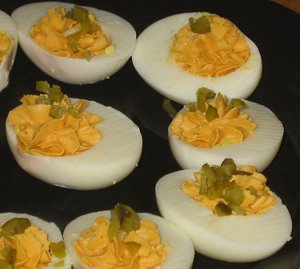
Slice a tiny bit off the outside of the white egg halves, so they'll sit flat on the platter. Fill the whites evenly with the mixture (with a pastry bag, which makes them look pretty, or with a spoon), and sprinkle a tiny bit of paprika on each for garnish. If you wish, stick a small piece of chive or two on the top!

Now, for variations:

1. Mix in some avocado with the egg yolks and mayo.
2. Mix in some sour cream with the yolks.
3. Mix in some chopped tomato, or parsley, or dill.
4. Mix in some dried herbs.
5. Mix in some dry onion soup mix.

In other words, have fun!


Are you interested in contributing to The Daily Tiffin? Drop us an email: blogmeeta@gmail.com. We look forward to hearing your ideas.

This Post was written by Lydia from The Perfect Pantry

Cake Decorating

Wednesday, February 13, 2008

Posted by Dharm


Although I've been baking cakes from a very young age, I never had any rhyme or reason to decorate them. Sure, I've had lots of experience in covering a chocolate cake with chocolate icing and maybe even a little ganache. But that was it.

And then everything changed when my son Michael turned one!

That was when I decided that I HAD to make his birthday cake and not order one. That decision meant that I had to learn to decorate it too.


The first cake I decorated was for Michael's First Birthday. I baked a butter cake in a Wilton Teddy Bear pan and the cake came out of the pan with the pattern embossed on it. Thus, it was fairly straightforward to pipe out an outline on the embossed pattern and then fill in the outline with piped stars. Easier said then done though!

Due to a lack of experience, I didnt realise that I should have iced the mouth and nose first before piping around it. So, to compensate, I used M&M's for the mouth and nose. After doing that, I realised that this made the bear seem a little evil!


It also took a lot of time to decorate the cake, basically due to my inexperience.
Nonetheless, I though it was a pretty fine effort for a first timer and what mattered most was that my son was pleased with his Teddy Bear cake.

The following year for his Second Birthday, he had developed an interest in Construction Equipment. Although he had been hinting at a Dinosaur Cake the whole year, he suddenly decided he wanted a Bulldozer for his birthday cake.

I had spent the preceding few months before his second birthday doing some research on how to transfer patterns on to a cake. What you are about to read is with the benefit of hindsight and gleaned from my failures and lessons learnt. Hopefully it will be simple and easy enough to follow and you wont have to learn the hard way!

  • First off, find a nice picture from the Internet, a colouring book or any other place, that you want to use.

  • Enlarge the picture (using a photocopier) to the size you want. I find that A4 or Letter size is large enough for a large rectangle cake.

  • Trace the pattern out on to tracing paper or greaseproof paper.

  • Bake your cake and then prepare a thick buttercream icing. I normally use a ratio of 1:2.5 meaning 1 part butter to 2.5 parts icing sugar. The icing should be firm enough to roll into a ball. Then when you press it between your fingers, it should become a flat circle and hold its shape. The reason you want it firm is so that you can place a sheet of tracing paper/greaseproof paper on top of the icing without causing it to smudge.[See, I didnt do this the first time and when I covered the icing with the paper, it all stuck to the paper and was a right royal mess!)

    "How do I ice the cake with icing so thick then?" I hear you ask. The trick here is to 'pat' the icing on. Take an amount of icing in your hands (of course
    make sure your hands are clean!) and press it out onto the cake. Flatten the icing, spreading it out slightly as you do so - much like you are lining a tart pan or mould. The icing will not be smooth but dont worry. Once the cake is covered, smoothen out the icing by dipping a metal spatula in hot water, wiping it dry and then smoothening out the icing.

  • Let the icing set for a bit.

  • Place the tracing paper with the image on top of the cake. Using a toothpick, prick holes into the icing following the pattern on the tracing paper.

  • Remove the tracing paper from the cake and you now have your pattern transferred on to the cake like a join-the-dots puzzle!

  • Connect the dots by piping icing along the dots and you have an iced outline.

  • Fill in the outline with piped stars or flowers or any other shape you like. Or simply use piping jelly or thin icing to 'flow' into the outline.


  • And there you have it! This is the Bulldozer cake that I iced using the method described above.


    The following year, for his Third Birthday, I made him an African Elephant. I used the same method as above but with a slight difference. I created the base icing out of three different colours - for the grass, the middle and then the sky. Also, I used melted chocolate for the outline.

    Having only decorated two cakes before this, I must say that I was amazed at how well this cake turned out. The Lovely Wife was equally amazed and to this day she says – “that cake was made with 20% skill and 80% love!” Proof that with a lot of dedication, anything is possible!


    Cake decorating didn't scare me anymore and I think I was really getting the hang of it. It was still hard work, but the happy look on my children's faces was reward enough. It was then time to celebrate my daughter Sarah's First Birthday. Her brother used to affectionately call her Bunny and so I decided on a Bunny Cake for her.


    This cake was another labour of love as would you believe that my icing set broke on me halfway through the decorating? I stayed up until almost midnight finishing the cake using various methods of ingenuity to pipe out the icing. I have since learnt the art of using piping bags rather than an icing set.


    For my son's Fourth Birthday, I made him this Dinosaur Cake. For any of you that have been forced to learn about Dinosaurs, this particular dinosaur is the Carnotaur that was little Michael's "most favourite dinosaur in the whole world." I added a few of his toy dinosuars around the cake to make it seem like the Carnotaur was stalking them!


    Practice really makes perfect and for Sarah's Second Birthday, I made her this Tigger Cake. I used some store bought plastic grass and coconut trees to further decorate the cake and give it more character.


    So you see, decorating cakes is really not that difficult. All it takes is a little patience and it gets easier the more you do it. I still dont think I'm particularly skilful at cake decorating but I think the more I do it, the better I get. It doesn't really have to be perfect either and the only thing you really need though,
    to make it very special, is a Whole Lot of Love!

    Speaking of Love, with Valentine's Day tomorrow, it's not too late to bake a cake for your other half. A simple square or rectangle cake decorated with a heart would be super. Or maybe his/her favourite sports team logo or even their favourite cartoon character. The possibilities are endless!

    The next time I write, I'll share my experience in making 3-Dimensional Cakes as well as share with you my experience in hosting Themed Birthday Parties for the kids. See you soon and in the meantime, Happy Valentine's Day!


    Are you interested in contributing to The Daily Tiffin? Drop us an email: blogmeeta@gmail.com. We look forward to hearing your ideas.

    This Post was written by Dharm from Dad ~ Baker & Chef


    What Does Your Valentine Really Want?

    Monday, February 11, 2008

    Posted by Meg Wolff

    Flowers. Chocolates. Diamonds. Teddy bears. Pretty handmade cards – all traditional gifts for Valentine’s Day.

    But what does your true love honestly REALLY want?

    I think, given a choice, that most people would skip the material gifts and opt for “quality time” with you and just feeling secure in knowing that you’re there, healthy … and sticking around!

    Getting and staying healthy is the best gift to give your kids, too. Showing them, by example, that they can take charge of their health by good diet and lifestyle choices is priceless. And that starts with making healthier food choices ... whether it’s bad to better, or good to great. To me, any steps made toward good health are a gift of love.

    So … what does it take to give this gift? If it’s not prompted by a health crisis that forces a change, it just takes really thinking about your choices and making good nutrition a priority.

    And then making some easy switches: Brown rice instead of mashed potatoes and gravy. Steamed green beans instead of French fries. Tossed salad with olive oil and lemon dressing instead of potato salad with gobs of mayonnaise. Fresh fruit instead of triple-chocolate cake or ice cream for dessert.

    And, eat as many vegetables as possible. Don’t like them, you say? Then try this tip: Cut down on sugar and or artificially sweetened and flavored foods … and your taste for the sweetness in vegetables will return. Guaranteed.

    I’ll leave you with this beautiful and delicious dessert recipe that would make a lovely ending to a healthy Valentine’s dinner:

    POACHED PEARS WITH GINGER ALMOND CREAM
    4 pears
    2-3 inch cinnamon sticks
    1 1/2 cups of 100 percent pear juice
    1/2 teaspoon nutmeg
    1/2 teaspoon cardamon

    Peel pears and square bottom for standing in pot. Put in cinnamon sticks in between pears. Pour pear juice over all. Sprinkle nutmeg and cardamon into juice. Bring to a slow boil over medium heat, simmer for 35 minutes. Take pears out. Cook leftover sauce down into syrup.

    ALMOND CREAM
    4-inch piece ginger (to make juice)
    1 cup raw blanched almonds (removed skins)
    2 tablespoons maple syrup
    1 tablespoon vanilla

    Pulverize almonds in a food processor. Add ginger juice, maple syrup and vanilla. To make it creamier, you can add a little more pear juice.

    Happy HEALTHY Valentine’s Day!


    Are you interested in contributing to The Daily Tiffin? Drop us an email: blogmeeta@gmail.com. We look forward to hearing your ideas.

    This Post was written by Meg Wolff from www.becoming-whole.com

    A New Year with or without resolutions

    Monday, January 07, 2008

    Posted by Amanda at Little Foodies


    Happy New Year to all of our lovely readers. We hope you have a truly wonderful 2008.

    As it's the New Year no doubt lots of people will have made New Years resolutions. I used to make them without fail every single year but by mid January I'd usually failed in most, if not all of them. I wonder how many of you have made resolutions this year, if you'll keep them and for how long. I find it fascinating.

    There are the usual resolutions that so many people make, including...

    Lose weight
    Get fit, start an exercise regime, get healthy
    Quit a bad habit like smoking, or drinking to excess, biting your nails?
    Get ahead, change jobs, get a promotion
    Go on holiday
    Move house
    Spend more time with loved ones
    Learn something new, do a course, get some training
    Get organized
    Spend less money or get out of debt

    I've heard so many resolutions from people over the years. Some weird and wonderful, some sad, like the friend who announced just after midnight that she'd be getting a divorce that year, at her instigation. I've also heard some totally awesome ones, inspiring and inspirational including raising money for charities, training for and running a marathon, taking a year out with the family to go traveling for a year, .

    So if you're in the camp that makes resolutions, I hope you manage to stick to them and if you didn't but you still want to make changes in your life then perhaps try and change things gradually. Give yourself smaller goals that are more realistic to attain.

    Don't be too hard on yourself - January is a hard time to start making major changes, especially if you live in the Northern Hemisphere when it's cold and we all need a bit of comfort.

    Maybe it's best to try and make changes, incorporating the good and positive things as an ongoing process throughout the year, and not try to suddenly change everything immediately just because it is the start of a new year.

    For me personally, I gave up making resolutions for a few years, but this year with a spinal injury I decided that I needed to make some changes in my life. I thought the New Year was as good a time as any to begin making these changes. I'm going to get my back better and then as soon as it is, work on my core strength so that it stays okay. I've heard pilates is good? This way hopefully avoiding surgery. I'm also going to lose weight, I call it 'the baby weight', which is ridiculous as my youngest will be four this year, however I didn't carry any excess weight until I had children so to me it's 'the baby weight'. Not fair to keep blaming them so time to do something about it and I'm sure it can all be incorporated into my lifestyle changes which are all going to help my back. I'm not going to be too hard on myself, things take time and if any changes are to be lifelong changes they will take time to implement and time to become a habit.

    Happy New Near everybody. I wish you all an awesome 2008!

    News:
    We'd like you all to help us welcome a few new members to our ever growing team. We are totally excited to have Petra of the fantastic FoodFreak join our Tiffin Tuesday series. Petra creates a few gorgeous looking bento boxes and lunch boxes, filled with health goodness.

    Here's Petra:
    I used to work the IT business, but now I am a freelance writer,
    cookbook author and novelist, living in Hamburg, Germany.
    I am a foodie, as reflected in my blog Foodfreak, active in the slowfood movement, and I have a passion for Asian cuisines as well as
    local ingredients. Two years ago I started packing bento boxes for my husband to provide him with fresh, healthy and nutritious foods, and this has turned into a passion for bentos, too. I learned that bentos are widely unknown in Germany. When I find the time, I love to paint, take photographs or stroll across one of the various markets of my hometown


    Another person who will be adding plenty of exciting healthy posts to our blog is VeggieGirl from the very interesting vegan blog VeggieGirl. She will be writing about a vegan lifestyle and giving all of us a few tips.

    Here is VeggieGirl:

    I am a nineteen-year-old, health-conscious vegan who has a passion for nutrition, cooking (especially baking!), food photography, animals, traveling, fitness, and writing (I'm a journalism major). On my blog, entitled VeggieGirl, I frequently post about my latest cooking & baking adventures, family get-togethers, and other topics.

    Look forward to their posts coming soon.


    Are you interested in contributing to The Daily Tiffin? Drop us an email: blogmeeta@gmail.com. We look forward to hearing your ideas.

    This Post was written by Amanda from Little Foodies

    Welcoming in the New Year

    Friday, December 14, 2007

    Posted by Dharm

    I love Christmas, don't get me wrong. However, it can be a very tiring time. What with putting up the tree, testing all the old Christmas tree lights and finding out some sets don't work which means going out to buy new Christmas lights. Then digging out the decorations and dressing the tree. Whew. I'm already tired thinking about it. Fortunately, our tree is already decorated.

    Then there's still the shopping for presents and wrapping them! I haven't even gotten to the part about baking the cakes and cookies. And don't forget the preparation of the Christmas Eve Dinner and maybe even Christmas Lunch the next day. All extremely tiring stuff.

    The problem is, just when you think it's all over and you can put your feet up and relax, the realisation that New Year is just around the corner hits you like a ton of bricks. WHAM!


    I have many fond memories of New Year celebrations ranging from when I was a young boy through to my teenage years and now as a father.

    As a child, New Year was always celebrated with lunch at my grandmother's house. She used to make the most exquisite ham, roast potatoes and even tongue! Surprisingly, the tongue was tender and very, very tasty. We weren't told it was tongue of course until AFTER we had eaten it!

    In addition to the cold cuts, there were always curried dishes as well, usually Mutton Curry and Chicken Curry. Sometimes, instead of rice, one of the aunts
    would order loads of string-hoppers.

    For dessert, my Grandma would make her famous Caramel Custard while my Aunty Julie would make her wonderful, wonderful desserts - Chocolate Biscuit Pudding, Frozen
    Sponge with Choc Sauce and so many others. She was the Dessert Queen! New Years lunch at Grandma's was certainly a treat.

    As I grew into a rebellious teenager and attained legal age, New Year's Eve was spent partying at some night spot with many friends. No matter how tired (or hungover!) I was from the previous night though, lunch at my Grandmother's house was not to be missed. Church could be skipped but not lunch at Grandma's!

    After I got married, New Years would alternate between lunch at my grandmother's or lunch at one of my wife's uncles' houses. The crowd at my Grandmother's had also dwindled with a lot of the grandchildren married and having obligations of their own. Two of my Aunts (including the Dessert Queen) have moved overseas as well.

    My Grandmother is still alive, (Yes! She recently celebrated her 100th Birthday!) and although she doesn't cook anymore, we still meet at her house for a Pot Luck lunch on New Years Day. Each family brings a dish and since my Aunt Julie is overseas, I have taken over the mantle of Dessert King.

    A Pot Luck is fine when you have a large family, but if you are just cooking for your own family and maybe a few friends, why not throw together something simple
    yet worthy of a New Years meal?

    I'd like to suggest taking the route of lots of light dishes or tapas. Serve it all at once or bring them out dish by dish. No real recipes are needed for these dishes as they are simple enough and you can play around with the flavours and ingredients as you see fit.

    Stuffed Mushrooms
    I love the taste of mushrooms and you can experiment with different stuffing's. I love to stuff Portobello Mushrooms and usually fry some garlic together with the chopped mushroom stems, a little chopped red chillies, pine nuts and breadcrumbs. Then stuff this back into the mushroom caps and bake for about 20 minutes. Simply delicious.


    Garlic Prawns on Leek
    Shell and devein the prawns. lightly sautee some garlic and black pepper to taste and then toss the prawns in. Cook quickly on high heat till the prawns turn pink. Serve on a bed of boiled leek. Simple yet so tasty.


    Meatballs or Sausages
    Marinate ground beef/chicken/lamb/pork or a mix of these meats with some ground onion, garlic, ginger, salt, pepper and tomato sauce. Roll into balls or sausage shapes.
    Bake for about 30 mins in a 190C oven. The meatballs/sausages will hold their shape and this is something the kids will love. Serve it on its own or with some tomato sauce or maybe mustard or even barbecue sauce. If you want something more substantial, make some Bolognese sauce or maybe even Meatball Curry. So many choices!


    Pasta with Chilli Flakes
    For a difference and to spice things up a little, why not toss some pasta in olive oil and chilli flakes. You can use whatever chilli you like depending on the 'hotness' factor you want.


    Devilled Eggs
    This is always a favourite with the kids. Hard boil some eggs, and then cut them in half. Scoop out the yolks and 'devil' them anyway you like. Perhaps some mustard, or curry powder; maybe just some Worcestershire sauce and mayonnaise. Or perhaps a combination of everything! Spice it up even more with some Tabasco sauce.


    And of course, finish off with dessert. To welcome in the new year, why not have something very simple to make and yet so tasty. The kids love this and it was indeed one of my favourite desserts harking back to my childhood. The original recipe comes from my Aunty Julie but over the years I have modified it to what it is now.

    Chocolate Biscuit Pudding
    Ingredients
    1/2 Cup Butter
    3/4 Cup Castor Sugar
    350ml Unsweetened Cream
    2 Eggs (separated)
    150gm Dark Chocolate
    2 Tablespoons Cocoa
    1/2 - 1 cup Chopped Cashews (or Almonds)
    1 packet Marie Biscuits
    1 cup milk
    Optional
    Brandy or Rum (I use liberal amounts - 4 to 6 tablespoons!!)

    Method
    Melt chocolate with 1/2 the cream over slow fire. Ensure cream does not boil. Leave to cool. Separate eggs, ensuring that egg whites have no yolk. Whisk egg whites till they peak. Cream butter and sugar then beat in egg yolks.
    Add Rum (dependent on your alcoholic tendencies!)
    Stir in sifted cocoa then stir in cream followed by the chocolate mixture.
    Fold in egg whites and Stir in 75% of nuts.
    Dip Marie Biscuits into milk (to soften slightly) and line a tray with one layer of biscuits.
    Cover biscuits with layer of mixture. Alternate with layers of biscuits and mixture (with final layer being mixture).
    Sprinkle remaining nuts on top (this just makes it look good)
    Chill for 2 - 3 hours

    All in all I think this makes a lovely menu for New Year's Tiffin. Or maybe do it for New Year's Eve to welcome in 2008 or just throw it all together for whatever you are celebrating! Best of all, I think it is something that both adults and kids alike will enjoy.

    Happy New Year Everyone!


    Are you interested in contributing to The Daily Tiffin? Drop us an email: blogmeeta@gmail.com. We look forward to hearing your ideas.

    This Post was written by Dharm from Dad ~ Baker & Chef


    It's a Wrap

    Wednesday, December 12, 2007

    Posted by Meeta K. Wolff


    This holiday season, rather than wrapping all your gifts the same way, let the gift wrap hold some clues about the contents- see if your recipient can guess the gift just by looking at the way you have wrapped it. Chances are pretty good that you already have things around your home that would be useful for jazzing up your gifts.

    Here are five ways to give your gifts a unique look:

    1. Skip the store-bought gift wrap...and come up with your own. Sunday comics, old maps, calendar pages and foreign language newspapers all make interesting substitutes for wrapping paper. You can get kids to make their own signature wrapping paper by decorating plain brown or white paper. One of my favorite craft activities as a kid was to dip cut vegetables into paint and stamp paper with them- cut okra, carved potato halves and halved onions look just beautiful. Leaves and buttons are also great for stamping.

    2. Skip the paper altogether and use fabric for wrapping. Fabric is especially great for wrapping gifts that are awkwardly shaped. Some ideas for pretty fabric wraps: scarves (could be made of a variety of fabrics), Indian dupattas, shawls, tea towels (for food gifts and kitchen-related gifts), bandanas. Scour thrift shops for old linens that will the gift an antique look. Furoshiki is the Japanese art of fabric gift wrap with many beautiful ways of neatly wrapping gifts in fabric.

    3. Skip the bows and try some unusual package toppers. Found objects from nature look gorgeous as gift toppers- some examples include pine cones, dried leaves and flowers, perhaps a sprig of mistletoe? Shells and pebbles could be glued on too. A cute brooch or pair of earrings might be much appreciated as well. For a food related gift, spices like cinnamon sticks, bay leaves and star anise would be very suitable. Jingle bells or small ornaments would also be gorgeous toppers for the perfect look.

    4. Skip the conventional ribbon and look around the home for something different to use instead. Bright shoelaces are a great way to tie a gift for a child or a teen, or if it is a sports-related gift. One could use beaded necklaces too. Yarn or lace might be cute for a gift for a crafter. For a festive look, use colorful tinsel.

    5. Give a gift inside a gift. Use a nice tote bag or drawstring bags to package the gifts. All of us should be using reusable shopping bags anyway, so an extra tote bag is always welcome. Or you might give a gift card packaged inside a wallet. Flower pots or watering cans can be filled with gardening supplies. Homemade food gifts can be filled into a cute baking dish. A child's toy could be wrapped in a folded T-shirt. The possibilities are endless!

    One tip that I have found very useful is to have a location in the home as a central spot for all things related to wrapping gifts. It could be a shelf or a drawer; I simply use a cardboard shoe box tucked into a closet. Throughout the year, any bits and bobs (trinkets/beads/ribbons), old cards, paper with interesting textures, gift bags that I receive- all of these things find their way into this box, ready to be recycled into fresh clothing for the next gift. Yes, I freely recycle wine bags and gift bags. There are those who believe that recycling gift bags is tacky. To me, being spoilt and wasteful and tossing perfectly good gift bags and boxes into the trash is waaaay tackier. A small pair of scissors and sticky tape also have a home in this little shoe box. It makes wrapping gifts a fun and interesting activity when you don't have to overturn the whole house to look for double-sided tape.

    Happy Holidays!


    Are you interested in contributing to The Daily Tiffin? Drop us an email: blogmeeta@gmail.com. We look forward to hearing your ideas.

    This post was contributed by Nupur from One Hot Stove


    10 Unique Christmas Gifts for Her

    Wednesday, December 05, 2007

    Posted by Meeta K. Wolff


    The holiday season is supposed to be about enjoying oneself, spending time with family, and enjoy the act of giving and receiving gifts. And it is the thought that counts when giving a gift – that is, the long thought required to make sure the gift is liked.

    While getting the usual gifts can often times get you by, you should at least once in a few years put some effort into truly impressing your lady. There's also no requirement to break the bank in doing so, as many people assume. While knowing what the woman values, you can know what to give her that's surprising, unexpected, and most importantly appreciated and remembered for years.

    Here's a starter list to give a few ideas. Think fast, though, the holidays are coming up quick!

    1. A perfume she's never worn – The expected gift would be her usual fragrance, but why not shop around the department stores for something new? Find something you think will match her personality and style. Done right, this gift can be quite affectionate.

    2. Custom portraits – Ask her friends or family if they'd be willing to take a trip to a photo studio (or take your own if it's more financially feasible). Add them to a collage, or buy a large frame with numerous smaller places for photos. Add hers to the center, surrounded by the portraits taken. Of course, be sure to include yourself.

    3. Personalized bible – If the woman celebrates Christmas for religious reasons too, then she'd appreciate your acknowledgment of this by giving her a bible with her initials or name printed on it.

      Generally you have to order a bible with the included monogram, although if you look around you may be able to find a shop that will add one to a bible you already have. Do not alter one she already owns, and take any messages from yourself you decide to add lightly.

    4. Book of Poetry – Writing one poem is great, but writing a few and adding them to a book says a whole lot more. Again this can go from simple craft style to elegant, handmade by you or professionally printed and bound.

      If you need fillers, draw a few pictures or include photos. Write the poetry about them if it's not written already. Other great, appropriate, and rather easy topics include the winter season and weather, holiday foods, and Christmas itself.

      It's also quite acceptable to give this gift privately, as there are very few men who would want to be seen by anyone other than their woman giving their own written works of art. And any woman who doesn't absolutely adore this can just enjoy the lump of coal she probably received this year!

    5. Photo locket – avoid the cliché gold heart locket with a photo of her on one side, and one of you on the other. Why not a tree instead of a heart? Silver is also a great Christmas color (and less expensive!).

      Want to be seen as open minded and caring again? Rather than a picture of you, put in one of her mother. Want to be cute and funny? Make it her dog instead. While a locket is more on the expected side, you can add some twists to make it creative.

    6. Music lessons – Sign her up for a few music lessons. For all either of you know, she's a great guitar player! An instrument is generally a better idea than vocal lessons. Also, make it something fun and easy like the guitar or drums.

      It could spark a new interest in music, and could lead into easy gift ideas for the next occasion.

    7. Swimsuit – For the girl who hates the cold winter weather, buy a swimsuit along with the promise of a trip to the beach in the summer. Not meant to be the main gift, but something on the side for a laugh. Plus, she may just have to try it on for you!

    8. Make her a Scarf – It's surprisingly easy to knit, and anyone with a little patience can pick it up rather quickly. The supplies are very cheap, and she's sure to love the effort you put into it. If you like what you're doing, you can even go onto knitting other articles of clothing, such as gloves or a sweater.

    9. Bicycle – Certainly not expected for an adult, which is what makes it unique. Many bicycle manufactures still make the old-style bikes seen in the '50's, which when accompanied by a basket on the front and a big Christmas bow would be adorable.

      Intended not only to be in the style of Christmas, it's also a great hobby to take up for those who haven't peddled since they were in middle school.

    10. Finally, something has to be said about jewelry. One problem that men make when buying jewelry for a woman is that they always stick to the expected, and they think that going over the top is the best.

      That may be fine for Valentine's Day when it's expected, or an anniversary, but it's not the best taste for Christmas. Take a step away from the tacky holiday sales at chain stores that advertise "Diamond heart pendant for only $59.99!" It's not worth your money, and it's definitely not something she'll want to wear after the season ends. Go for something elegant and stylish. Handpick a set (necklace and pendant, earrings, and bracelet, for example). Every piece, by no means, has to be encrusted with gemstones, and nor does it have to be gold.

      If you can afford it, it's certainly acceptable, but don't feel the obligation to spend hundreds or even thousands. Smaller, non-commercial jewelry stores often sell sterling silver with earth stones (Jade, Onyx, Turquoise, etc) that are much more affordable. This is by no standards "cheap" jewelry – it will still set you back a bit, but it's much better than truly "cheaping out" with low quality gold and gemstones.

      Plus, many women enjoy silver and stone jewelry. To go even further, get a set with stones that are her favorite color. Save spending a large sum of money on very valuable jewelry for a more personal time.


    Are you interested in contributing to The Daily Tiffin? Drop us an email: blogmeeta@gmail.com. We look forward to hearing your ideas.

    This Post was contributed by Vicky from Got A Crush


    Happy Thanksgiving!

    Thursday, November 22, 2007

    Posted by Meeta K. Wolff


    Wishing you all a glorious Thanksgiving weekend.

    Thanksgiving Fun with Kids

    Monday, November 19, 2007

    Posted by Meeta K. Wolff


    There are times when we as adults forget one thing in the midst of planning parties or traditional feasts like Thanksgiving and Christmas - the kids. They are certainly not interested in how long the turkey takes to roast or if the tablecloth matches the napkins or if Uncle Harry can or cannot be placed next to Aunt Greta. I am also pretty sure that on Thanksgiving, it's not only the kids that DO NOT want to watch 6 hours of football!

    So, how to integrate the children into such family holidays and feasts.


    I decided to take a look into my own planning. We celebrate Thanksgiving because it's something I did growing up. My parents believed it was a fantastic way to be thankful for so much - friends, family, food, health. So, ever since I can remember we have been celebrating Thanksgiving.

    Although in Germany it's not an official holiday, I am carrying on this tradition for my own son. I invite some of our closest German friends and their families and we spend a wonderful day together. It's something that over the years is so looked forward to by all of my friends. Each one of them brings a little something for our dinner table. Now many of them (me included) have children and we are always looking for ways to integrate them.

    It's something I am sure many of you think about and so I thought I would simply share a few things we do.

    When I am busy cooking Tom and Soeren always help out. There's plenty to do and one of the things we love is playing a game we call "Peels". The idea is to peel the longest apple, potato or carrot peel, without breaking it. All of us, armed with peelers, get ready to produce the longest peel. The winner then gets to proudly display it at the dinner table for all the guests to admire.

    If weather allows it, we all go outside and play a few games. Kids love it when adults simply join in and become "one of them". Here are two games we really love and are sure to have everyone playing in fits of laughter.

    Deer & Hunter
    Several players of all ages stand in a circle holding hands. The first person, who is the deer, runs around through the circle, ducking under the hands of various players and finally taps a player - the hunter. The hunter then separates from the circle and follows the deer. He has to imitate the exact moves the deer makes.

    If the hunter catches the deer, the deer goes into the middle of the circle. But if the hunter doesn't follow the deer's movements exactly, or doesn't catch the deer before it has gone around the circle once, he has to stand in the center of the circle. The game continues until there are too many people standing in the center to be encircled by the remaining players.

    Turkey Trot
    I love this game. Pair up the players and get them to link their elbows. Each team is handed a turkey mascot. We normally stuff a brown bag with crumpled newspaper and draw on a face with colored markers (making this mascot can be treated as a separate kids activity). The Turkey mascot has to be held between the two players' heads.

    On cue, the pairs try to make their way to the finish line at the far end of the playing field. The first team to get there without dropping their bird or unlinking their arms wins.

    Of course the weather outside is not always perfect and so we have a few indoor games we love to play too.

    One of my favorites is "Stories". It can get so crazy and funny but at the same time provokes the imagination to great extends. Soeren has become such a funny and great story teller that almost everyone picks him.

    Here's how it goes:

    Someone starts a story and, after a couple of sentences, points to someone else to continue the story. It's more fun if you go fast. The crazier the story, the better and the more laughs we all have.

    So whatever you choose to do over Thanksgiving try and integrate a few fun games to keep not only our little ones smiling, but I promise you the grownups will have a great laugh too. As for those grownup "kids" who prefer to watch 6 hours of football instead joining the fun - well sometimes kids will be kids ;-)

    I hope you all have a great week and a Happy Thanksgiving!


    Are you interested in contributing to The Daily Tiffin? Drop us an email: blogmeeta@gmail.com. We look forward to hearing your ideas.

    This Post was written by Meeta from What's For Lunch, Honey?

    Happy Halloween!

    Wednesday, October 31, 2007

    Posted by Meeta K. Wolff


    Hi Folks!

    We all at the Daily Tiffin wish our wonderful readers a Happy Halloween!

    You'll find a few great pumkin carving ideas here and a fun Halloween facts quiz here. You'll also find a few fantastic and rather spooky party food ideas here.

    I am now off to prepare for our little Halloween party tonight when witches, ghosts, devils and other creatures take over the streets.

    Have fun!


    Are you interested in contributing to The Daily Tiffin? Drop us an email: blogmeeta@gmail.com. We look forward to hearing your ideas.


    Happy Mother's Day!

    Sunday, May 13, 2007

    Posted by Meeta K. Wolff


    We all at the Daily Tiffin would like to wish mummies around the world a very Happy Mother's Day! Put your feet up and enjoy the day. This is in honor of all your hard work, love and affection!


    If you like what we girls do here and would like to vote for us in the Blogger's Choice Awards here. Thanks for your support!


    Are you interested in contributing to The Daily Tiffin? Drop us an email: blogmeeta@gmail.com. We look forward to hearing your ideas.


    Mother's Day - A special day for mommies!

    Wednesday, May 09, 2007

    Posted by Meeta K. Wolff


    The family
    is like a garden
    with joy
    for all to share,
    With tender, growing blossoms
    that thrive on love
    and care,
    And when
    the flowers are gathered
    for a very special day,
    They make
    a bright and beautiful
    happiness bouquet.


    by Mary Loberg

    This is one of my favorite poems describing a family and what it means to have a family. I got it on a beautiful card last year from my son!

    I'll be celebrating Mother's Day for a the fifth time this Sunday!


    However, it is particularly this year that I am really taking this actively in. Why? Well probably this year my son is also old enough to understand what each individual parent can offer him. As a mommy my love, affection and provisions for my son are different as those to what his daddy gives him. Sure we both are very eager about his well being and welfare and always have his best interests in minds. But each parent provides differently for their child.

    This year I too am also understanding what it meant for my mum to raise me. I may not have been the easiest of kids to raise but I think she did a wonderful job. I am seeing myself mirror in Soeren in so many situations, that makes me open my eyes as to the efforts my own mother put in raising me.

    All this made me curious as to where Mother's Day tradition actually originated from. So, began my little research. I wanted to share this with you as I know there are many mommies out there reading this today. Instead of gift ideas and card ideas, I thought it would be nice to go back to the roots and see where this tradition came from.

    There really is a history to Mother's Day and it is not something invented in the meeting rooms of card manufacturer's!

    Tributes to mothers can be traced back to ancient Greek times when their annual spring festival dedicated to the mother of many deities, Rhea, was celebrated. The ancient Romans made offerings to their Great Mother of Gods, Cybele. In the 1600's, England celebrated a day called "Mothering Sunday", which is celebrated on the 4th Sunday of Lent and honored the mothers of England. Mother's Day in England today is still celebrated on this day.

    In the United States, Mother's Day actually started approximately 150 years ago, when Anna Jarvis, an Appalachian homemaker, organized a day to raise awareness of poor health conditions in her community. She believed this cause would be best advocated by mothers and called it "Mother's Work Day."

    When Anna Jarvis died in 1905, her daughter, Anna Marie Jarvis, began a campaign to memorialize the life work of her mother. Anna is said to have remembered a Sunday school lesson that her mother gave in which she said,
    "I hope and pray that someone, sometime, will found a memorial mother's day. There are many days for men, but none for mothers."

    Anna lobbied her cause to prominent businessmen and politicians including Presidents Taft and Roosevelt to support her campaign to create a special day to honor mothers. In 1908, one of the first services was organized to celebrate Anna's mother in her church in West Virginia. Anna handed out her mother's favorite flowers to the attending guests - white carnations. In 1914 Anna's hard work paid off when Woodrow Wilson signed a bill recognizing Mother's Day as a national holiday.

    Initially, people celebrated Mother's Day by attending church, writing letters to their mothers, and eventually, by sending cards, presents, and flowers. With the increasing gift-giving activity associated with Mother's Day, Anna Jarvis became enraged. It was her belief that the day's sentiment was being sacrificed at the expense of greed and profit. She even filed a lawsuit to a Mother's Day festival. Before her death in 1948, Jarvis is said to have confessed that she regretted ever starting the mother's day tradition.

    Today, Mother's Day has flourished all over the world. In fact, many countries have their own specific day where Mother's Day is celebrated. Sons and daughters take advantage of this day to honor and to express appreciation of their mothers

    How are you celebrating Mother's Day? Do you have special Mother's day traditions? Share these with us in our comments section. On Sunday we'll list the top 10 traditions in a separate post.

    And for any daddies who might happen to read this post and have younger children: Mother's Day is on May 13th - that's this Sunday!!

    Resources for this post:
    Mother's Day - The Story
    Mother's Day on Wikipedia


    If you like what we girls do here and would like to vote for us in the Blogger's Choice Awards here. Thanks for your support!


    Are you interested in contributing to The Daily Tiffin? Drop us an email: blogmeeta@gmail.com. We look forward to hearing your ideas.

    This Post was written by Meeta from What's For Lunch, Honey?

    Happy Easter!

    Friday, April 06, 2007

    Posted by Meeta K. Wolff


    Wishing all our readers a very Happy Easter! We hope you enjoy the next few days in the warm spring weather with your family and loved ones.

    May your children have a blast with the egg hunt ;-)

    We'll be back next week with new articles and interesting lunch box ideas.

    Warm regards,
    Your Daily Tiffin Team


    Reminder!
    Our first event on the Daily Tiffin this month is Show Us Your Lunchbox. Hope you will join us and allow us to peak into your lunch. Deadline April 20th.


    Are you interested in contributing to The Daily Tiffin? Drop us an email: blogmeeta@gmail.com. We look forward to hearing your ideas.


    What's in your Easter basket?

    Monday, April 02, 2007

    Posted by Meeta K. Wolff


    I think Easter is a holiday loved by all young and old. I personally love Easter because it marks a change to my favorite time of year. I think about picnics, barbecues, relaxing in my hammock. For Soeren he likes Easter because of the excitement and fun an Easter hunt brings along with it - and of course the candy, sweets and chocolates.

    Does it always have to be tons of sweets and chocolates in the basket? Tom and I discussed this last year and decided to try and create a more or less candy-free Easter basket for Soeren. The result was that he did not even realize that there was less candy in his basket.
    He was happy with the other items we had placed that the lack of sweet things went unnoticed.

    This year we're doing the same thing. We've discussed this with the grandparents and uncles etc. and all have agreed to cut down on their offerings of sweets in Soeren's baskets.

    So what are the alternatives that one has? I admit going to the stores becomes a bit of a tough task finding quality items to fill the basket and often I find myself in the chocolate aisle thinking "maybe just this one treat!" It's easier as there is a larger and newer variety every year.
    Here's what I did this year. I made a list of a few items that Soeren needs and might like to have.
    The list looks pretty good and I thought I'd share it with you. Maybe you would like to use one of the ideas for your own candy-free basket.

    • As the weather is only going to get better, Soeren will be spending most of his afternoons outside. Either in our sandbox or with the other kids in the neighborhood. So, I have a beach set on the list with a small rake, spade and bucket. Ball games are popular amongst the kids in the group. So I found a nice ball game where each player attaches a type of Velcro plate to their hands and has to catch a tennis ball with it. Other interesting ideas would be skipping ropes, swim tubes or toys or colored chalks to draw on the sidewalks.
    • Arts and craft supplies. Paints, markers, crayons, coloring books, stones, shells, beads etc. These are always needed and a great way to spend rainy April days indoors.
    • Play-doh, Matchbox cars, small Lego sets/figures are additional ideas that many kids really love getting.
    • Of course the list would not be complete without books. We love books and it is always a part of any gift we give Soeren. There are sets of Encyclopedias for different ages available on the market. Soeren gets one new edition every event. This time we bought him an edition that describes and discovers the five senses.


    What about you? What's going into your Easter basket? We would love to hear your ideas and thoughts on this.


    Reminder!
    Our first event on the Daily Tiffin this month is Show Us Your Lunchbox. Hope you will join us and allow us to peak into your lunch. Deadline April 20th.


    Are you interested in contributing to The Daily Tiffin? Drop us an email: blogmeeta@gmail.com. We look forward to hearing your ideas.

    This Post was written by Meeta from What's For Lunch, Honey?


    Giving Thanks

    Wednesday, October 11, 2006

    Posted by Meeta K. Wolff


    As I mentioned yesterday, Soeren's KIGA had their Thanksgiving festival today. We were all supposed to bring a colorful basket filled with food that represented the season. They do this every year and the whole day is spent doing great and fun things to welcome the Autumn season. Soeren made me a crown decorated with colorful dried maple leaves. He said to me "You are my autumn princess!" CUTE!

    This was our basket that we brought to give thanks. Carrots, corn, apples, a pear and a bell pepper! Colorful and healthy!!



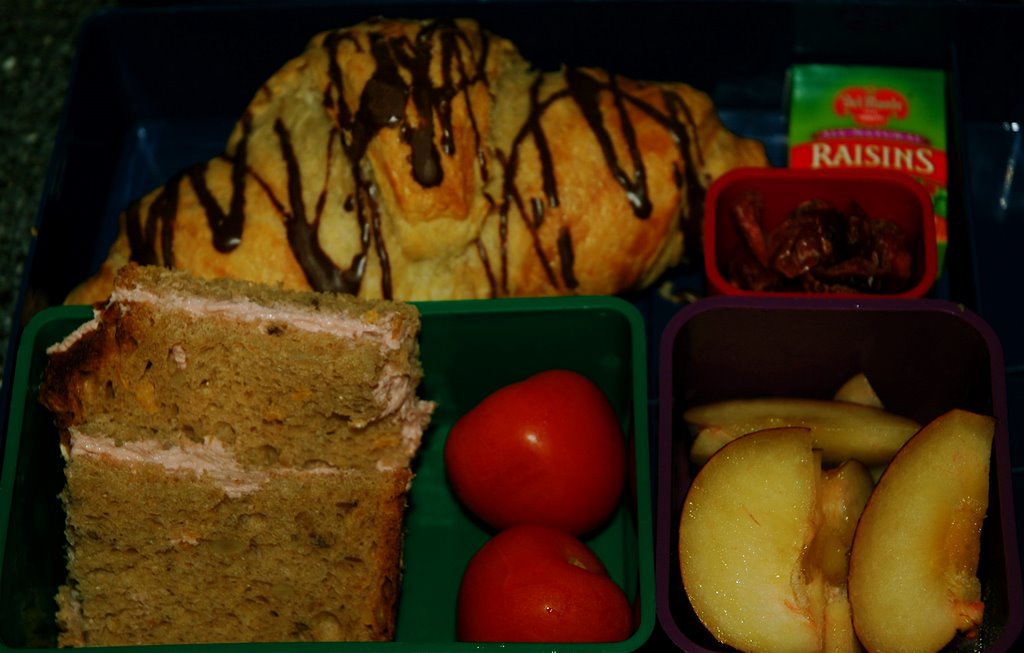
    The lunchbox was also packed with wonderful stuff. A slice of the healthy rye, flax, sesame seed bread spread with leberwurst and a few cherry tomatoes. A mixture of fresh and dried fruit accompanied the lunchbox today. Fresh plums and dried raisins and cranberries. Last but not least a wonderful chocolate croissant.

    Adult Variation:
    If you do not like the leberwurst then try a fish pate! I made one the other day and it was lovely. Recipe will be available on WFLH? at some point in the future.

    Where am I taking Tom for his Birthday?

    Friday, March 31, 2006

    Posted by Meeta K. Wolff

    Here is a little game I am playing on my personal blog, The Family Buzz. Thought the readers here might want to play too.

    I am taking Tom somewhere special for his birthday. Over Easter we will be off to this great city. Can you guess by looking at the pic above where this is? Actually, there is a cheat to this, but I hope you are all honest enough to guess without the cheat.

    If you do guess right then I will send you a postcard from this place, so make sure you leave your address!

    Carnival

    Tuesday, February 28, 2006

    Posted by Meeta K. Wolff

    Today Soeri and his KIGA group are celebrating their carnival party. So, no lunchboxes today. They will be becoming a carnival breakfast and in the afternoon I have organized carnival specialties called Berliner for the entire group.

    These are doughnuts filled with strawberry jam. The little ones are really yummy and my favorites. They are filled with something similar to cream cheese called Quark.

    Instead of the lunchboxes I am leaving a great recipe for homemade Berliners!

    As they say here in Germany during carnival "Helau!"


    Ingredients

    15 g Yeast
    1/8 liter Milk
    250 g Flour
    25 g margarine
    1 Egg
    Lemon aroma
    6 teaspoons Strawberry jam
    30 g Icing sugar
    1 tablespoon cold water


    Dissolve the yeast in luke warm milk. Add the flour, margarine, egg, a pinch of salt, and a few drops lemon aroma in a mixing bowl and beat with a kitchen machine. While beating slowly add the yeast-milk. If needed add a little more flour. Cover the dough and let stand in a warm place until it has doubled. Form 6 round balls and press gently to flatten it slightly and place on baking paper.

    Heat the deep fat fryer to 165° Cand take out the basket. Add the Berliner in 2 portions into the basket and fry for 2 minutes, take out, turn and bake for another 2 minutes. Take out and let drip on kitchen paper.

    While still hot sprinkle icing sugar (you can also use normal sugar) over the top. Fill the jam in a piping bag and fill the Berliners with this.