MERRY CHRISTMAS...

Friday, December 25, 2009

Posted by Deeba PAB

"From home to home, and heart to heart, from one place to another. The warmth and joy of Christmas brings us closer to each other."
Emily Matthews


 Daily Tiffin wishes all its readers a Merry Christmas.
Have a great holiday season and a prosperous new year.


This post was written by Deeba


Are you interested in contributing to The Daily Tiffin? Drop us an email: thedailytiffin@gmail.com. We look forward to hearing your ideas.

A Time For Giving ... Bitter Orange Marmalade

Tuesday, December 22, 2009

Posted by Deeba PAB

It’s the time of the year that I like best. A time for giving, a time for sharing, and a season full of joyous spirit. Now is perfect for baking, cooking & gifting home made food stuff, and is a longstanding Christmas tradition. A tradition which is about giving, and not so much about getting. Baked goods play a huge role in celebrating holidays. Add fudge, praline, jams, jellies, relishes, homemade chocolates and life sparkles with festivity.

This is also the time of the year that the tangerine tree is laden with fruit & calling my name. I have a tradition of making bitter orange marmalade at this time of the year, packaging it in reusable jars that I collect through the year, and gifting them. I have a long list of bitter marmalade lovers who await their annual 'share'!

Most people in India grow these tangerine trees for it's ornamental beauty as the fruit is sour beyond belief. I make this traditional British-style marmalade with a recipe handed down from my mothers' friend. British marmalade is a sweet preserve with a bitter tang made from fruit, sugar, water and, in some commercial brands, a gelling agent. American-style marmalade is sweet, not bitter.

Bitter oranges originated in the northeast of India and neighbouring areas of China and Southeast Asia. During the first centuries of their empire, the Romans took a great interest in the fruit; however, as their domination of Europe ended, so did the cultivation of oranges. By this time, Arabs had established both themselves and the bitter orange in Spain. With the Moors' irrigation technology, the fruit flourished in the once-dry land.

Some believe that the British passion for the fruit – or rather, the fruit transformed to marmalade – began with a happy accident in 1700, after a young Dundee grocer named James Keiller took a risk on a large consignment of oranges that were en route from Seville, on a ship sheltering against a storm in Dundee harbour. The oranges were cheap, but Keiller couldn't sell them: the flesh was far too sour. His shrewd wife, however, used the oranges to make a spreadable preserve. The jars went on sale in Keiller's shop and soon demand became so high, the family had to order a regular shipment of oranges from Seville. By 1797 they had opened Britain's first marmalade factory.

Tangerines are easy fruit to preserve as jam, as the seeds are high in pectin content. This particular recipe has the seeds tied together in a tiny piece of cheesecloth & immersed in the ingredients during the process. I think it adds to the conventional bitter edge to the marmalade.

BITTER ORANGE MARMALADE
Ingredients:
Tangerines - 1 kg
Sugar – 1.250 kg
Water - 250ml
Method:
Sterilize 4-5 jam jars, including lids. Place a sterilized metal spoon in each jar (this ensures that the glass jar will not crack when the hot jam is poured in).
Halve the tangerines and deseed them. Tie the seeds in a small piece of cheesecloth and reserve them.
Snip the peels and pith included into strips with kitchen scissors.
Put the strips, with the pouch of seeds, in a heavy bottom pan on full heat. Boil for 2-3 minutes till the peel is tender, stirring constantly.
Add water and boil for 2-3 minutes. Now add sugar, stirring constantly.
Continue to boil on full heat for a further 10-15 minutes until the mixture thickens & the strips becomes translucent.
Drop a few drops on a cold metal plate to check if the jam is setting properly. After 30 seconds, it should congeal and look jellylike.
Put off the flame, discard the muslin pouch with the seeds and allow the jam top cool slightly, about 10-15 minutes.
Now pour the marmalade into the jars, and seal after 10-15 minutes. (Refrigerate if you like. I do because I make a batch that lasts me 6 months.)


This post was written by Deeba

Are you interested in contributing to The Daily Tiffin? Drop us an email: thedailytiffin@gmail.com. We look forward to hearing your ideas.

Quick Indian

Friday, December 18, 2009

Posted by Bina

A perfect example of an oxymoron! I bet it's what some of you are thinking. Especially if you believe a common misconception about Indian cooking; that it is complicated and time-consuming. In reality, it's quite the opposite. Just look at the delicious, quick and healthy Indian meals made with little fuss in millions of Indian home kitchens everyday. Food that makes its way into lunch boxes packed early in the morning, evening meals with family and leisurely meals with friends. You can do it too. It is not difficult, I promise!

The series will hopefully inspire you to cook Indian food in your own kitchen. The recipes over the next few months will be simple, vegetarian dishes that are typical to everyday meals-vegetables, legumes (lentils and beans), rice, breads, snacks/appetizers, chutneys and desserts. Don't be fooled by their simplicity though. Many of them are also great for entertaining, and show up on my table when friends just drop by and stay for a meal, as well as for formal parties.

All the recipes are fairly quick but factor in some time for prep work like chopping vegetables, soaking beans etc. You can, of course, use frozen vegetables when possible. Canned beans are really convenient but make sure they are rinsed well before cooking. As far as cookware and tools go, you will need a very basic coffee grinder for the spices and a blender for the chutneys. I know many Indian cookbooks suggest using a kadai (a wok shaped vessel) for cooking but it isn't a must. I use regular, heavy-bottomed pans (nonstick and stainless steel) and only use the kadai for deep-frying.

Spices

Any talk of Indian cooking is immediately followed by that of spices. The seemingly endless variety can be very daunting. It's true....there are a lot of spices used in Indian cooking in general. However, you don't need to have all of them in your pantry, and not all of them are used together at the same time. Usually, it a combination of just a few spices that go into the making of a dish. Speaking of spices, a wonderfully detailed explanation about individual spices can be found here.


The initial recipes will use spices that are easily found in your grocery store. As we move along, we will add others like fenugreek, asafoetida, curry leaves etc. that might require a trip to the local Indian or Asian store. You can buy most of the spice powders/mixtures readymade. I do. Except coriander powder and garam masala, which I make at home. It is really not hard to do and makes a huge difference to the taste. Garam masala is quite possibly the most recognized among all the Indian spice mixtures. Many recipes for garam masala are very elaborate and are jealously guarded secrets. Mine is simple and not a secret at all!

Garam Masala

3 tablespoons cumin seeds

6 tablespoons coriander seeds

1 1/2 tablespoons black peppercorns

3 tablespoons cardamom seeds

3 sticks whole cinnamon (about 2 inches long)

1 tablespoon nutmeg, freshly grated

1 1/2 tsp whole cloves

Method

  • Put all the above spices except the nutmeg powder in a heavy bottom skillet or pan.


  • Dry roast it on medium to medium-high heat stirring very frequently. Keep stirring till the spices start turning darker.


  • Take the skillet off the heat and transfer the spices into a plate to cool.


  • Add the nutmeg.


  • Once the spices come to room temperature, grind it to a fine powder in the coffee grinder.


  • Store in a bottle with a tight lid (I use jam/jelly bottles)


  • Herbs and stuff


    Ginger, garlic, mint and cilantro are easily found in stores. You can use jalapeno, serrano or other hot peppers instead of the Indian or Thai chillies. The curry leaves will require a special trip to an Indian and Asian grocery store. I have found that the best way of storing them long term is by freezing. However, directly freezing fresh curry leaves results in the leaves turning black over time and also having an off taste. Flash-frying it first and then freezing works very well for me. Just remember to add the frozen leaves directly to the dish while cooking and not in the tempering oil (The moisture in the frozen leaves makes the oil splutter). When added during cooking, the leaves get rehydrated and look and taste very much like the fresh ones.

    The following recipe can obviously be scaled up or down based on your needs.


    Preserving Curry leaves

    Ingredients
    1 cup curry leaves
    3/4 tbsp canola/peanut/vegetable oil

    Method

    1. Wash and dry the curry leaves (A salad spinner is great for this)
    2. Spread them on a kitchen towel and leave them for about 10 minutes.
    3. Heat the oil in a wide skillet (not nonstick). The oil should get very hot but not smoking
    4. Add the curry leaves and stir lightly for about a minute on medium heat. The leaves will make a crackling sound and start turning crisp.
    5. Transfer to a plate and cool completely.
    6. Put in a ziploc bag and freeze for upto 6-8 months. (I have frozen them for a year with no loss of color and flavor).

    Stay tuned because future posts are all about recipes that will hopefully have you cooking up a storm!


    This post was written by Bina


    Are you interested in contributing to The Daily Tiffin? Drop us an email: thedailytiffin@gmail.com. We look forward to hearing your ideas.


    Baby Proofing...or how to Protect your House from your Baby

    Wednesday, December 16, 2009

    Posted by Hilda


    Conventional wisdom has it that you are protecting your baby from your house when you baby proof it. Well, really you're protecting them from you and your bad habits... you know what I'm talking about: leaving change and small things everywhere when you clean your bags and pockets, the cables that, even when painstakingly separated, manage to get back into an impossibly tangled mess a day later, etc... as soon as you own up to that, the whole process of proofing will become more straightforward.
    Once a baby is crawling or walking, making your home safe for baby is almost a daily chore. Here are some important things to watch for:
    • As soon as your child can sit up or be on all fours and therefore reach up and touch them or pull them down, remove mobiles or hanging items from his/her crib.
    • Keep any items that will fit into the palm of your hand if you close it, such as coins, small toys or pieces of toys, buttons, balloons, etc... off any surface that is at or below your waist level since a child who can sit up and crawl could possibly stand up and pull those items off a low table.
    • Beware of curtain or blind cords that hang, shorten them or position them on a hook high up on the wall so they are well out of reach of the child. 
    • If you use doorstops (for example we have to have them everywhere here as our doors are fire-safety doors), buy the all-plastic all-in-one large doorstops or doorstops that are much bigger (e.g. we have a small bean bag door stop that is a bit larger than the size of our child's head) and absolutely remove plastic ends from non-plastic doorstops as those are a serious hazard and several infants choke on them each year.
    • Put away any chemical or hazardous substances preferably in high-reach cabinets with locks or put child-proof locks and other babyguards on any lower cabinets which might contain these items. Remember that substances hazardous to a baby include alcohol or medication of any kind.
    • Pad the edges of any item of furniture that has square or fine (and therefore sharp) edges. You would also be well-served to put any glass furniture (e.g. glass coffee table) in storage for a few years, or simply get rid of it for a more child-friendly material. We don't have glass furniture because, while I love glass tables, my husband fell on one when he was two, thankfully not injuring himself, but it was a close call and he now harbors a mild fear of glass furniture as a result. Anyway, we have a baby so case closed.
    • Cover all electrical outlet with child-proof covers. The more commonly found plastic plugs are easily pried out, particularly if you have an extremely persistent child (guilty as charged). 
    • If you must have houseplants, place them out of the baby's reach and become very familiar with every one of your plants' names and potential effects if ingested. It's the 21st century people, if you're reading this you can google your plants; it takes a couple of minutes and could save you so much grief.
    • If you use a crib bumper, remove it when your baby can get on all fours as he might use it to climb over the side of the crib. Seems unlikely, but you don't want to find out the hard way.
    • Secure heavy stand-alone furniture such as shelves and commodes to the walls so your child cannot topple them if he/she tries to climb up on them. By the same token, try to hide or securely cover all appliance cords (IKEA has cord tubing for this specific purpose) so that your child cannot either pull table-top appliances off surfaces or items such as audio/stereo equipment off their perches - try to position those things far back and high away from your child's reach to begin with. If, by some miracle, you still have a VHS player or more likely, a CD player, find a guard to put in front of their "openings"; most of us are old enough to remember at least one baby "feeding" the VCR...
    • On gates and guards: If you have any heating units or a fireplace, position gates or guards to prevent the baby from crawling too close to them, for obvious reasons.
    • If you have any staircases that are more than two stairs, install a hardware-mounted gate, meaning a gate that fastens directly on the wall and uses a latch to open and shut, rather than a pressure-mounted gate that works through a mechanism of two sliding panels designed to reach the opening dimension and lock by pressure. Pressure-mounted gates are fine between two rooms on the same level but are not recommended at the tops of stairs.
    Of course, these are not all the things you could possibly think of, but it's a good list to start with. If there are any other obvious things missing, please feel free to add them

    With the holidays upon us, take care that your safety checks include such things as menorahs (brass and candles) or christmas trees (pine needles, ornaments - i.e. small breakable objects, tree lights, etc...).

    Most importantly, if you feel overwhelmed at the idea of doing all of this, remember that you can do it progressively while your baby is still stationary and that just a bit of prevention can avoid emergency room visits later.

    Happy proofing and Happy Holidays!


    This post was written by Hilda


    Are you interested in contributing to The Daily Tiffin? Drop us an email: thedailytiffin@gmail.com. We look forward to hearing your ideas.

    TWO HOLIDAYS IN ONE

    Wednesday, December 09, 2009

    Posted by Jamie

    Tis the season to be jolly, according to one well-known holiday song. And it certainly is what with the swags of gaily-colored lights and the glittery garlands strung up and down the streets, the holiday music piped into shops and city squares adding a festive rhythm to your already bouncy step. Candy shop windows have become wonderlands of silver and gold, boxes tied up in plump velvet bows and crystal dishes filled with every chocolate delight. Toyshops greet you with fluffy cotton snowmen and jolly Santas prancing through the snow laden with gifts for all. Friends chattering non-stop about holiday meal preparations, the pies and the cookies, the turkeys and hams, the family flying in from the four corners of the earth to celebrate together amid laughter and seasonal joy.


    And if you don’t celebrate Christmas? I know how easy it is to get swept up in the festivities, the bright lights and the wonderful culinary traditions. “I don’t celebrate Christmas” is often greeted with quizzical, confused looks and “Why not?” follows the surprise. For many, this holiday is universal, a sharing of love and human kindness, the excitement of decorating and the pleasure of giving and receiving gifts. Yet when raising children in another culture or religion, how does one balance the traditional/religious side of Christmas with the non-religious commercial side, that part of Christmas that kids see others celebrating, and often watch enviously from afar?

    I have tried to raise my children in a Jewish home, yet they have celebrated the odd Christmas whenever they spent their winter holidays with their French grandparents: chopping down, dragging home and then decorating the tree, pulling out tiny figurines and setting up the crèche in front of the fireplace, hanging stockings and receiving Christmas gifts directly from the hands of Jolly Old St Nick (le Père Noël or better known as Tonton Claude!), and eating their fare share of Bûche de Noël and marrons glacés. We even had a small tree once or twice in honor of their heritage and their grandparents, but the real excitement and joy seeped into our house at Hanukkah time: the boys drew and cut out Maccabees and Assyrians when they were small, creating a cardboard version of the great battle scene in which the tiny Jewish army, made up of a band of brothers, defeated the powerful, well-armed great Greek Syrian army who were out to wipe out the Jews; and still every year the boys pull out these tiny figures and line them up on the dining room buffet, they hang glittery, shiny garlands of silver and blue and prepare the two Menorahs (one for each of them to light). This is the Festival of Lights, the holiday in which we are reminded of the destruction of the Holy Temple in Jerusalem by that mighty Assyrian army and the oil in the Holy Eternal Light that burned for eight days instead of one until more oil could be prepared. We therefore light candles on a Menorah, the special holiday candelabra, for eight nights, starting with one candle on the first night, and adding one more each night. On the eighth and final night of Chanukah, all the candles are lit. And, of course, there is a gift on each night, with the lighting of each candle. And lots of latkes, the traditional treat of Hanukkah, fried potato pancakes eaten with fresh applesauce.


    Yet, how to deal with the Christmas season for those of us who don’t celebrate this holiday? Food is always my way! Bring in a little of that Christmas cheer by baking puddings and cakes, stollen, panettone, gingerbread men and whatever other little goodies and treats that can be baked and offered to your loved ones. The kids can bring in their friends to share in the holiday goodies or pack them up and dole them out to neighbors and colleagues. And why not mix it up? Here is my absolute favorite cut-out cookie recipe, buttery sweet and tender, never crumbly and dry: every year I pull out my Hannukah and Christmas cookie cutters: the Star of David, the Menorah and the Dreidl along with the sleigh and reindeer and Santa cookie cutters. Glazed and sprinkled with colored sugar or rolled in nuts or simply eaten plain, these are the best cookies ever!


    This year I’ve made my traditional Hanukkah cookies, drizzled with white chocolate and sprinkled with blue, but for the Christmas in me, I’ve used my ruffled cutters in 4 sizes to create a Christmas tree. Once cut out, I brushed the edges of the shapes with a bit of beaten egg then dipped them carefully in crushed green pistachio nuts to give the idea of a fir tree. They baked up perfectly! I then sandwiched them together with “snow”, a fluffy lemony mascarpone-goat cheese cream with plenty of whipped cream folded in. I piled up the layers then sprinkled them with a little bit of gold sugar crystals and some gorgeous pink praline, a gift from Pam.


    HOLIDAY CUT OUT BUTTER COOKIES

    2 sticks (1/2 lb, 225 g) unsalted butter, softened to room temperature
    ¾ cup (150 g) sugar
    2 large eggs
    ¼ tsp salt
    1 Tbs Amaretto (optional)
    ½ tsp vanilla – use 1 tsp if omitting the Amaretto
    3 ½ cups (525 g) flour

    In a large mixing bowl, cream together the softened butter and the sugar until light and fluffy.

    Add the eggs one at a time, beating briefly after each addition just to incorporate.

    Beat in the salt, the Amaretto and vanilla and then about a third of the flour until smooth. Gradually beat in as much of the remaining flour as possible using the electric beater, then stir in the rest with a wooden spoon or a spatula.

    Turn out onto a lightly floured surface. If you haven’t stirred in all of the flour you can knead in the rest quite easily. Once you have a smooth, homogeneous dough, wrap tightly in plastic wrap and let it chill in the refrigerator for at least 30 minutes.

    Preheat the oven to 350°F (180°C).

    Working with about half the dough at a time, roll it out to a thickness of not less than 1/8-inch (no less than .3 cm), being careful that the dough is very evenly rolled out. Carefully cut out shapes with your cookie cutters. Gently transfer to a cookie sheet (I use unlined, ungreased cookie sheets with no problem at all). If you want the fir tree effect, just gently lift the cookies one by one, brush around the edges with a beaten egg, then dip in crushed pistachio nuts before placing on the cookie sheets. I also brushed my Hanukkah cookies very lightly with egg wash and doused them with colored sprinkles.

    Bake for about 10 minutes. They will be set and appear cooked but they will NOT brown. You’ll know they are cooked because they will slide right off the cookie sheet when just nudged with a spatula.

    Allow to cool. You can now frost them or drizzle with melted chocolate as I have done.


    MASCARPONE-GOAT CHEESE LEMON CREAM
    This is adapted from a recipe I found on Meeta’s blog What’s for Lunch Honey?

    7 oz (200 g) mascarpone cheese, drained
    1 oz (30 g) fresh, tangy goat cheese, drained
    2 Tbs (30 g) superfine sugar
    Finely grated zest of ½ lemon
    1/8 tsp ground cinnamon
    ½ tsp Limoncello

    ¾ - 1 cup (about 200 ml) heavy whipping cream
    Edible decorations (colored sugar, chopped nuts, etc)

    Make the Lemon Mascarpone Cream:
    Place the mascarpone, the goat cheese, the sugar, zest, cinnamon and Limoncello in a mixing bowl and beat until smooth and creamy. Chill.

    Have the Lemon Cream, the whipping cream as well as the glass bowl and beaters for beating the whipped cream very well chilled before making the “snow”.

    When ready to make the Cookies and Cream Christmas Tree, beat the heavy cream in the chilled bowl with the chilled beaters until thick. Using the same beaters, beat the Lemon Mascarpone Cream briefly (in a large bowl) just to loosen it and make it smooth and creamy after chilling in the fridge. Add the whipped cream to the Lemon Mascarpone Cream and beat briefly to blend and thicken.
    To create the Cookies and Cream Christmas Tree:

    Simply pile up the various-sized ruffled cookies which had been trimmed in chopped green pistachio nuts from largest to smallest, placing a large dollop of snow/lemon cream carefully in the center of each cookie round before placing another cookie on top. Decorate by sprinkling the snow with colored sugar decorations.


    This post was written by JAMIE


    Are you interested in contributing to The Daily Tiffin? Drop us an email: thedailytiffin@gmail.com. We look forward to hearing your ideas.

    Vegetarian Pyramid Series - Corn

    Saturday, November 28, 2009

    Posted by DK


    Person1 : I am planning to buy some polenta today..
    Person2: Buy? Why go for ready made stuff? You can make it so easily at home….?
    Person1: Make? How am I going to make some wholegrain at home??
    Person2: ????

    As if the idiosyncrasies of the English language was not enough (quoting my German professor!), we have similar terminologies to mean different things in the Food dictionary too! It can sure be quite confusing at times. The word “Polenta” is used to mean a dish made with cornmeal as well as the cornmeal itself. When it comes to cornmeal, the variety available in the markets now days is simply mind boggling to say the least. Let’s take a quick look at corn shall we?

    Corn is a wholegrain which falls under the category of cereal grasses. If you walk down your food aisle in the market, you will come across yellow corn (otherwise known as maize) and other corns colored red, blue and black. I recently happened to see multicolored varieties too. There are many corn products too.It is a staple in many countries around the world with having prominence in U.S.A, Italy and the Caribbean. (White cornmeal - image courtesy -ansonmills.com)


    The most commonly available forms of corn are –

    Cornmeal

    The minute ‘cornmeal’ is mentioned, the first thing that probably comes to an American’s mind is the classic cornbread. For the Italians, its ‘Polenta’.

    Polenta has a golden, thick-porridge like consistency and is flavored with butter and cheese. They make an excellent alternative to Mashed Potatoes. It is also used to make dumplings and puddings in the Caribbean.

    Masa Harina
    Masa Harina also known as Maize meal is made from the cooked wholegrain where it is ground into flour. This flour is mostly used to make Mexican flatbread called as Tortillas. (Yellow cornmeal - image courtesey - ansonmills.com)

    Cornstarch
    This is a fine white powder mostly used as a thickening agent for stews, soups, casseroles etc. Sometimes it is also used in baked goods and in making desserts. (cornstarch -image courtesy -Bonappetit.com)

    Hominy or Grits?
    There is big confusion regarding these two where they are sometimes used interchangeably.

    Hominy are the husked whole grains of corn. To use them, they have to be first softened by cooking them in hot boiling water and then used in other dishes like soups, stews or in any baked goods.

    Grits are in fact coarsely ground dried yellow or white corn. They can be used in baking and also for pancakes.

    There is wonderful article which throws more light about Hominy grits and corn grits with humorous analogies at mrbreakfast.com. Also a discussion regarding the finer differences between corn products can be seen here at Chowhound.com.

    Popcorn
    We all love popcorns don’t we? This is a completely separate strain of corn which is grown specifically for this purpose. The kernels can be store bought and the popcorns can be easily made at home with any type of seasoning added as per taste.

    Corn syrup
    This artificial sweetener is a staple in many households now. Though the name suggests it, it is not made by directly pulping the corn. Instead it is made from cornstarch which is actually the pulpy middle layer of the corn where it is separated from its outer husk and its inner germ layers. Storage of these in giant vats helps it to produce glucose when natural enzymes are added to it. This glucose is heated and made into corn syrup. It’s used in candy making and also in baked goods.

    Few recipes with Corn based Products
    1. Skillet Polenta Pizza
    2. Iron skillet Jalapeno and Cheddar cornbread
    3. Corn Muffins
    4. Corn Tortillas
    5. Blue cornmeal pancakes
    Health benefits
    Corn plays an important role in American folk medicine where its famed to be a diuretic and a mild stimulant. Few studies have shown that it even helps to prevent colon cancer and lowers the risks of heart disease. Corn is one of the few grains (or probably the only one) that contains vitamin A as well as Vitamin B and iron. It has about 18.4% of daily recommendation of fiber. Since its high on fiber, it helps to lower levels of cholesterol in the body along with blood sugars proving beneficial to diabetics.

    This post was written by Dhivya

    Are you interested in contributing to The Daily Tiffin? Drop us an email: thedailytiffin@gmail.com. We look forward to hearing your ideas.

    LIFE AND DEATH AND THE ROAD WE TRAVEL TOGETHER

    Tuesday, November 17, 2009

    Posted by Jamie

    How do we deal with the death of a loved one? You wipe away your tears as you walk away from the funeral, join the family back at the house for a cool lunch, cold cuts and fresh fruit and more tears but mostly laughter, enjoying this time together no matter how bittersweet, recounting family stories, pulling up memories from some deep spot in your heart. And then, what happens next? You pack your suitcases and fly back home where husband and kids await, the laundry pile has mysteriously grown all out of proportion, the dog dances around you, nosing into your bags as soon as they hit the floor, everyone clamoring for your attention.

    Michael and I 1962

    You try and get back into the swing of things, “real life”, as quickly as possible, partly because there are those who need you, who depend upon you, but more likely because it is the easiest way to block out the thoughts, the loss.

    Almost two months has past since I was standing in the burning Florida sun trying not to look in the direction of the wooden box stretched out serenely in front of us, saying good-bye to my beloved brother. Heartbroken doesn’t even begin to describe it. As we get older we begin to expect, to understand that one by one we will lose our loved ones, grandparents, parents, and we try and brace ourselves for the eventuality. Yet when another older generation passes away, someone in their 70s or 80s or 90s, we can comfort ourselves with the thought that they lived a good, long life, accomplished what they wanted to accomplish and hopefully didn’t suffer too much on the way out. It is the way of life, one generation at a time, life then death.

    Sue and Michael 1960

    Yet when the unexpected happens, friends or family of our own generation or, heaven forbid, a child, go, whether illness or accident, incomprehension intertwines with the pain: We look at their life and think of all they had yet to accomplish, the years and road ahead of them, and we wonder if the tears are for them or for ourselves. Their death brings us closer to our own destiny and, truth be told, we just aren’t ready, we have such a long time ahead of us, there is still so much to do, so how is this possible? The loss is so close, too close, and it is as if we have lost a limb or part of ourselves. And now we return to our family our home our job and must move ahead. How?

    Michael and I 1972

    I have been keeping busy. Blogging, writing, cooking, baking. Laundry, shopping, evenings out or in with the family. No time to think about the loss. Afraid to look at it in the face, scared and simply not understanding the unfairness of it all. And then I wonder if we, the survivors, cry for them and such life cut off in its prime, everything left undone, or are the tears for ourselves, left alone like orphans, no more birthday calls or silly cards, no more long catch-up phone calls or brotherly advice, no more visits or cooking together or laughing over stories of when we were kids. Or maybe this unexpected death forces us to look our own destiny, our own eventual death, in the face. And what happens afterwards? Heaven? Reincarnation? Nothing? And all too often, we close our eyes and refuse to look.

    A dear friend of mine reminded me of the importance of grieving: “The death of a loved one is something that we all experience at some point in our lives and I think it is important to talk about it instead of tidily brushing it under the carpet. When my grandfather died, I was so unprepared and had no idea how to deal with my emotions.” We tend to skip around the issue, avoiding it as if it were taboo. Yet somehow it is comforting when people ask how the funeral went, how we are doing and open the door to discussion. Why are we so nervous bringing it up to someone who has just lost a loved one? We should talk about it, even if we stumble around searching for just the right words. Even no words, the “I don’t know what to say”, helps break down the invisible barrier and allows us to share feelings and fears, hopes and dreams, memories and ideas about where we go when it all ends. Another friend of mine sent me a fascinating book about reincarnation. Her philosophy? Spirits are all around us but aren’t there to do harm but rather to watch over us, help us understand what we don’t understand and we should simply give a friendly Hello from time to time and let them know we appreciate the visit and the care. Talking with her is so comforting, no black thoughts, no fear of the unknown, rather the joy of life, the dream of an afterlife and never losing touch with those who have passed on.

    Michael with our mom and my boys @1995

    And what about the kids? Children may not feel the death of a loved one as strongly, but may need to talk about it even more than we do. My 19-year-old son said “I didn’t see Uncle Michael often enough to really feel the loss, not like you do what with your history together.” Yet several weeks later, as we were strolling down the street, he burst forth with “I just can’t believe Uncle Michael is gone. It is so strange to think about!” The door to discussion needs to remain open for them as well as for us, for the strangeness of it all, the scariness of an illness or death, should be talked about. If we don’t talk about that then how can we spend the time talking about his life and all that fun that we shared together? It all blends into one.

    So it is perfectly fine to broach the subject, don’t be afraid. There is comfort in allowing us to talk, to share the stories that we all have, to hear yours as well. This is the only way we can grieve, by telling the tale, sharing the stories, crying and laughing together. Not only does this draw us, the living, closer together, but it allows us to face our own fears of “what happens next” and realize that we are all in it, this crazy thing called life, together.

    The family in Florida 2008


    This post was written by JAMIE


    Are you interested in contributing to The Daily Tiffin? Drop us an email: thedailytiffin@gmail.com. We look forward to hearing your ideas.

    Foods You Thought You Knew

    Friday, November 13, 2009

    Posted by Hilda


    So I think I’m probably going to be known as the baby-lady around here, but as many of you know, it does take over your life doesn’t it... but in a very good way.
    Today we are going to talk about carrots. That’s right, you heard--err, read me correctly, carrots. Why are we going to talk about carrots? Because I use them a lot in my baby’s food and because they’re quite interesting in more ways than you’d think.

    I guess there could have been many other vegetables I could have written about for this post but I picked carrots because -WARNING: I’m about to admit something I probably shouldn’t here so get ready- I only just discovered- NO not carrots silly, of course I’ve known carrots forever, who hasn’t- rainbow carrots. I’ve only just discovered rainbow carrots. I didn’t actually know there were other colors of carrots than orange, (did you?) so imagine my surprise when my husband brought home these beautiful carrots in shades of purple and greenish-yellow and told me there even were red carrots out there somewhere.
    Upon doing a little bit of research I discovered that carrots, in fact, were not orange to begin with. That seems odd doesn’t it? It seems like no actually they always were orange and then some guy with too much time and a lot of carrot seeds laying around started making hybrids and coming up with cool funkedelic colors, but it just seems that way, that’s not really what happened.
    In reality, it’s not exactly clear what the chronology of the modern carrot is other than, from evidence found in archaeological digs, some form of carrot, as in plants from the carrot family, existed back in the Eocene period (55 to 34 million years ago). After that, there is no actual written record of their use either for food or medicinal purposes until the Greeks and Romans, although the domesticated version of carrots (oh yes, I’ll tell you about that in a minute) are believed to date back to approximately 5000 B.C. in Afghanistan.
    So, to the issue of wild vs. domesticated carrots. When I first read that there were wild carrots and that the carrots we take for granted as simply being carrots are the hybridized and domesticated descendants of "wild" ones, I imagined a Mr. Potato Head version of a carrot wearing a loincloth and carrying a sharpened stalk of celery for a spear. It turns out that you probably know wild carrots by another name; they are commonly known as Queen Anne's Lace and are mostly considered to be a weed, albeit a pretty one; the root is tough, pale (most often white), bitter and quite small. Presumably, over thousands of years and many combinations, the modern, domesticated carrot evolved partially from the wild carrot, but attempts to create domesticated edible carrots -such as we know them- purely from wild carrots have failed, so the belief that domesticated carrots come entirely from wild ones is inaccurate.
    The first domesticated carrots that I mentioned above were purple and sometimes yellow. Through time and cross-cultivation, other colors appeared, first red, then white, then orange which became the most common form of carrot particularly in the West. They were brought to Europe by the Arabs in the 10th century, at which time the orange version did not yet exist, and it is thought that Western Europeans eventually developed the common orange-colored carrot some time around the 16th century.

    Now to the nutritive properties of carrots, which is really why you might still be reading this post:
    Carrots are phenomenally nutritious. They contain the most beta-carotene (unsurprisingly and that which gives carrots their orange color) of any fruit or vegetable which is converted to vitamin A by the body. They also are a source of vitamins B6 and C, and a pectin fibre known as calcium pectate which may have the ability to lower cholesterol. Carrots are loaded with potassium, thiamin, folic acid, and magnesium and when cooked also contain copper, iron, manganese, phosphorus and sulphur. The lesson here being that an apple a day is all well and good, but maybe you should consider eating some more of those carrots you have laying around. It's as easy as washing and peeling one. If you happen to get a bunch of carrots with their greens, those contain vitamin K which is not present in carrots themselves, so you might want to use those as well. It's all good.

    I used to hate cooked carrots when I was little, but realized in retrospect that that was only because my mother didn't cook them and the only cooked ones I had were often boiled to death and lacking any flavor. I've always loved them raw however, and now like them cooked as well. I've been making all of the carrots pictured above for my little noodle and she loves them, no matter the color or the manner in which they are cooked. It is thanks to her that I've discovered all of these things about carrots, and that I continue to discover things every day about foods I eat.
    Have you learned anything about foods you thought you knew from your children?


    This post was written by Hilda


    Are you interested in contributing to The Daily Tiffin? Drop us an email: thedailytiffin@gmail.com. We look forward to hearing your ideas.

    Tiffin Tuesday - The Grain-Free Bento

    Tuesday, November 10, 2009

    Posted by Petra Hildebrandt

    Whenever I read (quite useful) instructions on packing bentos, I stumble upon tipps like this one:

    Plan your meal. Bento lunches traditionally consist of 4 parts rice, 3 parts protein, 2 parts vegetables and 1 part dessert or pickles. Even easier-- mentally divide the box in half. Half for rice, then 1/3 of the other half for protein, 1/3 for veggies and the final 1/3 for condiments and dessert.

    While this is great advice, I sometimes feel at a loss. What are people on special diets supposed to do? E.g. my body doesn't respond too well to grains, to put it mildly - rice is one of the few things I can digest in small amounts, and I'd rather keep that portion for other occasions. If you are on a low-carb diet, or suffer from type 2 diabetes, having to control carbs, or are restricted in your food choices for one reason or another, especially when it comes to carbohydrates, you'll have to find alternatives.

    On the other hand, this is one reason for me - and I bet many of you - to pack my own lunches, aside from better value for money: being able to control what is in my foods, catering for the needs of allergic children or spouses.

    Still, rice, or noodles, bread, potatoes, are the obvious fillers in a bento - so we are in need of fresh ideas.


    Here I packed feta cheese cubes, with a sprinkling of pepper, and halved grape tomatoes (actually the pepper came in a small paper sachet I had saved on an airplane trip last year, and waited under the lid until lunch time), cucumber pieces, an egg, and a tuna dipp.

    In the spirit of getting back into the habit of packing bentos, here are just a few ideas for (not only) grain-free bentos:
    • grilled chicken pieces
    • leftover grilled steak, sliced
    • tiny brochettes (saté) with shrimp or meats or fish
    • paneer cubes
    • mini cheeses
    • cubed feta
    • eggs (think quail eggs!)
    • tamagoyaki, of course
    • omelette
    • konnyaku noodles (shirataki)
    • cooked chickpeas
    • tiny amounts of curry (any kind) to be eaten with torn romaine leaves
    • chicken or tuna salad, in muffin cups, or in cucumber cups or tomato halves
    • dips - guacamole, tuna dip, herbed quark or cream cheese, tsatsiki, hummus, Mexican bean dip, blue cheese dip, peanut dip, salsa
    • cooked beans
    • edamame
    • green beans
    • cherry tomatoes
    • kohlrabi sticks
    • celery sticks
    • carrot sticks
    • cucumbers
    • radishes
    • bell pepper strips
    • pickles
    • mini salamis
    • nuts
    • dried fruit
    • steamed cauliflower or broccoli
    • olives
    • yogurt (any type)
    • berries
    • mango pieces, to name just some fruit (because some are rather evil on the glycemic load)

    To replace flour, instead of using gluten-free mixes, you might coat chicken pieces with sesame before frying them - the sesame adds great nutrients, too!

    If your diet allows them, potatoes and sweet potatoes make great fillers, from potato salad to braised sweet potato, as do jerusalem artichokes - I like to eat these raw, they have a great crunch and nutty taste.


    Do you have allergies you need to consider when packing lunches? Please feel free to share your ideas for special diet bentos - we'd love to hear / read from you.


    This post was written by Petra


    Are you interested in contributing to The Daily Tiffin? Drop us an email: thedailytiffin@gmail.com. We look forward to hearing your ideas.

    Roasted Potatoes and my trip to Aleppo

    Monday, November 09, 2009

    Posted by Antonio Tahhan

    note: I want to apologize to everyone for being late with this post. I am going out of town in a few days and have been running around like a crazy person trying to get everything in order before my trip.


    A couple weeks ago, I finally bought my plane ticket to go to Aleppo. My grandmother is there now, visiting her sister, and I will get to join them in just a few days. Middle Eastern food, like most of the food from around the Mediterranean, is extremely fresh and healthy. I promise to be back with lots of pictures and recipes that I will share on the Daily Tiffin.

    In the mean time, I've been strategically trying to use up all my produce and perishables for the past couple of weeks. Today I chose to write about roasted potatoes because they're a healthy alternative to fried potatoes, but are still popular with the kids. They're great in lunch boxes or afternoon snacks, and easy enough to make in large batches. There are a few steps, however, to ensuring a perfect roast with an extra crispy exterior and ultra creamy inside.


    Preparation is simple. It makes a big difference to scout out good potatoes for this dish: small, firm and tight skin. I prefer reds simply because they have a higher sugar content, so they tend to caramelize better than other potatoes in the oven.


    Since potatoes grow underground, you'll want to give them a quick rinse before you roast them. Make sure to pat them dry so that the outsides crisp up.


    It's also important not to crowd the potatoes in a pan, otherwise they will still steam, regardless of how well you've patted them dry.


    Although I usually use Spanish paprika, or pimentón, it's a lot easier to find the Hungarian variety at my local grocery store. My inspiration for using paprika in my roasted potatoes came from patatas bravas -- a classic tapas made from fried tomatoes covered in a spicy pimentón-base sauce. If you can't find Spanish paprika near where you live, Amazon is where I usually buy from.


    Once they come out of the oven, they can be eaten hot or at room temperature. Enjoy!

    Click here for the recipe.


    This post was written by Antonio Tahhan


    Are you interested in contributing to The Daily Tiffin? Drop us an email: thedailytiffin@gmail.com. We look forward to hearing your ideas.

    Vegetarian Pyramid Series - Seitan

    Friday, October 30, 2009

    Posted by DK


    It sounds like ‘Shaitan’ and probably looks like one to most of us! But sometimes good things come in ugly packages and Seitan follows that literally. The first time I saw it, I made up a face similar to its looks but then after reading considerably about it, I thought why not. I am so glad I did cos not only it is an excellent meat replacement, is a super duper source of protein for vegetarians like me. Come to think of it, it doesn't taste bad either.


    Image source from wikimedia

    So what exactly is Seitan?

    It is made from gluten, the protein part of wheat. It is popularly known as ‘vegetarian meat’. It is also known by other names in different places – wheat meat, gluten or simply gluten meat. It has a very chewy and firm texture.Instead of reaching out for imitation meat in your local stores, which by the way has loads of additives, it would be a great idea to use seitan instead. It is immensely nutritious and without any artificial flavors. Seitan does not have any flavor of its own and hence it benefits from a marinade. Mostly you will find the precooked variety of seitan, hence simply adding it at the very end is enough. You can chop it or slice it and it goes extremely well in stir fries or stews of any kind.

    Availability

    Mostly available in health stores and in Asian specialty markets. Next time you visit one, don’t forget to look out for Seitan.

    Benefits of Seitan

    The protein content is humongous - About 85gms of Seitan consists of 18gms of Protein! It is also filled with essential amino acids and if cooked in soy sauce based broth then it would enhance the amount of vitamins and minerals. A four-ounce serving of seitan supplies between 6 and 10 percent of the U.S Reference Daily Intake of vitamin C, thiamin, riboflavin, niacin, and iron.

    To kick start your cooking with seitan, here are some sample recipes with Wheat gluten.

    I have one simple and amazing recipe with Seitan. Its Vegan sloppy Joes. You know how some kids have problems eating any vegetables? ( or should I say anything healthy?!!). A friend of mine recently brought her son, who is die hard carnivore, to my place. Being a vegetarian, I thought why not make something which looks like a non-vegetarian and also has nutrition. I made these sloppy joes with couple of vegetables, beans and seitan and they were gladly gobbled up by him!


    Other interesting recipes from the net

    1. Southern Fried Vegetarian 'Chicken'
    2. Mexican "Seitan" Fajitas
    3. Spicy "Seitan" Buffalo wings


    This post was written by Dhivya

    Are you interested in contributing to The Daily Tiffin? Drop us an email: thedailytiffin@gmail.com. We look forward to hearing your ideas.

    ‘Earth to Table in the Shortest Time’… The locavores have arrived!

    Friday, October 23, 2009

    Posted by Deeba PAB

    Locavore a term coined on World Environment Day, 2005, to promote the buying /eating of produce grown within the 100 mile (160Km) radius.
    ~
    The issue being addressed in 2005 was the alarming trend of produce being transported half way across the globe to feed a ‘global appetite for exotic fare'. What was satiating the palate was no different in calories, but meant hugely in terms of miles it travelled, the cost of shipping … in other words, the significant carbon footprint it left stamped on a burdened Earth.

    I am a firm supporter of the 100 mile diet. My Indian lamb chops taste as good as any I have had. New Zealand lamb chops may still be the best, but I am ‘palate happy'. I cringed when I heard of a new butter chicken launched in a city in India, advertised as “Anaarkali, the classiest Butter Chicken on earth is about more than just exotic ingredients & years of research.” A dish that serves 2 is for Rs 6000/- (USD 136/-), counts as its ingredients fresh tomatoes and Hunt’s Tomato Paste, Danish Lurpak Unsalted Butter, Fillipo Berio Olive Oil and Evian Natural Spring Water. It might well be the best butter chicken on the face of this Earth, and the entrepreneurs mean well as they are donating part of the proceeds to charity, yet, wouldn’t ‘eating off the land’ have been better for Earth?

    This is not about food snobbery. It’s all a matter of perspective, and it’s heartening to see foodie bloggers playing a hugely responsible role in following a locavore diet. It’s wonderful to see them following seasons, blogs glowing orange with anything from persimmons to pumpkins announcing fall. Even better to see folk roasting their own pumpkins for puree! It’s imperative to begin counting ‘Food Miles’, or the distance food travels from where it is grown. The words ring loud… the closer the food, the better the taste! Andrea Meyers leads with her Grow Your Own event, a twice-a-month blogging event that celebrates the foods we grow or raise ourselves and the dishes we make using our homegrown products.
    In September this year, the Obama administration launched a 'Know Your Farmer, Know Your Food' initiative to connect consumers with local producers. The idea is not to limit choice, but to expand consciences, and encourage healthy seasonal eating. 2 recent cookbooks that sing the locavore anthem of ‘Earth to table in the shortest time’ are worth a mention. In their book, Earth to Table, renowned chefs Jeff Crump and Bettina Schormann remind us of the relationship between local eating and taste, and demonstrate how you can reduce your carbon footprint without diminishing your enjoyment of food. Bringing together stories of the passage of seasons on the farm; how-to sections; stunning photographs; and, of course, creative and delectable recipes that will leave anyone wondering why they ever considered eating a tomato in February. In Cooking for Friends, award-winning chef, world-renowned restaurateur, bestselling author, and Hell’s Kitchen star Gordon Ramsey offers us more than 100 exceptional recipes from his own family table. The way Gordon cooks here embodies his strongly held views: use in-season, fresh ingredients at their peak; support local producers and farmers' markets whenever possible; and celebrate the food culture and its many influences.


    This post was written by Deeba

    Are you interested in contributing to The Daily Tiffin? Drop us an email: thedailytiffin@gmail.com. We look forward to hearing your ideas.

    Tiffin Tuesday - Getting Back Into The Habit

    Tuesday, October 20, 2009

    Posted by Petra Hildebrandt

    It's been a long time since I've posted a bento here - or on my blog. It is not that I don't pack lunches any more, but... most days I just grab some leftovers, and an apple or banana, and a cereal bar, and I'm done.

    Although it is not quite 2010 right now, I think it is time to start over and make 'New Year's resolutions', to set up new goals, and get back to packing lunches which are not only nutritious, but also fun to look at. Even if you don't pack meals for a child but for an adult, enjoying your lunch visually is a great part of the food with love theme, I think.

    And it doesn't have to be elaborated, fancy food, or decorating stunning anime images on a rice bed (which I could never do, anyway):


    Here I packed tiny tomato halves with a tuna salad stuffing, tiny cucumber and carrot bites for crunch and color, a slice of buttered wholegrain bread (wrapped in cling film to prevent it from turning soggy), 3 mini chocolate muffins, dried mango, banana chips, the last of the plum harvest, and an apple. Basically a pantry raid, but looks so much better than just a sandwich or a box with noodle salad :-)

    So, when do you get back in the habit?


    This post was written by Petra


    Are you interested in contributing to The Daily Tiffin? Drop us an email: thedailytiffin@gmail.com. We look forward to hearing your ideas.

    Nursing: A Journey to a Destination

    Thursday, October 15, 2009

    Posted by Hilda


    Any men out there who start to read this, gag and want to skip this article, if there is a woman in your life who might get pregnant and deliver a child she intends to nurse, I'd try to at least get halfway through it. I promise I won't get graphic.

    Disclaimer: This post is meant in no way to make a statement about the merits of nursing over formula or vice-versa. I don't see anything wrong with feeding your baby formula, I was a formula-fed baby and I turned out ok (I think anyway).

    The last time we saw our pediatrician at the 6-month appointment, he took one look at my baby and said "she looks perfect, she could be an advertisement for breastfeeding." I think it would be hard to describe the sense of relief I felt when he said that. I didn't originally think that I would be writing about breastfeeding/nursing here, but when I told K.'s Godmother what the doctor had said, she immediately insisted I had to write about it for my next DT post, if only to let other soon-to-be mothers know that as hard as it may be in the beginning, it can end up being perfectly fine. You see, it was very difficult for a while. 

    In England, midwives are the bulk of the maternity unit staff, rather than nurses, and because they are the main baby birthers in the public system (a doctor is called in to supervise if there is an issue of some sort but otherwise midwives often deliver babies themselves), many also consider themselves to be the authority on everything pregnancy and baby-related; this results in, over a post-birth period of 48hrs, receiving the advice of at least four different midwives on the proper nursing positions, times, frequency, etc... and they all have different ideas about every part of the process, all in contradiction with each other. The day I left the hospital, I had a breakdown on the phone with my sister because my baby seemed a bit jaundiced and had needed hardly any diaper changes that day, so she couldn't possibly be well; surely I was doing something wrong. The midwives weighed her, checked her bilirubin level (for jaundice), reassured me that she was fine, and off we went with a stash of painkillers for me.
    The timeline from then on went basically like this:

    Day 4 - Morning: Community midwife comes to the house as part of the National Health Service. First helpful with tips to improve latching position and keep baby awake during a feed, but also thinks baby looks very jaundiced and even though the hospital pediatrician has declared her to be fine, I become extremely anxious.
    Day 4 - Afternoon: Our pediatrician checks baby over thoroughly and plots out her bilirubin level on a special hospital jaundice chart so we can see that she's fine. He declares her to be in very good health. Says to put her in sunlight for the jaundice.

    I'd been told that it would take 6 weeks to establish the nursing completely, but I'd also been told that I seemed to be a natural at it and that I had the latching down properly somehow from the beginning, the main issue was that I had this baby who just couldn't last more than a few minutes into a feed without falling asleep and I was having a great deal of difficulty keeping her awake long enough to eat.

    Day 6: Baby has slept entirely way too long at night and I haven't been able to feed her at regular intervals. Am worried about my milk coming in and the supply being sufficient with a baby that doesn't create a demand (it's a demand-supply system). Midwife visits and weighs her, declares she is not putting on enough weight. We should supplement feeds with formula.
    Day 8: I've developed an infection and must urgently return to the hospital, nursing baby in tow.
    Day 9: I have an operation under general anesthesia which makes me drowsy and sick to my stomach. I am exhausted and have a hard time waking regularly to feed a baby I can't wake to eat and who won't stay awake through a 45mn feed. Am convinced my supply is not going to get established and my fatigue only augurs bad things when I'll get home. Am hysterical on the phone to my sister about the baby not putting on enough weight and my supply dwindling. Am sent home with more painkillers and antibiotics.
    Day 11: Midwife visit, I am advised to really supplement more with formula as she is not gaining enough weight, and by then am a complete mess. Tired, in pain, with an adorable baby who seems fine and alert when awake but who is asleep when the midwife visits and isn't gaining weight quickly enough. Try to pump to increase my low supply.  I supplement grudgingly, feeling excessive guilt even though I know very well that it would be fine if I ended up not nursing and giving her formula, after all I was a formula-fed baby. No matter how much coaxing we do or what we try, she takes almost no supplemental formula.

    Day 16: Midwife visits, the baby is an ounce shy of her birth weight and a few days away from being declared as"failure to thrive". Am about ready for the loony bin. Make my husband buy a medical scale most often used for weighing babies so I can weigh her every or every other day.
    Day 17: The health visitor, a person who basically checks in on the family from a child's birth until he/she is 5, comes by and I see my first glimpse of hope. She says that though she has no empirical evidence to support her thoughts, her experience is that in cases such as mine, as soon as the new mother stops taking the painkillers, the milk supply increases dramatically and the baby gains weight very well. I'd taken my last pill that morning and wait to see what might happen over the next couple of days.
    Day 19: Even though I can't measure it, I know my supply has increased and baby is starting to wake up to the world, clearly the painkillers were not helping in this whole debacle.

    Over the next few weeks, I had to sort through a number of other hiccups in the process (biting, soreness until I thought I couldn't possibly get through one more feed) until by about 6-8 weeks in, just as predicted, and in spite of everyone saying it would take me less time because I seemed to be doing well the first couple of days in the hospital (even though I wasn't), I'd figured out 95% of the problems and was nursing her fairly comfortably. I'm still nursing her now as she discovers solid foods.
    I often thought about just giving up, especially since we'd found a brand of formula that she actually seemed to like when we first had to supplement her, the point being that it was only perseverance and the will to nurse her that got me through. During those first three weeks in particular, and still fairly often until she was about 2 months old, I never thought I'd make it this long or that the pediatrician would ever say that she looked wonderful and could be an advertisement for nursing.
    I know this has been a long post, but I wanted to share that, just in case one would-be mom reads it and it makes a difference. Experiences like nursing that are very personal can make one feel very guilty or inadequate when they don't go well and it becomes hard to share, so if this helps even one woman out there, it's worth putting the rest of you to sleep.


    This post was written by Hilda


    Are you interested in contributing to The Daily Tiffin? Drop us an email: thedailytiffin@gmail.com. We look forward to hearing your ideas.

    FEEDING THE FINICKY

    Thursday, October 08, 2009

    Posted by Jamie

    MEET MR. PERSNICKETY

    Oh, happy the parent who has children who eat everything. Happy eaters are a joy to behold, watching as they merrily lick beaters and agree to taste test all cooking adventures. Pure pleasure is the child who digs the serving spoon into the bowl and piles it high on his/her plate, no matter that he/she has never eaten it before. Garlic, eggplant, carrots, mascarpone cream, preserved lemons or pumpkin desserts don’t lead to wrinkled brows, turned up noses and groans of disgust, but rather interest, excitement and licked lips.

    The persnickety child's dream!

    Clement was – and is – this kind of child. Maybe he was influenced by my diet when I was pregnant, a diet consisting of the savory and the spicy, couscous and tagines, stews and seafood creoles, the intense flavor seeping through my body to him, a baby growing into my adventurous tastebuds. Or maybe it is due to the fact that from the moment he could open his tiny mouth we would offer him tastes of everything soft and smooth, from fresh goat cheese to chocolate pudding, just a tad on the tip of our pinkie finger, enough to get a reaction. And the reaction was always one of pure pleasure. By the time he could sit in a high chair, he loved sucking on lemon slices or biting into cloves of garlic, he would suck down baby spoonfuls of everything that we cooked or baked for ourselves, a foodie in the making.

    And he always loved everything, cheeses, from the mild to the strong, exotic food from any culture, vegetables one and all, desserts both child-oriented and adult.

    And then came Simon. Ah, what do the experts say about this? This second pregnancy was punctuated by American fast food cravings and plates piled high with brownies. The tiny taste tests were mostly abandoned when he was a tot. And one day, out of the blue, he pressed his lovely pink lips together, crossed his baby arms and refused what was on the end of the fork. And life was never the same. Here was a child, adorable, sweet and mild-tempered, a child who simply said “no” to food, no to anything flavorful, anything out of the ordinary, his version of ordinary. Years followed, years of eating pasta in bianco or white rice, plain grilled fish drizzled with the smallest amount of olive oil, plain chocolate cake with a smattering of powdered sugar, simple, tiny cheese ravioli in brodo, chicken broth. Fruit he loved, almost all fruit, so mealtimes usually found Clem with a plateful of vegetables in front of him and Simon with a bowl of sliced strawberries and banana, grapes and cubes of apples or pears, anything to get the maximum mix of vitamins.

    As he’s grown, Mr. Persnickety, as I call him, has continued to eat simply, from pasta with red sauce to plates of white rice or unadorned couscous grains, spurning the fragrant, delicious veal blanquette or the lamb tagine that are served as the main course alongside these simple grains. He is wary of meat, dissecting it so minutely that it would make a forensic scientist proud, slicing off even the tiniest hint of fat. Vegetables get the old heave ho and most of what I cook is insulted with a “Oh, not that! Disgusting!” Fried foods and pizza, peanut butter or grilled cheese sandwiches, hamburgers and fries all pass with a thumbs up and desserts are limited to brownies and chocolate chip cookies, the most simple of chocolate cake or coffee cake with streusel. Simon was never so simple.

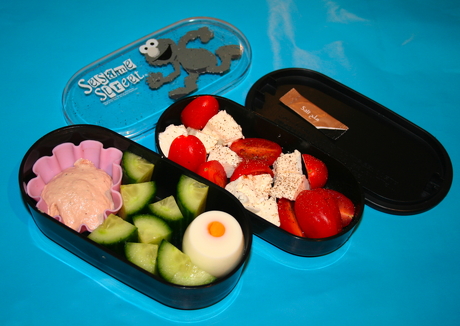
    Feeding your child can't always be a hold up!

    So how do we, the parent of the picky eater, how do we get our little darlings to eat anything healthy, anything vegetable, anything new? It becomes a game, a test: how to we package eggplant or spinach, fish or pumpkin in such a way that will actually have them eating it? Do we cook and serve them a separate meal or do we let them go hungry if they turn up their nose at what we have placed on the table? Or do we try and imagine dishes that may please, dishes that blend the loved with the hated in such a way that the persnickety child will finally put a forkful in his/her mouth and taste and maybe, just maybe, give a gentle shrug of the shoulders and say “it’s not bad”? And clean their plate. And make the foodie parent happy for one more meal. This is an ongoing project for me and I hope to be able, over the course of time and through my posts, I hope to be able to share some of these tasty dishes, successful meals, and there are indeed a few, with you.

    Have them eat better... and healthier than this!

    Greek-Inspired Spinach and Feta Triangles are easy to put together, if just a tad bit time consuming because of the phyllo/filo dough, and something that even my spinach-hating son, my finicky eater, will eat with pleasure (although he would never admit to the pleasure). I have made this at one time or another in one large baking dish, the filling sandwiched in between layers of filo dough, but wrapped in individual triangles makes it more fun to eat. Crunchy, buttery and delicious, chock full of feta cheese, add pine nuts or even chopped walnuts if you dare, this is a treat that everyone loves. It can be made in advance and stored in the fridge covered well with plastic wrap, just baking before serving.


    GREEK-STYLE SPINACH-FETA TRIANGLES

    1 1/2 lbs (800 g) fresh spinach, well-cleaned and coarsely chopped
    1 1/2 cups (235 g - one package) feta cheese, drained and crumbled
    1/2 cup (60 g) grated parmesan cheese, fresh when possible
    3 large eggs, lightly beaten (if you make this in pie form, use 4 eggs)
    2 Tbs chopped fresh mint
    1/2 tsp ground nutmeg
    freshly ground pepper and a dash of salt to taste
    1/2 lb (250 g, about 20 sheets) filo dough, thawed if frozen - if you make these 6 large triangles, you will need 12 sheets
    Melted butter for the filo


    Wash the spinach leaves, shake off excess water and put into a large pot with a tight-fitting lid. Steam the spinach until wilted, then pour into a colander to drain. Allow to cool until easy to handle. Press out all the excess water you can with your hands, then gather up the cooked spinach and place in the center of a clean but old cloth dishtowel. Wrap or roll up the spinach in the towel and squeeze for all you are worth, squeezing out as much water as possible. Place the spinach on a cutting board and chop.

    Put the chopped spinach in a mixing bowl, add the crumbled feta and parmesan cheeses, the chopped mint, nutmeg and salt and a good grinding of pepper (when adding salt, do so sparingly; remember that the feta is salty). Blend well. Now beat the eggs until well blended and stir them into the spinach-cheese mixture.


    Preheat the oven to 375°F (190°C).

    Now - the filo triangles. As you use each sheet of filo, keep the rest of the sheets covered with a just-damp towel so they don't dry out.

    Melt the butter and allow to cool a bit.

    Lay out the first sheet of filo with the wider length side to side, left to right. Brush the sheet quickly with butter. Lay a second sheet on top of the first and brush with butter. Repeat with a third sheet. With a very sharp knife, carefully slice from top to bottom into three equal strips. This will make the first three triangles.

    Divide the spinach mixture into 6 (like I did here) or more parts depending on whether you want to make more or less triangles.* Scoop up one quantity and place it on the edge of the first strip of filo closest to you. Now, to form a triangle, lift up the bottom edge and bring the right bottom corner up towards the left edge (side), lining up the bottom and side edges to form a triangle. Holding this in place, use your free fingers to push the spinach mixture so it fills the triangle shape. Lift this up and fold upwards and continue folding until you have only about an inch of filo dough at the top. Brush this with butter to moisten, fold it over and seal your triangle "package". Place the triangle on a parchment-lined or buttered baking sheet, sealed side down.


    Continue until you have made three triangles with the first three sheets of buttered filo. Repeat the process with three more buttered sheets and the rest of the spinach mixture. You now have 6 large triangles on your baking sheet. The triangles can be made ahead up to this point. Cover them well with plastic wrap and put into the fridge until ready to bake.

    Brush the surface of each of the triangles with more melted butter. Bake for 15 minutes until golden.


    * You can make this as one large pie, layering 8 - 10 of the buttered filo sheets in a buttered baking dish (the size of the dish depends on how thick you like the filling to be), spreading the spinach mixture evenly, then layering and buttering 8 - 10 more filo sheets on top. Bake until golden. Or you can make many more smaller triangles by cutting the filo dough either width- or length-wise into narrower strips.

    Serve large triangles for lunch or dinner with a salad or smaller triangles as finger food.


    This post was written by JAMIE


    Are you interested in contributing to The Daily Tiffin? Drop us an email: thedailytiffin@gmail.com. We look forward to hearing your ideas.