Gulkand

Tuesday, June 30, 2009

Posted by Indian Food Rocks

It's no secret that I am a lazy gardener. I prefer to let wildflowers and native grasses rule my yard than spend hours tending to specialty flowers and plants. The few plants that I have brought into my yard are drought-resistant. My neighbor cultivates roses. He has blossoms of various colors on the same bush. Me? I love the wild rose, Rosa woodsii.


It's a treat to see this wild rose in bloom as it lasts for just a day. If I could, I would have a thicket of wild roses to line my property but wilder things would leap over it, so I have abstained from taking it on. I do have a bush of hardy climbing roses that refuses to die. When it didn't bloom one year, I was rather thrilled because I had other plan(t)s for the coveted spot it is in, but it bounced back the following year and blooms profusely late spring through early summer.


If I hadn't been consumed by bed bug bites during late spring last year, I might have noticed my climbing rose bush. This year, I did take notice: the flowers are small but they do have a pleasant fragrance. That, to my mind, translates into essential oils even though this is no damask rose. I figured that these roses might have at least some of the 300 compounds reported to be found in rose oil.

While roses are generally not used in western cuisine, their culinary history can be traced back to Persia. Roses are used as flavoring agents in Middle Eastern as well as Indian cooking. Since I do not have the wherewithal to make rose water or extract rose oil, I decided to do the next best thing: make Gulkand in the sun, now that we have a respite from the incessant rains we have seen this spring. Gulkand is often referred to as rose petal jam but let's please just call it gulkand (Gul-kundh) - gul for rose and kand for sweet.

My first task was to deadhead the bush. Once I had that out of the way, I took stock of the number of buds on the bush to make sure that I would have enough petals to justify making gulkand. Just opened blooms are best for gulkand so it's worth the effort to wake up early to pluck the flowers off the bush.

Remove the petals gently, discarding petals that may be disfigured, have holes or appear to be eaten by insects. Also, discard the rest of the flower. Inspect closely to make sure there are no insects or other creatures that might inadvertently make it into your gulkand, making it not so vegetarian.

Wash the petals several times and lay them out on a wad of paper towels. There is no need to pat them dry as any residual water will simply aid in making the sugar syrup.


In an wide-mouthed jar, make layers of rose petals and sugar, pressing down with a spoon every so often and finishing off with a layer of sugar at the very top. Since my flowers were small, I arrived at the following estimate for a recipe:
3-4 cups of rose petals
3/4 to 1 cup of organic sugar
3 cloves (optional)
seeds of 1 cardamom (optional)

I like the hint of spices in my gulkand so I added cloves and cardamom. Allow this to cook in the sun for at least two weeks. Open it up every other day, not just to get a whiff of the heady fragrance, but to mix it up, too.


This little jar was overflowing when I put the lid on it. It whittled down to just about an inch thick in less than a day. I made two more jars of the same quantity and after a week of being in the sun, I combined them all into this same jar. It's been just over a week and I will update this post with a picture of gulkand as soon as it is ready. Until then, take a look at Anita's Gulkand.

If you have roses that have not been sprayed - please do not use store-bought roses unless you know they are organic and safe for consumption - do give this a try. It's great as a summer activity for kids, too. Which kid doesn't like ripping petals off flowers? They can also take the responsibility for putting the jar out in the sun and bringing it in every day.

Gulkand is supposed to have cooling properties and is best consumed in summer. And, supposedly a host of other benefits for the entire body. My parents sourced the purest and best gulkand for me to help cool my highly myopic eyes and perhaps even deter what genetics had in store for me. I can't say that it worked but I do know that unlike those awful Threptin biscuits that I launched off an 11th floor balcony or that terrible tasting Chyawanprash that followed a trajectory to the ledge under my bedroom window, gulkand made its way safely to my stomach with the spoon being licked clean each time!


This post was written by Manisha

Are you interested in contributing to The Daily Tiffin? Drop us an email: thedailytiffin@gmail.com. We look forward to hearing your ideas.

A world outside of mozzarella & pepperoni

Sunday, June 28, 2009

Posted by Antonio Tahhan

A simple google search for kid-friendly recipes is scary. What shows up, in fact, is a harrowing slew of butter-saturated, sugar-filled recipes written with a complete disregard for health. I discovered this last week because I was looking for just that - simple recipes that I can make with kids.

My friend Beth invited me to cook in front of a class of kindergarten students. Her son is in the class and they were looking for someone to do a cooking demo for the kids' end of the year party - I was flattered that they thought of me and happily accepted.

I took this as my tiny opportunity to make a difference in the way these kids looked at food. While this was not the time to introduce them to the delicate flavors of perfectly-seared scallops or steak tartare, I wanted to cook with them something they're familiar with, but probably never had before. I decided to let them make their own pizzas. Instead of just mozzarella and pepperoni though, I brought with me a ton of different vegetables and all sorts of sauces for them to experiment with. Well-aware of the fact that the kids will have a short attention span that rivals mine, I also brought with me my pizza paddle and pizza stone so they could take turns sliding their pizzas into the oven.


This is my first article for The Daily Tiffin, and it couldn't have come at a better time. Inspired by my pizza event last week and the smoldering heat of the summer, I decided to make a lemon-infused, goat ricotta, white pizza topped with thinly sliced zucchini. The flavors are light, refreshing, clean - perfect for the hot summer days ahead.


Count them - four ingredients; five if you include the extra virgin olive oil. This means no skimping on ingredients! I tried this same pizza with regular ricotta and it doesn't work. The wow factor just wasn't there. If you absolutely cannot find goat-milk ricotta, however, not to worry. Mix a semi-firm chevre (like Spanish Capricho de Cabra) with some good quality, fresh ricotta and you'll get a similar result. Like I said, it won't be spot-on, but you'll get pretty darn close.


The lemon zest in the ricotta serves two purposes. Not only does it heighten the flavors of the goat cheese, but it also gives the pizza a clean, crisp flavor. If you can get organic lemons, I recommend them because their zest tends to be more flavorful than their non-organic buddies.


Zucchini in general has lots of moisture and moisture is the kryptonite, so to speak, of pizza. To remove some of this excess moisture you'll want to thinly slice the zucchini (preferably with a mandoline) and fan the slices out on a plate so they're not on top of each other. Then season the slices with salt and pepper and the salt will start to break down the cell walls of the zucchini, and thus allowing it to give up some of that moisture. Soak it up with a paper towel and your ready to roll.


The kids were shocked when I hinted to the idea of a pizza without red sauce. Their facial expressions were absolutely priceless. And although not many ventured down this path, I feel like those that did may have a bright culinary future ahead of them.


Recipe:
Ingredients:


  • 24 oz. pizza dough

  • 2-3 tbsp extra virgin olive oil

  • 1/2 lb goat milk ricotta

  • zest of 1-2 lemons

  • 1 zucchini, thinly sliced

  • salt and pepper, to taste


Putting Them all Together:

  1. Zest the lemon(s) and stir the zest into the goat ricotta

  2. Thinly slice the zucchini (preferably with a mandoline), fan out on a plate, season with salt and pepper, and cover with a paper towel to soak up some of the moisture.

  3. Stretch pizza dough to approx 1/8" thickness - this pizza is better thin than thick - and brush a thin coat of olive oil over the top.

  4. Spread the goat cheese mixture over the top and top with the thin slices of zucchini.

  5. Preferably bake on a hot (550 degrees F) pizza stone for 5-7 minutes or until the crust gets golden brown.


This is why everyone should invest in a pizza stone:


This post was written by Tony


Are you interested in contributing to The Daily Tiffin? Drop us an email: thedailytiffin@gmail.com. We look forward to hearing your ideas.

Happy Father's Day!

Monday, June 22, 2009

Posted by Mansi

Happy Father's Day to all the readers of The Daily Tiffin!

It's one of those holiday weekends in US where it has become a norm to celebrate special "days", mostly to help the economy and gift- stores. However, I was a bit surprised to read the history behind the origin of Father's Day.

According to this source, Mrs. John B. Dodd, of Washington, first proposed the idea of a "father's day" in 1909. Mrs. Dodd wanted a special day to honor her father, William Smart. William Smart, a Civil War veteran, was widowed when his wife (Mrs. Dodd's mother) died in childbirth with their sixth child. Mr. Smart was left to raise the newborn and his other five children by himself on a rural farm in eastern Washington state. It was after Mrs. Dodd became an adult that she realized the strength and selflessness her father had shown in raising his children as a single parent.

This story proves that a father's role is as important as a mother's in the life of a child, and even if Mothers have a higher involvement in their lives, the presence and effect a father's influence can never be ignored or underestimated!

In 1924 President Calvin Coolidge supported the idea of celebrating Father's Day nationally, and in 1966, President Lyndon Johnson signed a presidential proclamation officially declaring the 3rd Sunday of June as Father's Day.

I'm not a great fan of celebrating all the different kinds of "Days" that have become an excuse for unwarranted gift-giving. But I do agree that some of these have a genuine message or purpose; they make you sit back and appreciate the significance of an event or a person in your life. However, it does NOT mean that you can ignore that person for the remainder of the year, or express Fake love or caring just on that one day, it does provide you an opportunity to plan something ahead and do something special, just because its hard to find time for things like these in normal day-to-day lives.

Whether you believe in this concept or not, is totally your choice. But I feel celebrating Mother's Day and Father's Day is a nice way to inculcate love and respect for a parent in a young child's mind. Just involve your kids in doing something together as a family, and they'll appreciate the fact that he is lucky to have a mom and dad who care for each other; it makes the kids feel more loved and secure, and will eventually help them be more empathic and emotional toward other relationships.

I would like to cite here President Obama's Father's Day Letter to the fathers of the world. In his own words, he says: In many ways, I came to understand the importance of fatherhood through its absence," says Obama, who was 2 when his father left. "I came to understand that the hole a man leaves when he abandons his responsibility to his children is one that no government can fill."

So, here's wishing a Very Happy Father's Day to all the dads in this world from the DT team, because all of you are doing a tremendous job out there, taking care of your kids and families. And though your children may not always tell you this, be sure to believe that you are very important to them, and NO ONE but you, can ever take your place!


This post was written by Mansi

Are you interested in contributing to The Daily Tiffin? Drop us an email: thedailytiffin@gmail.com. We look forward to hearing your ideas.

Vegetarian Pyramid Series - Couscous

Monday, June 15, 2009

Posted by DK

“Eating Balanced Meal is everything” - How many times have we heard this? But for a full time working woman, making a meal 3 times a day is big deal by itself – leave alone making it ‘Balanced’!! So does that mean we get slack about eating a healthy meal – of course not. What we can do is to make sure that we incorporate ingredients in such a way that not only they are fast to make, but also easy, delicious and nutritious too! “Awe come on, you got to be Kidding me!” I hear ya, but it’s true that indeed you can.

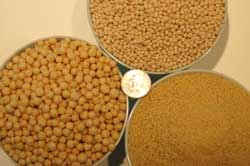
The vegetarian Pyramid Series that’s been going on for past few months is going to showcase one such ingredient today – Couscous! When the hard wheat is ground, it leaves few granules which resisted grounding which is what we call semolina. This is actually the endosperm of wheat which has proteins, mineral salt and also floury mass which is what constitutes the making of Pasta.

Although the term ‘couscous’ also refers to a cooking method, I am just going to focus on Couscous instead.Although the original couscous (called as Rolling Couscous) takes longer and requires more prep work to cook, nowadays the ones available are pre-steamed and hence reduces the cooking time drastically.


Image source : acornadvisors.com

From my research, I have come to believe that there 3 main types of couscous available.

Moroccan couscous:

This is probably what you would find most often in your shop aisles. These are commonly available and are tiny yellow semolina pasta. All you have to do is to boil sufficient amount of water, turn off the flame, add the couscous and let it sit for 10 minutes with the lid on. The couscous is done when all the water is absorbed and all you have to do is to fluff it with a fork and serve! Wasn’t that easy? Innumerable have been the times when I have just boiled some vegetable stock, added few frozen vegetables along with couscous – a little bit of seasoning and tada! Lunch/Dinner is ready.

Check out a yummy Moroccan Tagine with Couscous


I also find a Whole Wheat couscous variety which is lightly brown in color and cooks the same way as the regular yellow couscous. There is not much of a difference in taste.

Israeli Couscous:

This variety takes a little longer to cook than the Moroccan variety, but I have come to like it way lot than the former. It has more chewy texture to it which I love. These are larger than the Moroccan type, beige white in color, about the size of peppercorns


Colorful, filling and delicious Israeli Couscous Recipe


Lebanese couscous:

This is the largest of all couscous types. I have personally not been able to get my hands on them, but they are supposedly the size of small peas. The cooking process, naturally, is longer then the usual couscous and is more suited for cooking like the way you would do for Risotto.

Note: Make sure whether you have bought the traditional or instant type of Couscous. The traditional couscous takes a longer cooking time, where it is originally steamed in a specialized steamer called as “couscoussiére.”

Health Benefits: It is immensely low in fat and is enhanced with complex carbs. It is rich in dietary fiber, protein, potassium etc

This post was written by Dhivya


Are you interested in contributing to The Daily Tiffin? Drop us an email: thedailytiffin@gmail.com. We look forward to hearing your ideas.

Summer Fruits: Blueberries

Thursday, June 04, 2009

Posted by Andrea Meyers

Andrea's Recipes - Blueberries

Summer wouldn’t be the same without some of our favorite fruits, and blueberries are at the top of the list. Though native to northeastern parts of North America, they are now grown in many parts of North America and in other countries around the world. Blueberries typically fall into two categories: highbush, which can grow as much as 4 meters tall; and lowbush (aka “wild”), which typically grow just 35 centimeters tall or less, but can grow as tall as 60 centimeters. The various species produce fruit at different times in the season, and are thus categorized as early, mid-season, or late.

Early fruits start arriving in the United States in mid-May, so blueberries are already in the markets and grocery stores. We planted six blueberry bushes this spring with harvest times spread all across the season in hopes of having blueberries throughout the summer. It takes a few years before the bushes produce fruit and you have to protect them from birds and other animals, which enjoy the berries as much as people do. The fruits can be used in a wide variety of ways, including preserves, baked goods, frozen desserts, sauces, yogurt, beverages, or just enjoyed out of hand.

In recent years blueberries have received recognition as an important food for good nutrition. Both lowbush and highbush blueberries are rich in vitamins and cancer-fighting antioxidants, and studies conducted by the USDA Human Nutrition Research Center have shown benefits in the fight against chronic disease and reversal of short-term memory loss associated with Alzheimer's as well as the loss of motors skills with age. Recent studies even demonstrate a link between blueberry consumption and improved blood pressure, lowered cholesterol, and total lipid levels.

So go ahead, treat yourself to the the taste and health benefits of blueberries while they are in season, and if it’s hot where you are you can try this berry sorbet made with blueberries, raspberries, and marionberries.

THREE BERRY SORBET

Sorbet_three_berry4

Makes about 1 quart.

Equipment

medium saucepan
blender
fine mesh strainer
1 to 2 quart bowl with lid (or plastic wrap)
ice cream freezer

Ingredients

1 cup (175 g) granulated sugar
1/2 cup (120 ml) water
1/2 teaspoon salt
1 pound (~900 g) blueberries, rinsed and patted dry
8 ounces (~450 g) raspberries, rinsed and patted dry
8 ounces (~450 g) marionberries (or other blackberries), rinsed and patted dry
1/4 cup (60 ml) freshly squeezed lemon juice

Preparation

1. In the saucepan combine the sugar, water, and salt. Cook over medium heat until completely dissolved. Let cool for 15 minutes.

2. In the blender, purée the berries with the syrup and lemon juice until very smooth. Press the mixture through the strainer to remove the skins and seeds. Cover and refrigerate until chilled, at least 4 hours or overnight.

3. Churn in an ice cream freezer according to the manufacturer's directions.

References

Wikipedia – Blueberries

Wild Blueberry Association of North America

US Highbush Blueberry Council


This post was written by Andrea

Are you interested in contributing to The Daily Tiffin? Drop us an email: thedailytiffin@gmail.com. We look forward to hearing your ideas.

GYO - May # 28 Round up

Monday, June 01, 2009

Posted by Dee


Thanks to all the participants who have sent delicious , mouthwatering entries to this unique event . We have very interesting recipes to share with all. I have bookmarked my favorites too :) Thanks Andrea for giving us the wonderful opportunity to host this event.

Here are entries in random order . Do check the album to see the mouth watering delicacies.

Green is my Valley's Garden Bounty Shrimp Ceviches

Everything's Herbed 's Burrong Mangga ( Pickled Mangoes)

Allotment 2 Kitchen's Forced Rhubarb Cheese cake

Standing Straight's Duck Confit in white wine reduction


Recession Recipes' Quinoa salad

Less sugar Please's Spinach Ambat

Chocolate & Croisssants' Tomato Salad

Andrea's Recipes' Lemon thyme Sorbet

Masala Heaven's Baingan Masala

Kitchen Gadget Girl's French Breakfast radish Appetizers

Evening Shade Morning latte's Herb Butter roast Turkey and Zucchini Bread


Erbe in Cucina's Flower's Tea


Taste Food's Scallop Cilantro Gremolata

Kitchen Therapy's Chive on Fish

Salt and Pepper's Salad Greens

Eating Drinking and other Adventure's Quick Stir Fried Peas

Gustoso's Baba Ghanoush

Green is my Valley's Tartines

Playing House's Parmesan Chive Crackers

Evening shade Morning Latte's Garden herb Bread


Here is it folks ! and I hope you guys have a great week ahead! if I have missed out any entry, please leave a note in the comment section or email us , I will look into it .


This post was written by Dee


Are you interested in contributing to The Daily Tiffin? Drop us an email: thedailytiffin@gmail.com. We look forward to hearing your ideas.

Art of Rock Painting - Kids Crafts

Thursday, May 21, 2009

Posted by Mansi

rock-painting
(LadyBug Image copyright & property of Patty Donathan)

As Summer vacation sets in, parents are scrambling to keep their kids entertained as much as possible. Summer camps and activity centers are obviously, the first choice, and a great way for them to get some healthy exercise. But there are a lot of activities that you can do with your kids over the weekends, or when you have some free time, and right in the luxury of your home. Rock Painting, or Rocks Arts, is one such fascinating best-out-of-waste kind of project that can be great for kids of any age group. It is fun, simple, needs very few supplies, and will be a fun, creative weekend project to interact with your kids.

What & Why of Rock Painting?
As the name suggests, Rock Painting involves collecting small stones or rocks of varying shapes and sizes, and turning them into something more meaningful, like a creature, a flower, a centerpiece, a paper-weight or anything else, by being creative with shapes and of course, colors. Moreover, the actual experience of rock hunting also encourages the child to "look" for shapes within the rocks. Does that one look like a little gold fish? Maybe it looks like a shark? How about a flat rock that looks like a "potato"? This will help enhance their natural creativity and sense of imagination, along with the ability to identify and relate objects to one another.

What Do you Need?
The simplest of any kids' activities, Rock painting needs no more than a list of 3-4 things, and most of them, you'll already have in your house, except, of course, the Rocks:)
1. Rocks of different shapes & sizes
2. Acrylic Paint & paint brushes of all sizes
3. Photo or Image you want to create on the rock
4. recycled newspaper - to prevent stains!

How to Do it?
If your child is old enough, and has a natural interest in painting, this project should be fun and easy for him, and can be done with minimal intervention, yet supervision and support from the parents. However, if your child is too young, or not so good at drawing/painting, go easy and choose simple patterns or ideas to recreate shapes and images on the Rocks. Here are some neat Rock Art Ideas that you could try, with complete information about what you need, and the How-To steps, all included:

1. San Diego Zoo's Rock Owl Paperweights
2. Martha Stewart has a ton of lovely rock craft ideas, with detailed instructions for most of them. The Ladybug, the Frogs, the Pandas and the Turtle are some of my favorites - heck, even adults would have fun doing these!
3. Creativity Portal has a bunch of ideas, weblinks and tutorials on how to get started with Rock Painting, and I'm sure you'll find it inspiring.
4. Use your Imagination, and go wild! Don't just restrict yourself to using paints, you can use tissue paper, threads, ribbons, fiber, glitter or fabric to create beautiful creatures out of stone. Check out some more rock crafts at Lakeshore Learning
5. Finally, take some inspiration from Patty Donathan, who's an established Rock Painting specialist. She has some free tutorials/PDF's on her website, including the "LadyBug" shown in the pic above.

Summer is a great time to go outdoors and play in the sun, though not too much! But there are several ways you can interact with your kids and keep them entertained, as well as inspire creativity by engaging in simple yet fun activities, like Rock painting. Hope these tips and ideas help you and your child create a masterpiece that can find a place on your mantel, something you'll be proud of for years to come!


This post was written by Mansi

Are you interested in contributing to The Daily Tiffin? Drop us an email: thedailytiffin@gmail.com. We look forward to hearing your ideas.
ARE YOU OBSESSIVE?

Tuesday, May 19, 2009

Posted by Deeba PAB

Are you obsessive?

Sometimes I feel that I’m possessed by obsession. And more often than not, IT follows me to the kitchen. Each time I finish a part of the menu I am cooking up, I do the dishes, wipe them, clear the place, put everything back, wipe the counters…& then begin the next bit. My knives have to be in the right place, the right knife has to be used for the right thing. I will not slice tomatoes till I find my serrated slicer, I worship my microplaner, my santuko is the only thing that slices my grilled chicken … & I’m the mistress of the kitchen. So much so, that when I chop, each piece should be the same size. The saving grace is that I’m pretty quick with the cutting, chopping and clearing up, otherwise we would have a ‘singing for the supper’ happening every night!

Things are slowly changing, & now I have company. The daughter is growing up, & she’s the regular teen with her head in the clouds. My knives are misplaced; my favourite non-stick is where I can’t find it, the ketchup is out & the cupboard is open … SIGH!! Sometimes I wish I was more chilled out, but it's not happening yet!

Wonder if I'm alone in this obsession; are you in there with me?


This post was written by Deeba


Are you interested in contributing to The Daily Tiffin? Drop us an email: thedailytiffin@gmail.com. We look forward to hearing your ideas.

Vegetarian Food Pyramid - Wheat Bran

Sunday, May 17, 2009

Posted by DK


In my last post, I was talking about the important byproducts of my favorite whole grain - wheat. The last edition was about wheat germ. Now let’s get set to wheat bran. The wheat grain has a hard outer layer. So while the grain is being processed for the purpose of making whole wheat flour, Bran is created as a by product.

How does it look like?
(Source: http://www.mdidea.com/products/proper/wheat_bran02.jpg)


In its raw form, wheat bran has a light brown color and is similar to sawdust in texture. It is also available in powdered forms. Although cereals of bran is available ( as do readymade wheat bran muffins/pancakes) it is advisable to stay away from them since they are known to be high in high fructose corn syrup and unwanted sugar.


Where to buy?
Wheat Bran is mostly available in health stores. I personally haven’t been able to get in my local grocery stores. If you are in the US, you can find them in stores like Whole Foods.

How to buy?
Buying bulk would be preferable since it can be added to almost all types of dishes that you can think of – breakfast cereals, granola, pancakes, muffins, cookies, breads etc. You name it, you can add it :). You can powder it finely and add it to your smoothie too.

How does it taste?
I personally find it mildly sweet with a delicious chewy taste. I esp. love it in my muffins for the very same reason since it sort of makes me feel filled up pretty fast but is in fact pretty light. Sometimes the repeated mechanical movement of the mouth (aping the looks of a digesting cow!!) makes me feel like I am eating more! Psychology – well yeah, anything to cheat my brain into thinking that I am actually eating more though its otherwise in reality! One can def. cheat for the “greater good”- I always say!

How to store?
If you are buying in bulk, make sure you refrigerate it since it can go rancid. One may also store it in a vacuum –sealed canisters and placed at a moderate temperature. If your wheat bran starts tasting bitter, then probably it has already gone rancid.

Benefits
One word of caution before I list down the benefits. Please avoid going overboard with adding wheat bran after reading this post). It’s known to cause diarrhea with over consumption.

1. Nature’s answer to Man’s fiber needs about 99% ( in one cup) of the daily requirements.
2. The fiber helps in body regulation and in providing a normal bowel functioning.
3. Have constipation? Then Wheat Bran will surely help you in relieving the problem.
4. It also helps in preventing intestinal related disorders.
5. Studies show that it also helps people with hemorrhoids.
6. It also provides about 9-10 gms of Protein ( 1cup) and approx 35% of Iron.
7. Other essential nutrients and minerals like magnesium,manganese, niacin, phosphorus, zinc and vitamin B6, and is low in fat, with no cholesterol, and no sugar or sodium.

Recipe Ideas
There are no specific methods to add/include wheat bran in our diet. It is as simple as adding a tablespoon along with your baking batter or mixing it up with your smoothie or topping it off on your breakfast cereal. Two sample recipes to start you off with wheat bran are :

Apple Bran Muffins with the goodness of whole wheat, apple and nuts. Less fat more nutrition


Famous french bread Pain Au Son made with the complete goodness of bran. You can make it using Wheat bran or Oat bran. Both work perfectly in this recipe.


This post was written by Dhivya


Are you interested in contributing to The Daily Tiffin? Drop us an email: thedailytiffin@gmail.com. We look forward to hearing your ideas.

GYO - May #28

Sunday, May 10, 2009

Posted by Dee


The daily tiffin is proud to host this month's GYO. Thanks andrea for allowing us to host this wonderful event.

Grow Your Own is a twice-a-month blogging event that celebrates the foods we grow or raise ourselves and the dishes we make using our homegrown products. Anyone with a blog can participate! Do you write a food blog? A gardening blog? A farm blog? A hunting or foraging blog? An eco blog? A frugal blog? Anything whatsoever related to home and garden or fun activities to do with children? You can write a post about some of the edibles you have raised, grown, or found and cooked with. Having a food blog is not a requirement for participation.

The rules are simple:

* Make a dish that uses at least one item from your very own garden or farm and post about it. Your garden doesn’t have to be big. Container gardens are welcome! If you hunted or foraged, those items are also eligible. You can also use something that was given to you, but the giver must have personally grown or raised the item. If you paid for it, then it doesn’t count.

* Anything edible that you have grown or raised qualifies, including fruits, vegetables, herbs, sprouts, edible flowers, nuts, grains, legumes, dairy products, eggs, livestock, and anything else I might have forgotten. Produce from both indoor and outdoor gardens are welcome! Different regions will have different things available, so feel free to feature things unique to your area. (Rambutan trees, anyone?) We are all about celebrating variety!

* Please make sure your dish is posted during the month of the event because we like to celebrate seasonal items. One post per blog, please.
* As a courtesy, please include a link to this announcement in your blog post, and then update later with a link to the round-up.

* If you want to include one of the Grow Your Own badges in your post, feel free to grab one from here. (Please upload to your own server/image repository.) Logos professionally designed by Jeff Meyers.

To include your post in the round-up, send an email to thedailytiffin(at)gmail (dot)com by the 30th of May 2009 with the following information:

* Subject line: Grow Your Own #
* Your name and location (country, state if applicable)
* Your blog URL
* Permalink to your post
* 300×300 pixel photo of your dish (As long as the photo is no larger than 300 pixels in either direction, it will work.)

For an event like this I think it’s useful and interesting to see what is fresh and available from different regions at different times of the year, so please make sure you include the location information when you submit your entry.

It’s hard to keep track of entries if we don’t receive an email, so please remember to email your information to us. We feel bad if we miss someone’s post!


We will post a round-up of all our dishes within a few days after the deadline (of course subject to any other events in life, acts of God, etc). Questions? Please ask in the comments or email us.

We are eagerly looking forward to seeing those wonderful recipes made by the ingredients from your kitchen garden !


This post was written by Dee


Are you interested in contributing to The Daily Tiffin? Drop us an email: thedailytiffin@gmail.com. We look forward to hearing your ideas.

Spring Vegetables: Rhubarb

Saturday, May 09, 2009

Posted by Andrea Meyers

The Daily Tiffin - Rhubarb stalks

Originally grown in Asia as a medicinal plant, rhubarb is botanically a vegetable but its tart flavor makes it a terrific ingredient in fruity desserts, compotes, and chutneys. Think rhubarb pie or galettes, rhubarb torte, rhubarb crumble, rhubarb jelly, and rhubarb drinks such as martinis and margaritas. Two popular red fruits, strawberries and cherries, work well with rhubarb and that’s perfect because they are all in season at the same time, so try them together in pies, jellies, or even sangria.

Whether you buy rhubarb from a produce stand, farmers markets, or grocery store, or perhaps grow your own, you’ll want fresh crisp stalks and deep red color, which usually indicates more flavor. The leaves are not edible as they contain the toxin oxalic acid, so cut those away completely. Stand the stalks in a glass of cold water for an hour to refresh them before cooking. Rhubarb stores well in both the refrigerator and freezer, and also cans well using the hot-pack boiling water method.

Growing rhubarb is relatively easy because it’s a perennial, it just needs lots of room to accommodate the large leaves, so pick a spot on the edge of your garden where it can take off and not cover your other plants. Rhubarb thrives in moderately acidic soil, so add some pine bark mulch if necessary. In warm climates it grows year round and produces two harvests each year, while in temperate climates the parts above ground disappear during the winter and grow back in the spring producing one harvest each year. You can force rhubarb in winter, just cover it with an overturned bucket or pot, and it will sprout more quickly and produce longer stalks and smaller leaves. To harvest rhubarb, just pull the stalks away.

Raw rhubarb is a good source of Vitamin K and a moderately good source of Vitamin C, Calcium, and Manganese, though cooking slightly reduces the amount of Vitamin C and Manganese and increases the Calcium.

For a delicious way to get started cooking with rhubarb, try this quick and easy recipe for spiced chutney, which pairs well with roasted pork, chicken, duck, or lamb. The red onion and cherries carry on the bright red theme and the rhubarb and apple cider vinegar add a delicious tartness.

Spiced Rhubarb Chutney

(adapted from Epicurious)

Equipment

6-quart Dutch oven or pot

Ingredients

3/4 cup (131 g) granulated sugar
1/3 cup (80 ml) apple cider vinegar
1 tablespoon minced peeled fresh ginger
1 tablespoon garlic powder
1 teaspoon cumin
1/2 teaspoon ground cinnamon
1/2 teaspoon ground cloves
1/4 teaspoon dried crushed red pepper
1-1/2 pounds (680 g) fresh rhubarb, cut into 1/2-inch cubes
1 medium red onion, chopped
1/3 cup (about 2 ounces/57 g) dried tart cherries

Preparation

1. Combine the sugar, cider vinegar, ginger, garlic, cumin, cinnamon, cloves, and red pepper in heavy large Dutch oven. Bring to simmer over low heat, stirring until sugar dissolves.

2. Add the rhubarb, onion and dried cherries. Increase heat to medium-high and cook until rhubarb is tender and mixture thickens slightly, about 5 minutes. Cool completely and store in a jar. (Can be made 1 day ahead. Cover and chill. Bring to room temperature before using.)

References

Wikipedia – Rhubarb

VideoJug – How to Harvest Rhubarb

Fruits and Veggies Matter (CDC) – Rhubarb

Health Alicious Ness - Rhubarb


This post was written by Andrea

Are you interested in contributing to The Daily Tiffin? Drop us an email: thedailytiffin@gmail.com. We look forward to hearing your ideas.

When a Beautiful Hike Can Go Wrong

Thursday, April 30, 2009

Posted by Indian Food Rocks

I wouldn't say we are avid hikers or adventurers but we do like to hike as a family. That usually limits us to easy to moderate hikes with moderate gains in altitude. The longest hike we have done is a 5.4 mile hike along The Loop in Rocky Mountain Park. We always take the necessary precautions:

  • we carry enough water for each person
  • we wear sunscreen
  • we carry or use insect repellent
  • we carry several layers of clothing, including one that is water resistant, as the weather can change in a heartbeat in the Rockies
  • we carry walkie-talkies just in case. Most of the time, my daughter uses these to sing to everyone else who might be on the same frequency.
  • we do not let our daughter walk alone ahead or behind us - we're usually in mountain lion territory.
  • we carry energy bars or fruit leather on short hikes. On slightly longer hikes, I carry boiled eggs - it's the only time I eat boiled egg yolk - and sandwiches.
  • the hikes we go on have well-marked trails so we don't need a map but we carry the one the Park gives us anyway.
  • we stay on the marked trail.
  • we don't pick wildflowers or mushrooms or any plants.
  • we're keyed into the weather and if we see a thunderstorm approaching - a very common afternoon phenomenon around here - we pack up and head for safety.
  • we do not hike in the dark, except at Delicate Arch in Arches National Park, where the hike back is well after sunset and partly in the dark.
  • we carry flashlights.
Is it possible then that anything could go wrong? It can and it did. On a very easy hike - you could even call it a stroll. You see, there were a couple of important things that are not covered in the list above and add to it a sense of complacency.

Like out of a dream, the kind that suddenly goes bad without any warning
We were hiking in Yosemite National Park over spring break late last month. The hike or stroll in question was around Mirror Lake, a shallow pool of water along Tenaya Creek that has fabulous reflections during spring. As the season progresses, the water dries up to reveal sandy beach-like areas along the creek. People walk off the trail and onto these beaches for a picnic.

YO-12

I was so enamored by the reflections that I started to lag behind as we walked towards the beach. Usually, we are always within earshot and sight of one another and no matter what, my daughter is never alone. Soon, my family had gone so far ahead that I couldn't see them. When I reached what looked like the access point to the sandy area, I looked out and couldn't see them. I saw other picnickers frolicking away instead. Irritated, I continued along the trail thinking that it was rather typical of my significant other to keep going. He is known for pushing us further and further on every hike. Hmmph. He might have waited for me to catch up!

As I hiked on alone, the forest started getting thicker and there was no-one ahead of me or behind me. I looked in my backpack and oops! I'd forgotten the walkie-talkie in the car. There was no way I could ping them and my cellphone was also in the car - not that it would have helped any as T-Mobile has no reception, whatsoever, in the Park. AT&T does have a signal in some parts of the Yosemite Valley. After about 20 minutes, the terrain started becoming rockier and I decided to turn back. A short while later, I met a couple who were planning to hike to the head of the creek and they promised me that they would let my family know that I had turned back, if they ran into them. The couple then advised me to stay put at the trailhead, which was 1.2 miles from the parking lot, because my family would have to go past the trailhead to get back to the car.

I returned and waited at the trailhead. And waited and waited and waited. It was nearing sunset and becoming progressively colder. After an hour of fuming, I decided to give them another half hour before going in search of a ranger. Luckily, I didn't have to because two very worried and very angry persons showed up soon thereafter.

They had not walked on ahead along the creek like I had assumed. Instead, they were trying to get back onto the trail from the sandy beach and could not be seen from the trail. When they got back onto the trail, they assumed that I was still walking towards them and so walked back. When they didn't find me along the trail, they walked back to the car. [3.4 miles total at this point] They had tried calling me on the walkie-talkie and got no answer and realized why when they saw the walkie-talkie in the car. That was my first Oops! Since it was an easy hike, I was not careful about ensuring that I had my walkie-talkie with me.

They found the second set of car keys also in the car. That was my second Oops! Always keep a second set of car keys with another person in the group so that if you split up, the other group has access to the car, especially if you traveled in one car. Of course, if both keys end up with the group that gets lost, not much can be done!

Since they now knew why they could not contact me, their irritation levels were higher than their concern levels. They walked back to the trailhead [4.6 miles total at this point] and found me. This was my third Oops! If you get separated from your group, head back to where you left the car or always have a place that you will meet at and, also agree upon the latest time that everyone should expect to reconvene in such an event. We never expected to lose each other and while it seemed practical to me to wait at the trailhead, it wasn't for several reasons. The trailhead was a short loop and returning hikers usually take the shorter route out to road that leads to the parking lot. Not that it mattered, in this case, because when I reached the trailhead, they had already gone past it on their way to the parking lot! Also, I would have been exposed to the elements at the trailhead had there been a storm. Another point to consider: discuss how long each party should wait before going in search of help.

After taking turns to vent, we walked back to the car together and when we reached the parking lot, two out of three of us had walked 5.8 miles of which 2.4 miles was completely unnecessary and could have been avoided easily.

So learn a lesson from our experience where I made several basic mistakes on a very easy hike, despite having hiked for so many years.


This post was written by Manisha

Are you interested in contributing to The Daily Tiffin? Drop us an email: thedailytiffin@gmail.com. We look forward to hearing your ideas.