Showing posts with label Cakes. Show all posts

LA GALETTE DES ROIS

Wednesday, January 06, 2010

Posted by Jamie

A CAKE FIT FOR A KING!


The plate is set before me, the aroma of warm pastry and almonds whirls and swirls up and around my head. I inhale deeply and breath in all the goodness, the scent of cozy winter afternoons in front of a roaring fire, snowy days bundled up under a thick blanket, dog at my feet, a mug of hot tea in my hand and this delicacy, this thing of beauty placed before me. Layers upon layers of flaky golden pastry, its sugary, buttery flakes cradling a rich, rum-kissed almond cream in which hides a very special prize. And like all great French fashion, it comes with the perfect accessory: a golden crown.

Many of us are winding up the Christmas season by packing up the decorations, taking down the colored lights and disposing of the tree. The last of the turkey or ham has been sandwiched between bread and eaten, the fruitcake and panettone, the cookies and the stollen all devoured. The gifts have all been opened and enjoyed and the last card has been stamped, sealed and sent. Now is the 6th day of January, the Twelfth Day of Christmas, the Epiphany, Three Kings Day, the day, as the story goes, on which the Three Magi arrived in Bethlehem and carried gifts to the baby Jesus. To celebrate the occasion, the French fête this joyous occasion with a very special patisserie, la Galette des Rois, Kings’ Cake.

J-B Greuze, Le Gateau des Rois, 1774

We all know that many well-known and loved symbols and traditions of Christmas are originally of pagan origin: the decorated tree, mistletoe, the Yule log among others. In fact, during the early years of the religion, the Christmas festivities were actually pushed up to the end of the year to coincide with the Winter Solstice and thus overlapped the pagan Saturnalia, a most popular Roman celebration marked by rambunctious behavior, overall silliness and fun and games, somewhat more joyous than the usually solemn Christian celebrations. Little by little, the Christians absorbed some of the practices that highlighted these non-religious pagan festivities. It is thought that originally the day of Jesus’ birth, celebrated on December 25, was reserved for strictly religious observance while the Epiphany, January 6 was a day of celebration, the day of giving and receiving gifts, a day in which some of the less than religious practices were merged with the gift-giving of the Magi.

In France, this day, January 6, the Epiphany, is known as Le Jour des Rois, The Kings Day. And in France, this day is fêted by the eating of La Galette des Rois, the King’s Cake. This special cake of pâte feuilletée, puff pastry, filled with almond cream, frangipane, wasn’t always reserved for this day, but was eaten on most festive occasions when frivolity was called for. Little by little it found it’s way to representing the Epiphany and Kings Day. But did this grow out of the story of the Magi, the cake representing the Three Kings and their gifts or did it come from the Saturnalia celebrations whose parties were characterized by the tradition of the reversal of social roles in which the king became servant and the servant became king? Either way, tradition has it that a lucky charm, originally a, small fève or bean is buried in the almond cream before the top layer of puff pastry is placed atop the cake and then baked. When the cake is served, the youngest child of the party scoots underneath the table where he cannot see what’s on top of the table and as the cake is sliced the child shouts out the name of the recipient of each piece. Why? Because whoever finds the bean in his slice of Galette is crowned with the accompanying paper crown and is king for the day. And what is the role of the king, you ask? Why, to offer the guests another Galette! It’s a day of indulgence, frivolity and merry-making!


Legend has it that for quite a while the King, the person who had discovered the bean in his slice of cake, was obliged to buy a round of drinks for everyone in the room. But those who were too stingy to pay would often just swallow the bean with the cake to avoid being named, so somewhere during the 19th century the bean was replaced with a tiny ceramic charm, sometimes representing a religious figure but more than often not, a tiny charm simple or fancy. Collecting these charms soon became a craze and people today are known to search far and wide and spend crazy sums of money buying special charms for their collections.

A collection of fèves.

Beginning just after the New Year, glass cases in every French pastry shop are lined with Galettes des Rois, filled not only with the traditional almond cream but with chocolate or fruit fillings as well. Every year I buy one or two over the course of the week or two of their short-lived appearance and we all enjoy these wonderful, rich confections. But this year, I have decided to make my own! It starts with homemade puff pastry, easy to make although rather time consuming, or store bought if you like, and then simply filled with a luscious filling of ground almonds, softened butter, sugar and an egg and flavored with rum and vanilla, whipped together in the flash of an eye. And a fève of course.

Enjoy it, for the season is short.

GALETTE DES ROIS or KING’S CAKE
I referred to Julia Child’s Mastering the Art of French Cooking for quantities and procedure and then adapted to my own taste.

About 1 – 1 ½ lbs (500 g) puff pastry or two store-bought rounds *
2 ½ oz (70 g) sugar
2 oz (60 g) unsalted butter softened to room temperature
1 large egg
2 ½ oz (70 g) ground almonds
¼ tsp vanilla
1 Tbs rum
Egg wash (I yolk whisked with 1 tsp cold water)
Icing/powdered sugar for dusting the top of the Galette.

* I followed this recipe which yields 2 ½ lbs (1 kg) dough and I used a tad more than half of the prepared dough.

Prepare the Frangipane filling:
Beat the sugar and butter together until fluffy. Beat in the egg, the ground almonds, the vanilla and the rum. Add more vanilla or rum to taste, if desired. Place the filling in a small bowl covered with plastic wrap or in a lidded plastic container and refrigerate until ready to use. It needs to firm up before assembly the cake.

To prepare the Galette des Rois:
Roll out the puff pastry to a thickness of ½ inch (1 cm) and not less than 3/8 inch, long and wide enough to cut out two 8 or 8 ½-inch (21 cm) discs. Using a cake tin or plate of about 8- or 8 ½-inches (21 cm) diameter and using a very sharp knife, trace and cut out two discs. Place each disc carefully on parchement-lined baking sheets, cover with plastic wrap and let rest in the refrigerator for 30 minutes.

Stack remaining dough (don’t mash together into a ball as you would other dough), wrap in plastic wrap and store in the fridge for another use.

Preheat oven to 425°F (220°C).

Remove prepared rounds of puff pastry. Choose one to be the bottom of the cake a gently press with your fingers the edges out a bit to enlarge the circle slightly. Remove the chilled almond cream from the fridge and mound in the center of the bottom disc of dough. Press it flat and out, using the back of a soup spoon, leaving about 1 ½ inches (4 cm) border of dough free around the edges. Press a fève, a ceramic charm of some sort, or even an old-fashioned dried bean or a coin into the almond cream.

Paint this wide edge of the dough around the almond filling with the egg wash. Gently place the second disc of dough on top of the filling placing the top and bottom discs edge to edge (so the edges meet all the way around). Press to seal.

Place a bowl upside down on top of the discs – the bowl should come up to ½ to 1 inch from the edges. Using a sharp knife held perpendicular to the table, cut into the dough to create a scalloped edge to the cake. Now carefully carve a design into the top of the cake. Cut a small circle in the center of the top dough disc and insert a chimney (make a chimney out of parchment or foil or, as I did, use an upside down aluminum pastry bag tip).

Brush the top of the dough with egg wash. Place in the hot oven and bake for 20 minutes until the pastry is puffed up and golden brown. If you think the pastry is browning too quickly, simply lay a piece of foil over the top.

Reduce the oven temperature to 400°F (200°C) and continue baking for an additional 25 to 30 minutes until the sides of the pastry are also golden and crisp.

Remove the Galette from the oven and move the rack up one notch. Generously dust the entire top surface of the Galette with powdered sugar then place the pastry back in the oven. Now bake for around 5 minutes until the sugar has turned to a golden and very shiny glaze. Stand next to your oven and watch because (as you can see from mine) it turns to the perfect glaze very quickly then in the flash of an eye burns! You must watch so you can pull it out of the oven just as the last of the top turns a gorgeous golden and not leave it one second longer.


Allow to cool a bit. Serve warm (not hot). Make sure there is a child under the table while the host cuts the Galette and then passes each slice as the child calls out whom to serve. Have a paper crown ready to crown the King who finds the charm!


This post was written by JAMIE


Are you interested in contributing to The Daily Tiffin? Drop us an email: thedailytiffin@gmail.com. We look forward to hearing your ideas.

Blender Carrot Cake

Sunday, July 05, 2009

Posted by Anonymous

This is one of my favorite cakes, it can be made in almost no time at all, and is perfect to go into lunchboxes, as you can cut it into any shape desired (aka the leftover space in the bento).


The recipe was given to me by a friend who received it from her guest mother in Brazil, and it has become a family favorite ever since. In Brazil it is called bolo de cenoura.

You can prepare the batter in a blender or in a food processor.

Ingredients:

  • 2 large carrots
  • 150 ml vegetable oil
  • 240 g sugar
  • 2 eggs
  • a pinch of salt
  • 240 g flour
  • 1 tablespoon baking powder

Combine carrots, eggs, oil, sugar and salt in a blender or food processor and pulse until smooth. Add the (sifted) flour and baking powder, process until a batter forms. Pour into a baking dish (I used my new IKEA reactangular baking pan, which was perfect) and bake in a medium hot oven until done (test with a toothpick).


Of course you could add any frosting you like with carrot cake, but we prefer this plain.


This post was written by Petra from Foodfreak


Are you interested in contributing to The Daily Tiffin? Drop us an email: thedailytiffin@gmail.com. We look forward to hearing your ideas.

The Great Pumpkin

Monday, October 13, 2008

Posted by Mike of Mike's Table

When I was a child, I had an unexplainaible but strong aversion to pumpkin. All it was good for was making jack o'lanterns on Halloween, period. How could anyone possibly eat these things--they're not food! The pulp was merely a nuissance that slowed down carving a face on the pumpkin and the seeds were just garbage.

As with many things, I've come to realize how very wrong I was. First off, pumpkins are obviously food--very good food, as a matter of fact. They're another gourd-like type of squash which, like tomatoes, are one of those things you'd never think to call a "fruit." They can come in all shapes and sizes, whether it be a tiny one pounder or obsenely large 1,000+ lb beasts. There are more varieties than I can count, but as far as your kitchen is concerned, you generally want the smaller varieties (e.g. called "sugar pumpkin," "pie pumpkin," etc.) rather than the giants you carve faces in as there is a big difference in flavor (namely a lack of it in the bigger ones--trust me, I've tried). As for health benefits, the orange color ought to give this one away: they're loaded with lutein, alpha, and beta carotene, which means vitamin A to you and I. And the seeds that I maligned as a child are a great source of protein, zinc, and other vitamins.

Pumpkin factoids aside though, the real issue is how did I ever spend all those years blowing off a sweet slice of pumpkin pie? Why was I going for peanuts and sunflower seeds when I could have opted for toasted, spiced pumpkin seeds? I'm definitely making up for lost time this season. Every week now, I leave the grocery store with a few pumpkins so I can break them down and make pumpkin puree so I have it handy throughout the week (yes, you can always buy canned, but I personally think has a tinny taste, and really, making it fresh is very easy to do and requires very little of your time in the kitchen. You can make a lot, bag it up, and freeze it, too, taking it out as you need it).

Of course, there's a lot more to enjoying pumpkins than the traditional pumpkin pie and toasted seeds. You could make muffins, rice pudding style risottos, cookies, macarons, ice cream, or donut holes. Armed with pumpkin puree, the only real limit to pumpkin-based sweets is your imagination. Of course, you aren't limited to sweets, either. You could try a loaf of bread, savory pumpkin pie, pumpkin wild rice soup, pumpkin gnocchi, or even try your hand at Afghani cuisine and make kaddo bourani. Its surprisingly versatile and I certainly will have a lot of new pumpkin-centric recipes to share this season, both sweet and savory.

How do you enjoy this autumn fruit?


Are you interested in contributing to The Daily Tiffin? Drop us an email: thedailytiffin@gmail.com. We look forward to hearing your ideas.

This Post was written by Mike from Mike's Table


Birthday Cakes - 3 Dimensional

Wednesday, March 26, 2008

Posted by Dharm


3-D cakes, also known as Novelty Cakes are lovely to look at and also give the impression of being extremely difficult to make. How many of you have looked at cake books that feature 3-D cakes and sighed enviously, if not in defeat?
I used to be like that but no more! That’s not entirely true. The cakes featured in books are still way beyond my league but I guess the point that I am trying to make is that the cakes shown in books are not only made by professionals, but the pictures are taken by professionals too! So there is no need to sell yourself short by comparing yourself with a pro now is there.

This article will attempt to show you that you can do it at home - with a little patience and creativity.

Novelty Cakes are really not that difficult to make. The trick is to work within your comfort zone. If you are not familiar with sugarpaste, then stay away from it. If you are afraid of fondant, then wear a string of garlic around your neck. One thing you need though, before you take the plunge into 3-D cakes is a good idea and a little faith in yourself. Okay, so that’s two things you need. So shoot me.

The very first time I ventured into 3D cakes was for my son’s 5th Birthday. You see, as I mentioned in my previous post, the best thing about making cakes for your own children is that it never has to be perfect. They will love you (and the cake!) no matter what.

I was planning to make him a Formula One race car and I knew that I could just trace a car design on to a rectangular cake and ice it. Nonetheless, I wanted to make an extra special cake for him and at the same time raise my ‘skill’ level. And so I took the route of a 3-D cake.

That's how I ended up making a Ferrari F1 cake for my very first 3D attempt. Sounds complicated? Yes, it sure does. It certainly Sounds complicated but it really isn't as I will attempt to explain. With all things, a little bit of planning goes a long way.

I'm an F1 fan myself. Have been for many, many years. So I knew what F1 cars looked like. This is also where my Engineering training came into good use! I figured what I needed was a Plan View (View looking from the top) of an F1 car. The plan view, coupled with the picture in my head of what an F1 car looks like would enable me to construct a 3D F1 Car out of cake. I guess all that time sepnt, many years ago, studying Technical Drawing using Third Angle Projection would come in really handy now! That was my plan.

Okay, so did I lose you? Sorry... Let me try again.

As always when you are trying to find information - Search The Web. I was looking in particular for an F1 car in Plan View. As I said earlier, this means a view from the top. (like in the diagram below - you Have To appreciate that I drew this (okay, maybe traced it) for you okay!!).


The plan was starting to come together. Now I needed to bake the cakes.

Did I say cakes? Yes! I baked two rectangular cakes. Why two cakes for only one car? Well, the car needs a track to run on doesn’t it? So anyway. Two cakes. The first cake acted as the roadway or base for the car. I iced it with buttercream icing – black for the road and green for the side of the track or runoffs. The sides of the cake was iced with a brownish green just to differentiate it from the actual track. To finish off the track I used strawberry flavoured rolled wafers to act as the Rumble Strips, or kerbs. My track was now complete. Now for the car.

Using the second cake, I cut the outline of the car out using the Plan View and that resulted in a piece like this:


You're starting to get the idea now arent you!! Now referring to the plan view again, I cut out a rectangular piece that would serve as the Front Wings for the car. Next, I cut out another piece that that resembled a rectangle with a half cone on top. This was the Engine cowling.

Finally, the Rear Wing was fashioned by cutting a squre piece of cake and covering it with a rectangular piece. Not exactly the way a Rear Wing should look but hey, its just a cake okay!!!

The cake was then assembled on a cake board and covered in a rather thick buttercream before being smoothened down with a spatula dipped in hot water. I let the cake rest for a while before lifting it using a spatula and cake server to place on to the ‘track’. You may notice that my car didn’t exactly sit very straight but at this point in time, I was just thankful that I had managed to get the car onto the ‘track’ without any damage!


The four tyres were fashioned out of icing sugar, a little butter and cocoa, rolled out into a ball and then flattened in the shape of tyres. The wheel suspension was simply chocolate biscuit sticks pushed into the cake and tyres. To give further detail and authenticity to the F1 car, I printed out my sons name, the Ferrari logo as well as the Number 5 – as the number of the car as well as my son’s age – on to Overhead Projector Transparency sheets. I then cut these out and ‘stuck’ them to the cake.

And there you have it – a Ferrari F1 Car. I added two Lego men to the cake and that made my son even more excited!


When my daughters 3rd birthday came up a few months later, I carried on with the theme of 3-D cakes. My daughter loves all the Disney princesses and in particular Ariel, the little mermaid. It only seemed logical to make her a mermaid cake!

All things must start with a plan. The plan in my mind was to buy a doll-pick (a doll with only the torso while the bottom half is a pick to stick into the cake). This would be the body of the mermaid. I would have the mermaid sitting on a rock and then fashion its tail out of icing. Not only did I have a plan, it also sounded do-able!

What I did was to make one large rectangular cake and a much smaller dome cake. The rectangular cake was iced in blue and green – for the sea. I didn’t make the icing too smooth but rather used the spatula to make little billows – for the waves.
The dome cake was cut somewhat jagged and then covered in chocolate and placed at the top half of the cake – like a rock. I then stuck the doll-pick into the ‘rock’ but left it sticking out just a little so that I could fashion her ‘hips’ and ‘tail’. I used a mix of butter, loads of icing sugar and some liquid glucose (you can also use Corn Syrup) to give the icing some pliability. I coloured it a dark green and then rolled it out into a sausage shape. I then flattened one end of it and cut the ends to resemble the fish tail. Now it was just a matter of draping the tail on to the rock and shaping the ‘hips’ to join nicely to the doll-pick. I then cut the end of a drinking straw into a semi-circle and used that to make scales on the tail!

To finish off the cake, I drizzled more chocolate around the base of the rock and then sprinkled some brown sugar around it – to make it look like sand. I placed some chocolate shells around the rock and used fish shaped candles for the final touch.


Just last year, I made this Pirate Ship cake for my son’s 6th birthday.


In the interest of saving space and since I already posted it before on my own blog, this is where you can find the full instructions for the Pirate Cake.

And just last month, I made this Dora themed Pinata Cake for my daugther’s 4th birthday. This was a lot of fun to make and even more fun to crack open! Again, full instructions are detailed on my blog.


So there you have it! 3-D cakes are possible with a little imagination and are really not that difficult to do.

I still owe you tips on hosting Theme Based parties but rest assured that I will cover that soon! Till next time…..


Are you interested in contributing to The Daily Tiffin? Drop us an email: blogmeeta@gmail.com. We look forward to hearing your ideas.

This Post was written by Dharm from Dad ~ Baker & Chef


Cake Decorating

Wednesday, February 13, 2008

Posted by Dharm


Although I've been baking cakes from a very young age, I never had any rhyme or reason to decorate them. Sure, I've had lots of experience in covering a chocolate cake with chocolate icing and maybe even a little ganache. But that was it.

And then everything changed when my son Michael turned one!

That was when I decided that I HAD to make his birthday cake and not order one. That decision meant that I had to learn to decorate it too.


The first cake I decorated was for Michael's First Birthday. I baked a butter cake in a Wilton Teddy Bear pan and the cake came out of the pan with the pattern embossed on it. Thus, it was fairly straightforward to pipe out an outline on the embossed pattern and then fill in the outline with piped stars. Easier said then done though!

Due to a lack of experience, I didnt realise that I should have iced the mouth and nose first before piping around it. So, to compensate, I used M&M's for the mouth and nose. After doing that, I realised that this made the bear seem a little evil!


It also took a lot of time to decorate the cake, basically due to my inexperience.
Nonetheless, I though it was a pretty fine effort for a first timer and what mattered most was that my son was pleased with his Teddy Bear cake.

The following year for his Second Birthday, he had developed an interest in Construction Equipment. Although he had been hinting at a Dinosaur Cake the whole year, he suddenly decided he wanted a Bulldozer for his birthday cake.

I had spent the preceding few months before his second birthday doing some research on how to transfer patterns on to a cake. What you are about to read is with the benefit of hindsight and gleaned from my failures and lessons learnt. Hopefully it will be simple and easy enough to follow and you wont have to learn the hard way!

  • First off, find a nice picture from the Internet, a colouring book or any other place, that you want to use.

  • Enlarge the picture (using a photocopier) to the size you want. I find that A4 or Letter size is large enough for a large rectangle cake.

  • Trace the pattern out on to tracing paper or greaseproof paper.

  • Bake your cake and then prepare a thick buttercream icing. I normally use a ratio of 1:2.5 meaning 1 part butter to 2.5 parts icing sugar. The icing should be firm enough to roll into a ball. Then when you press it between your fingers, it should become a flat circle and hold its shape. The reason you want it firm is so that you can place a sheet of tracing paper/greaseproof paper on top of the icing without causing it to smudge.[See, I didnt do this the first time and when I covered the icing with the paper, it all stuck to the paper and was a right royal mess!)

    "How do I ice the cake with icing so thick then?" I hear you ask. The trick here is to 'pat' the icing on. Take an amount of icing in your hands (of course
    make sure your hands are clean!) and press it out onto the cake. Flatten the icing, spreading it out slightly as you do so - much like you are lining a tart pan or mould. The icing will not be smooth but dont worry. Once the cake is covered, smoothen out the icing by dipping a metal spatula in hot water, wiping it dry and then smoothening out the icing.

  • Let the icing set for a bit.

  • Place the tracing paper with the image on top of the cake. Using a toothpick, prick holes into the icing following the pattern on the tracing paper.

  • Remove the tracing paper from the cake and you now have your pattern transferred on to the cake like a join-the-dots puzzle!

  • Connect the dots by piping icing along the dots and you have an iced outline.

  • Fill in the outline with piped stars or flowers or any other shape you like. Or simply use piping jelly or thin icing to 'flow' into the outline.


  • And there you have it! This is the Bulldozer cake that I iced using the method described above.


    The following year, for his Third Birthday, I made him an African Elephant. I used the same method as above but with a slight difference. I created the base icing out of three different colours - for the grass, the middle and then the sky. Also, I used melted chocolate for the outline.

    Having only decorated two cakes before this, I must say that I was amazed at how well this cake turned out. The Lovely Wife was equally amazed and to this day she says – “that cake was made with 20% skill and 80% love!” Proof that with a lot of dedication, anything is possible!


    Cake decorating didn't scare me anymore and I think I was really getting the hang of it. It was still hard work, but the happy look on my children's faces was reward enough. It was then time to celebrate my daughter Sarah's First Birthday. Her brother used to affectionately call her Bunny and so I decided on a Bunny Cake for her.


    This cake was another labour of love as would you believe that my icing set broke on me halfway through the decorating? I stayed up until almost midnight finishing the cake using various methods of ingenuity to pipe out the icing. I have since learnt the art of using piping bags rather than an icing set.


    For my son's Fourth Birthday, I made him this Dinosaur Cake. For any of you that have been forced to learn about Dinosaurs, this particular dinosaur is the Carnotaur that was little Michael's "most favourite dinosaur in the whole world." I added a few of his toy dinosuars around the cake to make it seem like the Carnotaur was stalking them!


    Practice really makes perfect and for Sarah's Second Birthday, I made her this Tigger Cake. I used some store bought plastic grass and coconut trees to further decorate the cake and give it more character.


    So you see, decorating cakes is really not that difficult. All it takes is a little patience and it gets easier the more you do it. I still dont think I'm particularly skilful at cake decorating but I think the more I do it, the better I get. It doesn't really have to be perfect either and the only thing you really need though,
    to make it very special, is a Whole Lot of Love!

    Speaking of Love, with Valentine's Day tomorrow, it's not too late to bake a cake for your other half. A simple square or rectangle cake decorated with a heart would be super. Or maybe his/her favourite sports team logo or even their favourite cartoon character. The possibilities are endless!

    The next time I write, I'll share my experience in making 3-Dimensional Cakes as well as share with you my experience in hosting Themed Birthday Parties for the kids. See you soon and in the meantime, Happy Valentine's Day!


    Are you interested in contributing to The Daily Tiffin? Drop us an email: blogmeeta@gmail.com. We look forward to hearing your ideas.

    This Post was written by Dharm from Dad ~ Baker & Chef


    Lemon Drizzle Cake

    Monday, October 22, 2007

    Posted by Amanda at Little Foodies


    We love lemon drizzle cake in this house and as it's the holidays I just made some heart shaped ones to eat over the next few days. That's if I can get them to last that long. Click read more if you'd like the recipe.


    Lemon Drizzle Cake
    175g/6oz butter (room temperature)
    175g/6oz caster sugar
    3 medium size eggs (room temperature)
    200g/7oz self raising flour
    juice and zested rind of one lemon
    2 tablespoons of milk

    Pre-heat the oven to 175C
    Cream together the butter and sugar, add the eggs and beat until it starts to come together, sieve the flour into the bowl and beat again until smooth. Add the lemon juice and rind and beat. Add the milk and beat again again until smooth.
    Pour into two cake tins (7 inch) or alternatively I have made 12 normal size cupcakes and 24 tiny cupcakes with this amount of cake mixture.
    Bake in the preheated oven for approximately 20-25 minutes. 12-15 minutes if you're making cupcakes.

    While the cakes are in the oven make the lemon drizzle icing.

    1 and a half cups of icing sugar
    juice and rind of one lemon
    Sieve the icing sugar into a clean bowl, add the zested lemon rind and then gradually add the lemon juice, mixing as you go. You may not need all of it.

    Take the cakes out of the oven and let them stand for about 5 minutes, then drizzle the lemon icing over the top. Let them cool, then remove from the tins.


    Are you interested in contributing to The Daily Tiffin? Drop us an email: blogmeeta@gmail.com. We look forward to hearing your ideas.

    This Post was written by Amanda from Little Foodies

    Lunchbox: Cake to Celebrate

    Tuesday, August 21, 2007

    Posted by Meeta K. Wolff


    Soeren had his first day at school yesterday. A very exciting day and most probably I was the one who was more anxious and excited then he was. Routines and daily rituals will change slightly around here now, but we are all looking forward to this new phase in his life.


    School for Soeren is the ThIS (Thuringia International School). A private school where lessons are taught in English rather than German. Saturday we were invited to the festivities of the German tradition of Zuckertuete - Sugar Cone, by the school. Here children starting school get a sugar cone made of cardboard and filled with a lot of goodies. As Soeren actually starts this year with Pre-School, and not 1st Grade, we decided to give him a small sugar cone.


    Yesterday, he was bubbling with energy and was very confident. Joined the group with no fuss or tears. It was me with the pounding heart! His teacher is a South African lovely lady - Ms. Pienaar.

    The lunch boxes for him will also be changing slightly. Instead of packing a breakfast and afternoon snack, he will only be getting a small breakfast snack. Lunch is eaten in a cafeteria where he can choose from 3 different warm meals and help himself to a "Vitamin Bar" - a buffet filled with salads and fruits - as much as he likes.

    At the beginning of the month we get the menu and choose which one of the 3 meals he would like to eat. The menu is then handed to the school and they save the lunches we chose on a special chip card specially made for him. Throughout the month he simply needs to give in his chip card to the cafeteria people and they serve him the lunch he selected. The money for this lunch is then deducted automatically from our accounts at the end of the month. It's a high tech system for a 4 year old but he had no trouble with it yesterday.

    I do hope at some point I can interview the cafeteria people and take a few photos so I can write a little article for you here. I love the types of food they serve - healthy, nutritious and fun. I was really impressed.

    The lunch box you see here is one still from the KIGA - I have a few saved up and would still like to share these with you. So, in the next few Tiffin Tuesday issues (whenever it is my turn) I'll be showing you these.

    Contents:
    Half a bagel, slightly toasted, spread with herb flavored cream cheese and a layered with a slice of honey glazed ham. A couple of yellow fruity cherry tomatoes and a mini bell pepper. They taste amazingly sweet. For the fruits we have a few cut up juicy organic strawberries and grapes. The cake is a delicious chocolate cake from our baker.

    Prep time: 7 minutes
    While the bagel is toasting you can quickly chop up the strawberries, wash and pick off the grapes. Once the bagel pop out of the toaster take them out and leave them to cool slightly - otherwise the cream cheese starts to melt when spread on the hot bagel. This gives you time to de-seed the bell pepper and and add them along with the tomatoes to the box. Cut up a piece of the cake and then prepare the bagel. I simply spread the cheese with not butter and then layer with the ham.

    Nothing extravagant - just a easy and simple meal that kids really enjoy.

    Hope you have a great week! Take care!


    Are you interested in contributing to The Daily Tiffin? Drop us an email: blogmeeta@gmail.com. We look forward to hearing your ideas.

    This Post was written by Meeta from What's For Lunch, Honey?


    A healthy cake in 15 minutes

    Thursday, August 09, 2007

    Posted by Unknown

    A no-bake, no-eggs, no-sugar cake and it is delicious

    Whenever I see a dessert recipe whose ingredient list does not feature sugar and a gazillion calories worth of butter, I almost try it out on the same day...firstly to see if it would taste good after excluding the 'evil' ingredients and secondly, it is quite difficult to resist such a recipe. When I chanced upon a steamed 'rava' (semolina) - banana cake, it seemed too good to be true. When my newly married cousin in Bangalore tried it out and gave me a really bright green signal, I had to try this out. Shilpa of Aayi's Recipes has something similar on her blog, an authentic Goan recipe sent to her by a reader, but her recipe uses sugar instead of jaggery.
    I've made slight modifications to the original recipe, in terms of microwaving the batter instead of steaming, and I did it on a trial and error basis, because my kitchen doesn't have a big enough steamer to take the whole batter in one go.
    Using the microwave for this recipe did seem to have its advantages:
    1. Lesser cooking time (7 minutes as against 25 minutes of steaming)
    2. Lesser cleaning up - just one microwave safe dish other than the wok used to mix ingredients
    3. Even your kids can handle the recipe from the assembled-ingredients stage

    Semolina-Banana-Coconut Cake (No bake)
    Time taken - Under 15 minutes
    Serves 6-8 people or more
    Category - Healthy dessert


    Ingredients
    1-2 tbsp ghee (clarified butter, see notes) If you don't have this, use unsalted butter
    1 1/4 cup semolina (buy the finer of the varieties)
    3/4 cup jaggery (see notes)
    3 bananas - medium sized
    1 pack thick coconut milk (I used Dabur's 200 ml pack)
    1/2 cup water
    1/4 tsp salt
    1/2 tsp baking powder

    Directions
    1. Grease a 9" or so microwave safe flatware with some ghee on your fingertips. Keep aside.

    2. In a blender / mixer, place the 3 peeled bananas with the jaggery, make a smooth paste and keep aside.

    3. Heat the remaining ghee in a heavy bottomed wok, put in the semolina. On medium to low flame, constantly stir it around until it turns lightly golden. This part requires your full attention for 5-7 minutes and the slightest burnt semolina will spoil the taste of the cake.

    4. Once the semolina turns golden, turn flame to lowest possible, pour in the banana-jaggery paste, stir till it is nearly absorbed by the semolina. This will take 30 seconds to a minute. Take the wok off the flame.

    5. In a jug, whisk well the coconut milk, water, salt, baking powder, cardamom powder and pour it into the semolina mix in the wok. Stir well till ingredients are blended through.

    6. Pour this mix into the greased microwave safe dish. Garnish with any nuts /dried fruits or candied fruit to make it more appealing to kids.

    7.Microwave at 100% for 5 minutes. Check the degree to which the cake is cooked and then depending on that microwave at 80% for 2 minutes or so. Remove, cool and cut into squares /diamonds.
    (For steaming - pour this in a greased 9" diameter tin and steam for around 25 minutes until the top is dry and a tester comes out clean. These are the directions from the original recipe. I haven't tried this method personally, but it should work well for those who do not have /use a microwave.)

    8. Serve warm.

    Health tip:

    This cake needs to be refrigerated because of its coconut milk content which may go rancid if left out for longer time. You can warm it by nuking it for 20 seconds or so. It makes an excellent dessert idea for the tiffin box for your kid or your spouse.
    Jaggery is known to be rich in iron because of the huge iron vessels in which it is processed, hence better that sugar which is just empty calories. Diabetics, please be informed that eating jaggery does nothing better than sugar for your blood sugar levels as they both have the same glycemic index - calorie-wise and carbohydrate-wise, both are nearly the same. If you have to choose between the two, jaggery is just a slightly better choice because its more natural and nutritive than plain sugar.

    Notes:
    1. You will find jaggery, rava and ghee in any store selling Indian groceries.
    You can also make ghee at home from unsalted butter - instructive posts here, here & here.
    2. In case you do not have a microwave, you can surely steam this cake as per original recipe's instructions.
    3. A lighter coloured jaggery will yield a paler cake and a dark brown jaggery will give you the rich brownier one. If you do not find jaggery, by all means use brown sugar or even white sugar.
    4. My cousin tried this with whole wheat flour instead of semolina and said the results were as good. Just increase the baking powder a tad bit.
    5. Try it out with spices of your choice. I love the taste of cardamom and hence it found its place in this recipe. You could try out cinnamon or clove powder or even all spice powder.
    6. This quick recipe can also fit into the 'Neivedyam' category, which is the offering to Gods made in most Indian homes for festivals and auspicious days as it has no eggs. And from what I hear, most Indian Gods and Goddesses love jaggery as well as bananas :) , and we love them for that.


    Are you interested in contributing to The Daily Tiffin? Drop us an email: blogmeeta@gmail.com. We look forward to hearing your ideas.

    This Post was written by Nandita from Saffron Trail


    Recipe: Welsh Cakes

    Thursday, May 03, 2007

    Posted by Meeta K. Wolff


    Our regular contributor Stephanie sends in her recipe for Welsh cakes. They are somewhat like scones and are perfect for many occasions. Stephanie packs them in her kids' lunch boxes as a treat.


    Ingredients:
    1 cup butter
    3/4 cup sugar
    2 1/2 cups flour
    1 teaspoon salt
    3 teaspoons baking powder
    1 egg
    1/2 cup milk
    1 cup currants, washed and drained

    Method:
    Mix together dry ingredients.
    Cut in cold butter. You can use a food processor and pulse for a few seconds until it resembles a course meal.
    Mix egg and milk together and slowly add to dry ingredients.
    Stir in currents. If they looked a bit dried out, you can plump them first by placing currents in a microwave safe dish, add ½ cup of water and heat in microwave for 1-2 minutes. Drain and cool before mixing.
    Turn onto a floured board and roll 1/4 inch thick.
    Cut into rounds and fry on an electric skillet at 300 degrees Fahrenheit (or medium heat on a gas griddle) for about 5 minutes on each side. I do spray my griddle lightly with non-stick baking spray.

    More bread ideas:
    <30 minutes Breads
    Welsh Breads
    Grain Breads
    Historical Traditional Breads


    If you like what we girls do here and would like to vote for us in the Blogger's Choice Awards here. Thanks for your support!


    Are you interested in contributing to The Daily Tiffin? Drop us an email: blogmeeta@gmail.com. We look forward to hearing your ideas.

    This Post was contributed by Stephanie from Mix it up Meals

    Vitmain C and A Spice Cake

    Tuesday, November 28, 2006

    Posted by Meeta K. Wolff


    How did Thanksgiving go?

    Hope you got over it with elegance and there were no major glitches - like burning the turkey!! I was pretty close to burning my roast I can tell you - but just close.
    We decided to go out and have a game of football, which is a novelty for my German friends, we were so occupied in the game and had all the neighbors cheering for us that I managed to remember the roast in the nick of time.
    Phew!

    Today I've got some really scrumptious things lined up for you. The weekly Tiffin idea filled with interesting goodies and a divine recipe of a wonderful treat.

    Tiffin Idea
    Winter is just around the corner, actually in some parts of the world it has already a tight grip on us. So it is very important to make sure you get the right amount of vitamins to keep away all those illnesses. One very important such vitamin, especially for the winter months is Vitmain C.

    Today's lunch box contains a great portion of natural Vitamin C found in fruit. That is an important point to remember. Although there are plenty of pills, syrups and prescription drugs supplemented with Vitamin C, the first choice should really be the fresh and natural fruit and vegetables. Nothing like juicy and sweet tangerines and fresh, ripe kiwis for the extra portion of Vitamin C. Vitamin C should be taken in divided doses throughout the day. Researchers found that an average dosage of 200 mg/day was adequate for men and women, but should be raised for growing children, pregnant women and elderly or sick people. This amount of vitamin C can be obtained from a diet containing five daily servings of fresh fruit and vegetables; unfortunately, less than 15 per cent of children and adults in the USA actually consume such a diet

    The funny thing is that I remember my mum telling me the same thing day in day out. Guess that really stuck in my head and now I am forwarding the same message to my own child.

    5 fruits a day!

    The kiwi contains 90 milligrams per 100 grams and the tangerines 30 milligrams per 100 grams. Not a bad start to the day. Furthermore, there is more to offer in that huge slice of Persimmon Spice Cake.

    The cake is also packed with lovely walnuts and aromatic spices to make it just perfect for this time of year. Yes! The recipe is below! I used a really lovely cilantro and garlic pita bread for the sandwich and filled it with some herb flavored cream cheese and slices of ripe cherry tomatoes.

    Persimmon Spice Cake
    Ingredients:

    4 - 6 ripe and soft persimmons - peeled and puréed. You can use an electric mixer or blender for this.
    2 teaspoons baking powder
    1 teaspoon baking soda
    115 grams butter
    200g brown sugar
    350g all-purpose flour
    1 egg
    1 teaspoon cinnamon
    1/2 teaspoon ground clove powder
    1/2 teaspoon nutmeg
    60g walnuts or pecans - coarsely chopped


    Method:

    Preheat oven at 180 degrees Celsius.

    Add the baking soda to the puréed persimmon. You will notice that the persimmon will set and become more solid. No cause for alarm. Although this might look strange it is perfectly normal.

    In a mixing bowl whisk the butter and sugar with and electric mixer, until creamy and fluffy. Stir in the persimmon and egg, beating until well combined. Using a rubber spatula, stir in the dry ingredients to the persimmon mixture. Blend in well and stir in the nuts.

    Spoon the batter into a round greased cake pan and bake for 40-50 minutes or until the knife comes out clean.

    Take out and allow to cool on a rack. Sprinkle generously with icing sugar. If you would like to freeze this cake then skip this part and freeze in an airtight container.

    I have more details, pictures and information to the spice cake here.

    Hope you enjoy this!


    This Post was written by MEETA from What's For Lunch, Honey?

    Watermelon and Plum Cake

    Monday, November 20, 2006

    Posted by Anonymous

    This morning was a late-rising Monday -- it was so warm in bed and so foggy and chilly outside. And the heat wasn't on! It took us a while to emerge from our cozy beds.

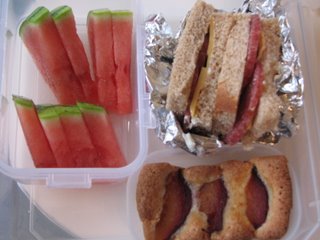
    But when my eleven year old son (one of the Tiffin Twins) opens his lunch today, there will be a little bit of summer inside. Watermelon is still yummy here in California and the cake is made with the last of the fall's good plums. (The sandwich? Whole wheat bread, his favorite salami, and some sharp cheddar cheese.)

    It's a happy day here in Berkeley, and one reason for that is my discovery that I'm not the only person in the world who's a little obsessed with packing lunches for herself and her children. On Mondays, as time goes on, I'll also be bringing you a few recipes, a snapshot or two from the hot lunches offered by my youngest son's school, some holiday baking, and the lunches we send with our children so they remember how loved they are even when they're away from home.

    Have a wonderful week!


    This Post was written by BlogLily from the Tiffin Tin.

    Great Grandma's Plum Cake

    Tuesday, September 19, 2006

    Posted by Meeta K. Wolff


    Plums, apples and pears are the fruit of Casa Wolff. We're loaded with these.

    Soeren's great grandma baked some lovely, sweet plum cake. I'll be making some apple mousse with the apples and freezing those. Thanks to Quelia for that idea.

    The cake was really great and Soeren got a nice piece for the lunchbox. I made some fluffy scrambled eggs with some sliced sausages, cherry tomatoes and cheese. To go with that a nice rye bread spread with cream cheese. Fruit (yes a little change from apples, pears and plums) are sweet mango chunks.

    Adult Variation: Instead of the rye bread I would suggest a nice dark roll with sunflower seeds and use the scrambled eggs to fill it. The rest is perfect the way it is.

    So folks, Desperate Housewives new season starts today and I'm off to watch it.

    Plums and Almond Vanilla Cake

    Thursday, March 16, 2006

    Posted by Meeta K. Wolff

    Only one snack box today - the afternoon box! I had to take Soeri to the Doc's today so he would be missing the morning snack at the KIGA.

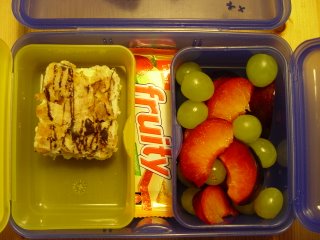
    I bought delicious organic plums. They were ripe, juicy and so sweet and so Soeren got one of these with a few organic seedless grapes. We also made this great cake together. This is the easiest recipe: I bought the biscuit base at the bakery and whipped up some vanilla pudding. Spread this on top of the base. We roasted some almond slices and sprinkled these over the pudding. Soeri's fave part: Melting the chocolate and pouring it over the cake (and tasting it several times to see if it was "cooked" well). I put the fruity bar in between to fill the space and stop the smaller containers from sliding in the larger one (I am worried that the cake might not survive the journey in Soeren's backpack).

    Adult variation:
    I have only one small modification to this box: Cut yourself a larger piece of the cake ;-) and enjoy it!